前言 这次于之前的文章都有所不同,是对刚刚开始的vhr这个项目的日志,仅仅记录vhr的编写过程和感悟。目的一是因为我对Spirng Boot各种功能好像还仅仅停留于了解这个阶段,记一下笔记能够巩固并加强我的认知。第二也是因为在暑假,记个笔记能够让我有更清晰的学习进度的了解。所以,开始吧!
目标是学完这个以后,可以独立去做Spring boot+Vue的项目
项目介绍 微人事是一个前后端分离的人力资源管理系统,项目采用SpringBoot+Vue开发。
项目加入常见的企业级应用所涉及到的技术点,例如 Redis、RabbitMQ 等。
项目原作者:江南一点雨
项目原地址:https://github.com/lenve/vhr
项目技术结构
Spring Boot(SSM)
Spring Security
Redis
POI/邮件发送/消息中间件
MySQL
Vue
axios
ElementUI
Vuex
Vue学习 快速入门,跳转至:Vue的快速入门!
SPA简介 当做项目的时候,通常还是做SPA页面的
single page application单页面应用。
如此可以进行更好的开发,分离模块。进行编译打包。单页面就是通过js操控动态重写当前页面来与用户进行交互,这种方法避免了页面之间切换打断用户体验。
比较适合做后台管理系统,而门户网站使用其他方法更加合适。
因为SPA无法进行搜索引擎优化,而因为后台管理系统根本不需要搜索引擎的优化,所以本次vhr会使用SPA。
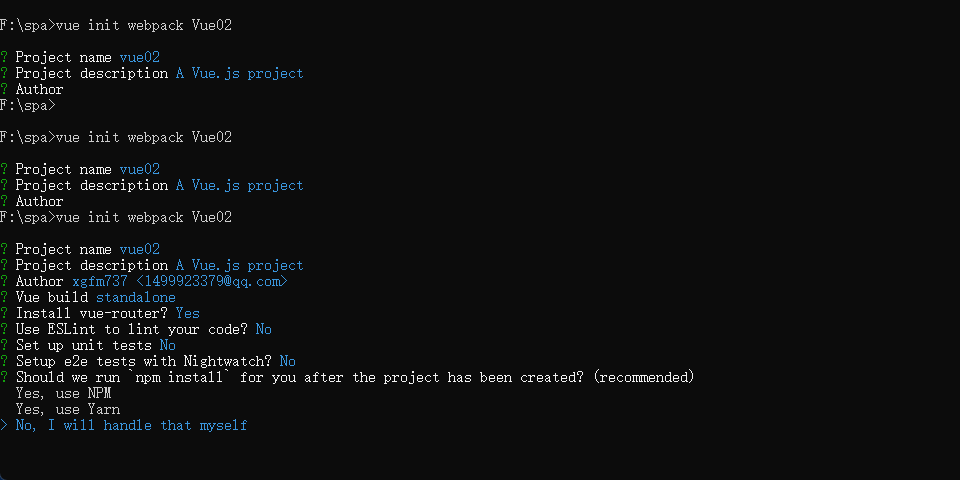
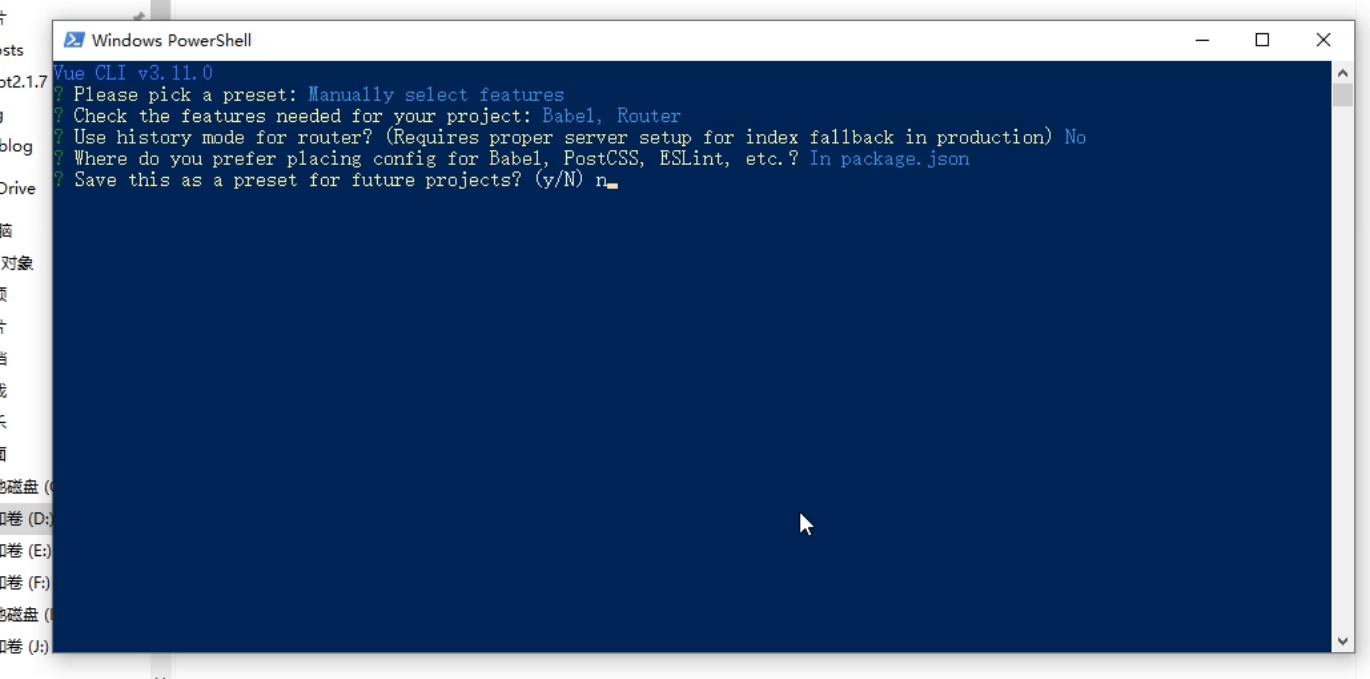
node和npm vue-cli2和vue-cli3可以帮助我们快速构建spa。
vhr中使用vue-cli3。
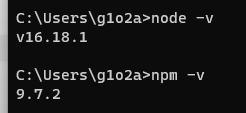
需要首先安装nodejs和npm(好像有点类似于maven)。
安装成功检验
SPA使用 创建一个SPA 1 2 3 4 5 npm install -g vue-cli # 只需要第一次安装时执行cd my-project #进入到项目目录中
流程图如上,最后一步直接算则YES,use NPM即可,本次不选择仅仅是为了更好的感受一下而已(给自己整乐了)。
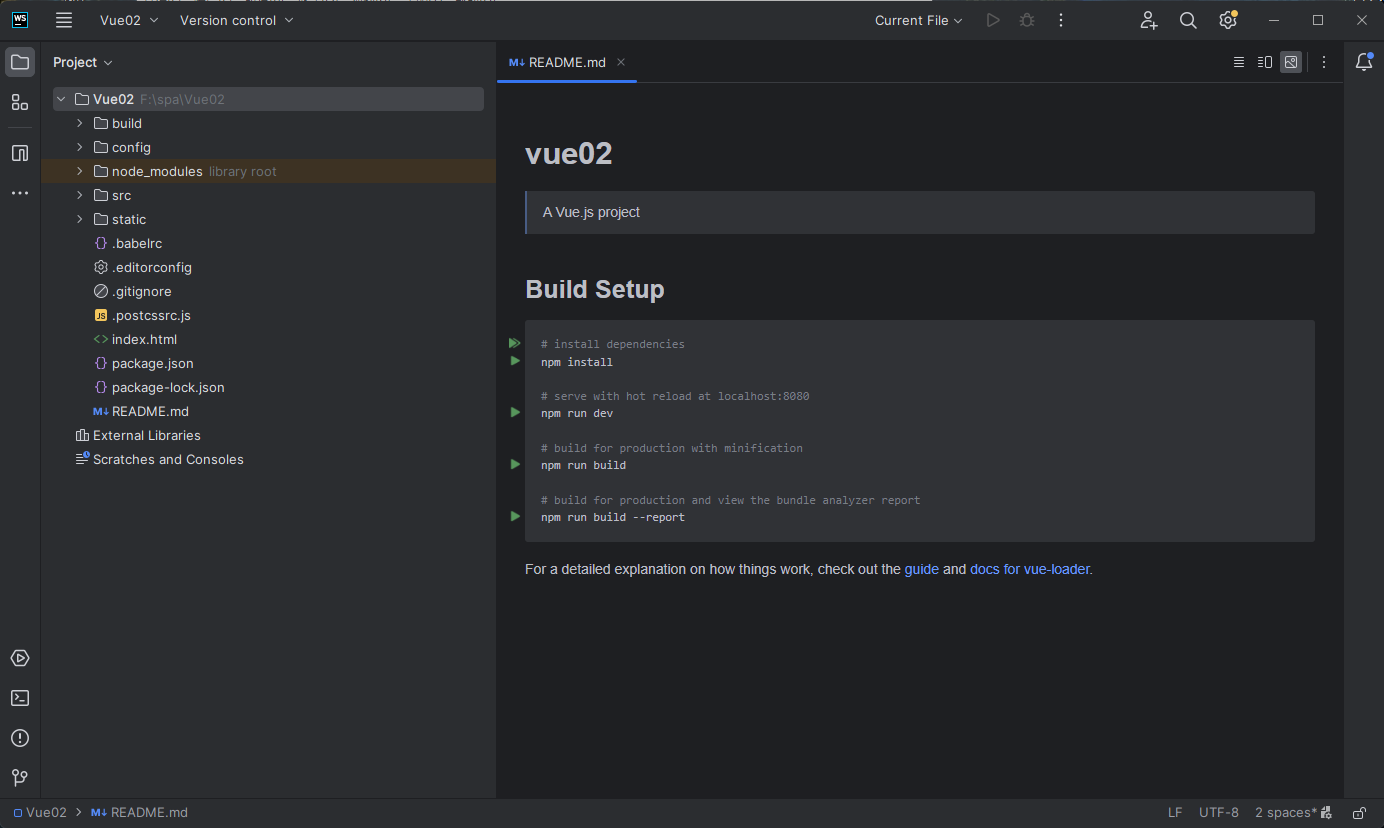
npm会下载完一个node_modules(这个巨大无比!!),然后直接使用ws打开即可。
创建完成!!!
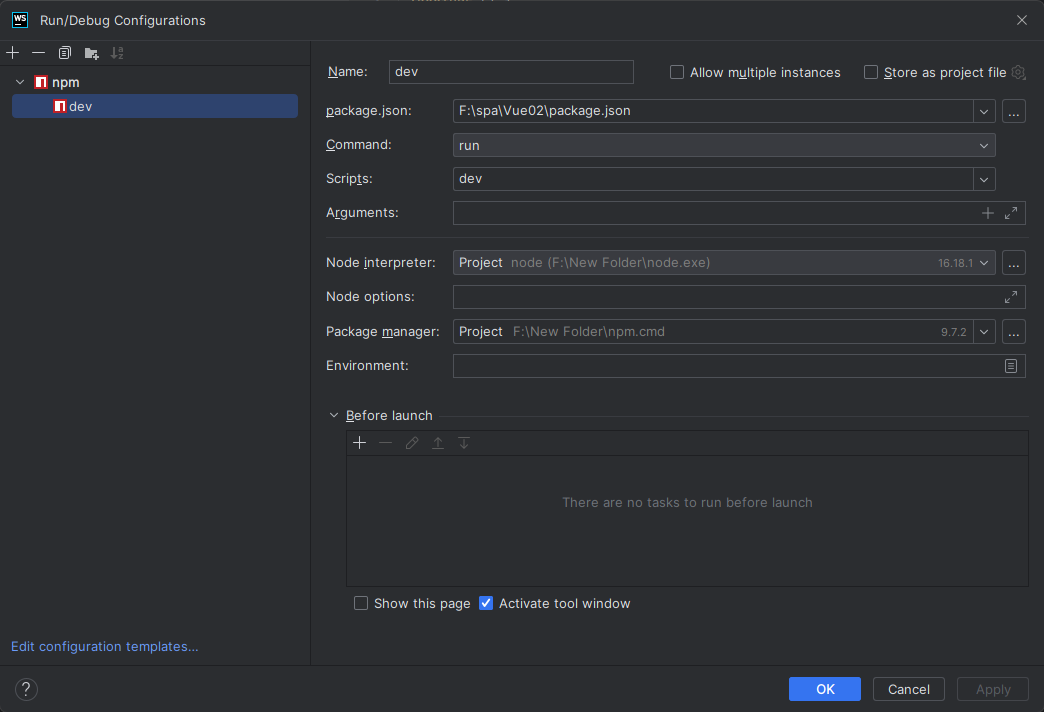
SPA运行 可以直接在控制台开启,指令如下:
可以在edit configuration中进行配置。
成功的结果如下:
工程代码解析 所有的东西被app组件代替
学习router和vue组件之间的关系
Vue-cli3构建vue项目 报了个错
1 2 3 4 5 vue create is a Vue CLI 3 only command and you are using Vue CLI 2 .9 .6 .3 :
因为用了vue-cli2需要先卸载,欧克!
管理员运行。
目前选项如下:
开始运行了就。
cli3创建的比2更加简洁明了一些,组件和页面放置的位置也有所不同。
VHR正式开始 步骤:前端–>接口
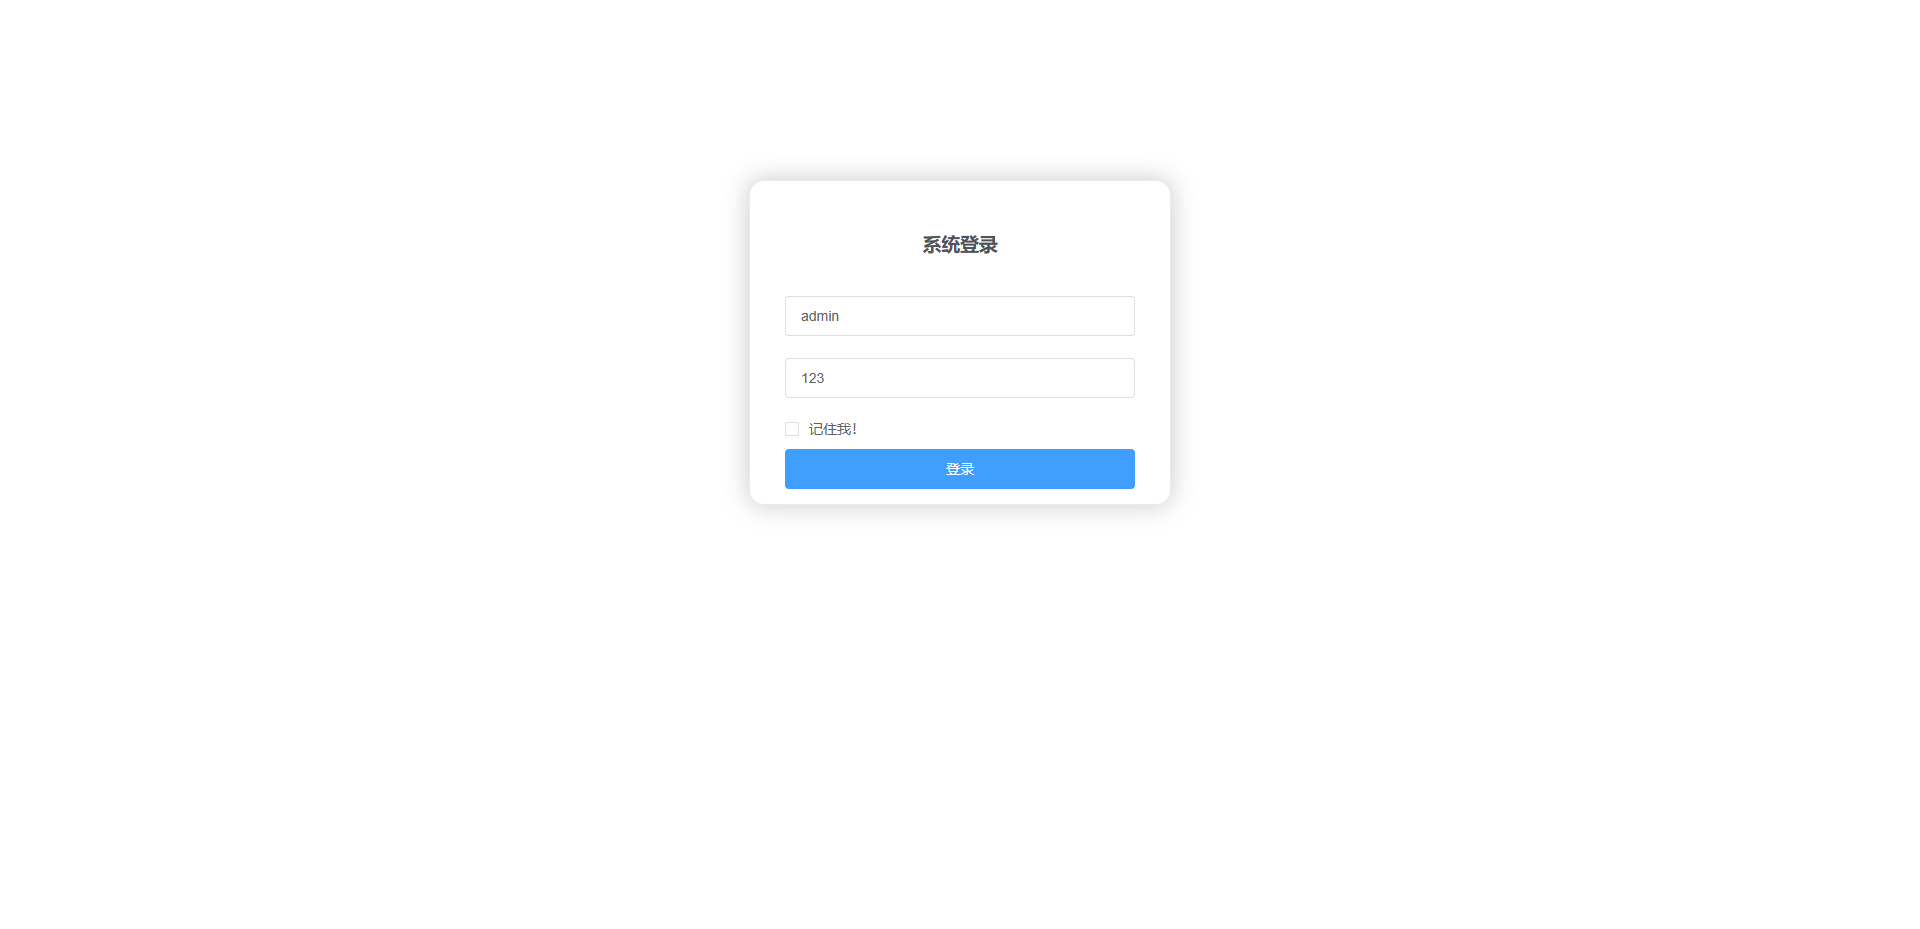
登录页面 前端 本文使用的ElementUI
前端页面完成结果:
问题1:我创建的步骤跟松哥的一致,但是目录有有些差距,创建vue组件的默认代码与松哥的也有所区别。但目前看来还是能用的,先看看。
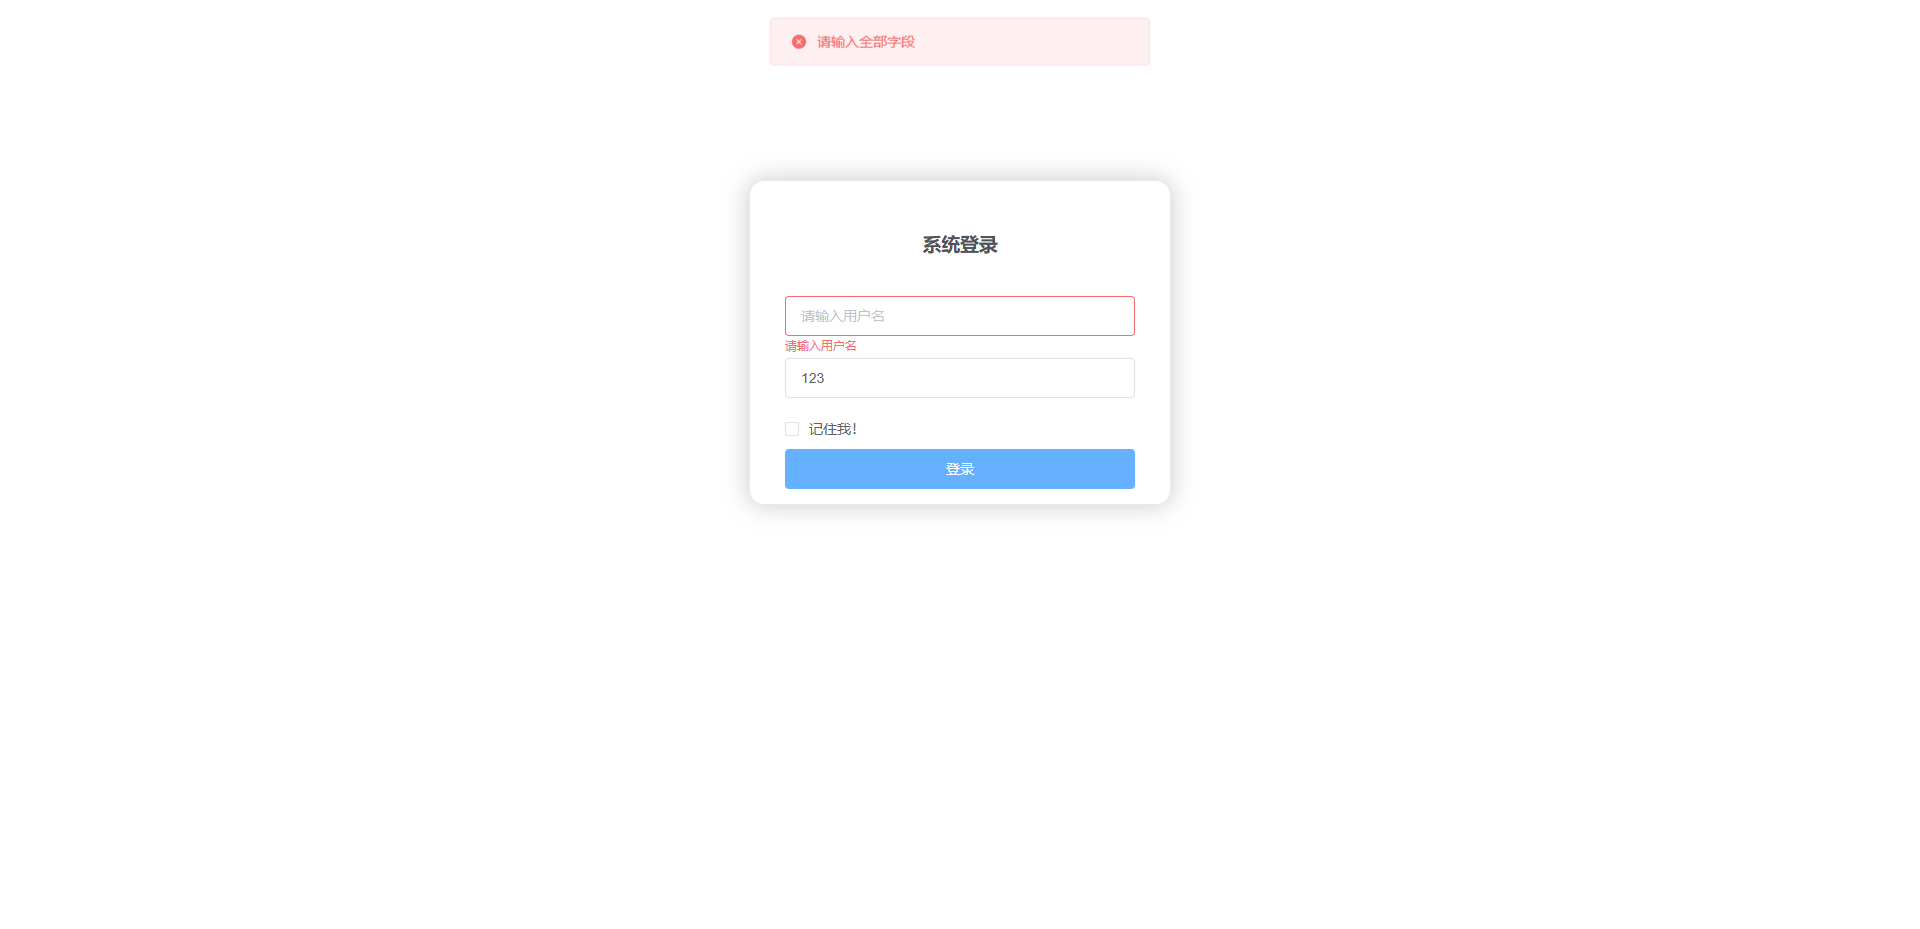
处理前端登录事件(表单校验) vue组件添加methods
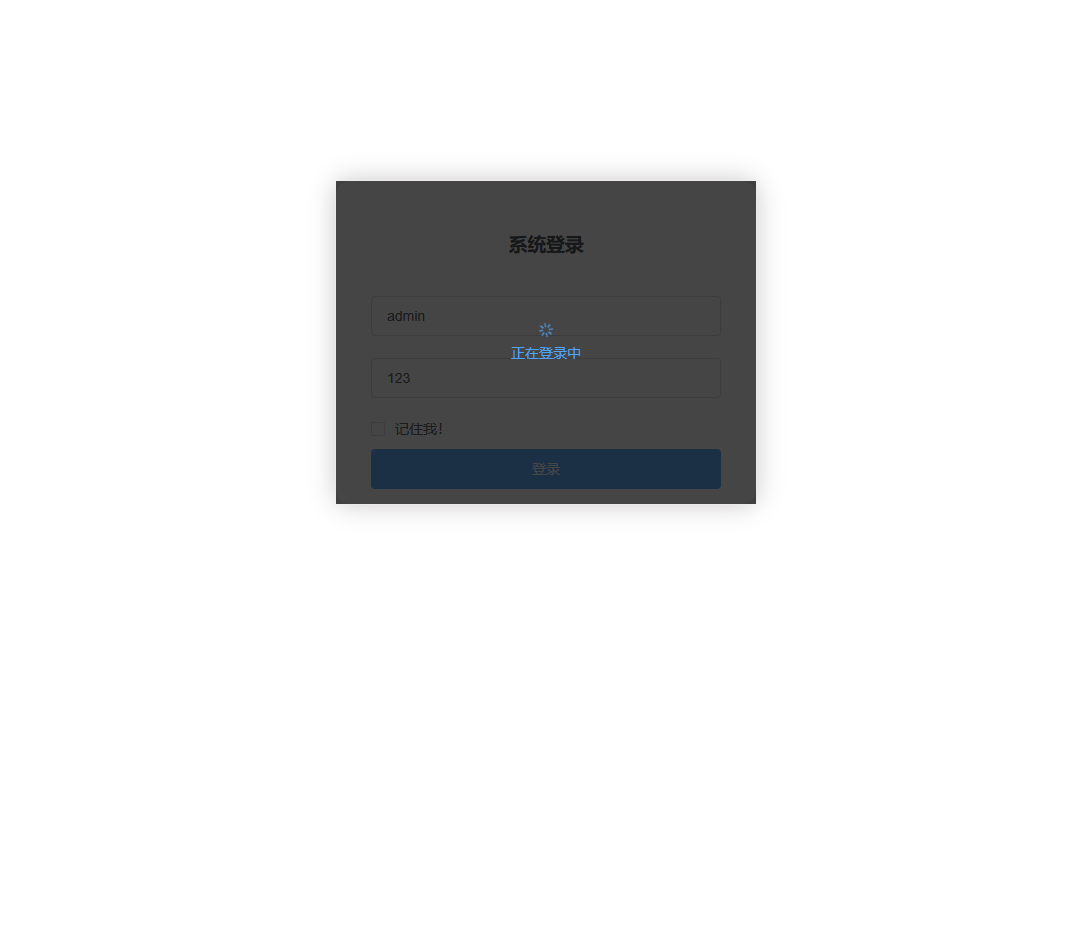
1 2 3 4 5 6 7 8 9 10 submitLogin (this .$refs .loginForm .validate ((valid ) => {if (valid) {alert ('submit!' );else {this .$message .error ('请输入全部字段' );return false ;
后端接口 准备工作 创建springboot项目,web,mysql Driver,mybatis Driver,Spring Security4个依赖。
mysql依赖依旧进行修改。
1 2 3 4 5 6 <dependency > <groupId > mysql</groupId > <artifactId > mysql-connector-java</artifactId > <scope > runtime</scope > <version > 5.1.48</version > </dependency >
再加一个数据库的德鲁伊连接池
1 2 3 4 5 6 <dependency > <groupId > mysql</groupId > <artifactId > mysql-connector-java</artifactId > <scope > runtime</scope > <version > 5.1.48</version > </dependency >
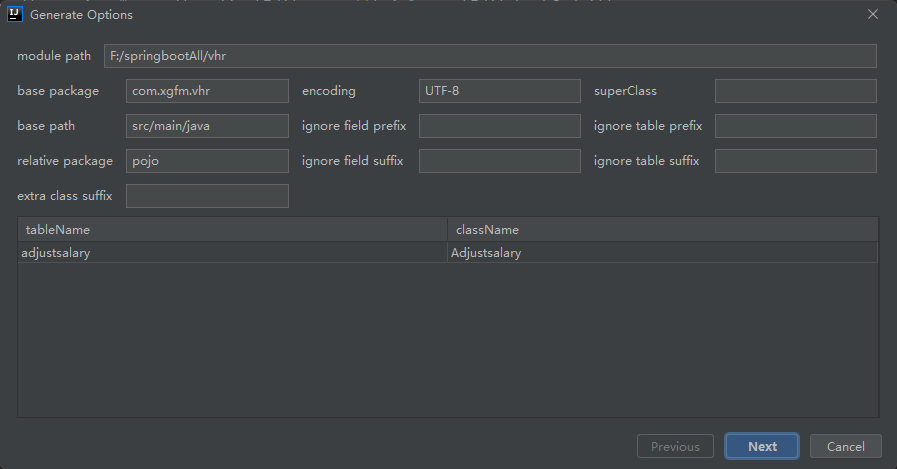
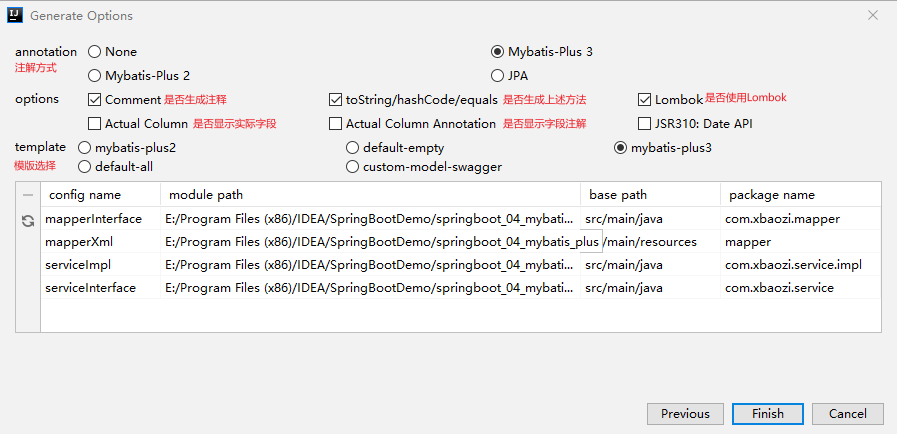
mybatisX自动生成代码 使用MybatisX自动生成mapper的接口和xml以及pojo的model。
踩坑:看了网上一些教程,然后一直操作不对,总有一些没有的包亦或者是使用的全是mybatis-PLUS的东西,果然学东西不能太囫囵吞枣,最后仔细看完了所有选项,差不多搞出来了mybatis的自动生成。
但是还是有点怪异,比如都是自带hashcode的等等,明天再研究一下。目前的理解就是,不要选择mybatis3等其他选项基本上全部使用默认选项即可。
然后base package填写项目的包名,这样生成的mapper和pojo就自动生成在常见的位置了。然后第二张图比较重要,我是直接拿csdn上大佬的图放置的,讲解详情请看:善我的mybatisX插件讲解 ,不过但是他使用的也是mybatis-plus,我第二章图的选项是自己试出来的,不知道是否有问题,反正目前可以正常使用。然后Lombok也没进行使用、选择。(Spring Boot可以通过引入Lombok来简化Java代码的编写。Lombok是一个Java库,它通过注解来消除Java类中的样板代码,例如getter和setter方法、构造函数等。通过使用Lombok,可以减少代码量,提高代码的可读性和可维护性。)
简单来说就是不用写getter和setter方法、构造函数等,但松哥没用,我也不知道好不好用怎么用,就先没用
继续准备工作 因为本人喜欢mapper.xml放在resources之中,所以并没有将xml放到java下的mapper,但是还是跟着配置了一下如果放置的白名单。
1 2 3 4 5 6 7 8 9 10 11 <resources > <resource > <directory > src/main/resources</directory > </resource > <resource > <directory > src/main/java</directory > <includes > <include > **/*.xml</include > </includes > </resource > </resources >
(目前也不知道会不会有反作用,先看看,根据我的认知应该是不会有的,因为我觉得这段配置只是让mvn打包的时候,不把java中的xml文件直接跳过,但这样并不会导致原来的那个跳过)
然后就是application配置,注释掉的代码时之前使用的mysql Driver,但是松哥没有加上,个人认为是使用了德鲁伊连接池的原因(不太明白,目前没有系统地对德鲁伊进行学习)
1 2 3 4 5 spring.datasource.username =root spring.datasource.password =1234 spring.datasource.url =jdbc:mysql:///vhr?serverTimezone=Asia/Shanghai&useUnicode=true&characterEncoding=UTF-8&useSSL=false spring.datasource.type =com.alibaba.druid.pool.DruidDataSource
然后再给VhrApplication加上MapperScan包扫描
1 @MapperScan(basePackages = "com.xgfm.vhr.mapper" )
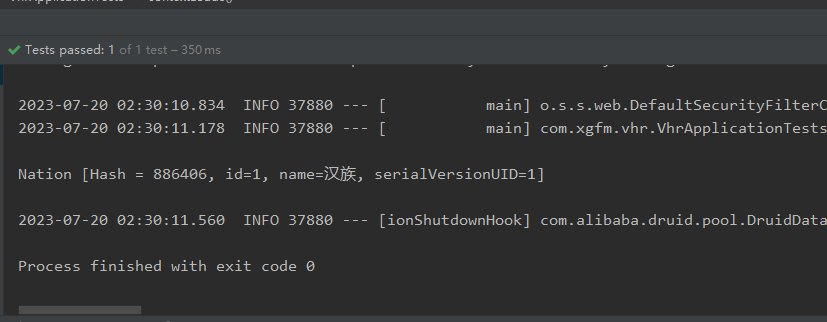
最后自己写了一个test,跑了一下,成功运行!yes!
接口制作 Hr实体类继承UserDetails接口,并重写方法
1 2 3 4 5 6 7 8 9 10 11 12 13 14 15 16 17 18 19 20 21 22 23 24 25 @Override public boolean isAccountNonExpired () {return true ;@Override public boolean isAccountNonLocked () {return true ;@Override public boolean isCredentialsNonExpired () {return true ;@Override public boolean isEnabled () {return enabled;@Override public Collection<? extends GrantedAuthority > getAuthorities() {return null ;
SecurityConfig
1 2 3 4 5 6 7 8 9 10 11 12 13 14 15 16 17 18 19 20 21 22 23 24 25 26 27 28 29 30 31 32 33 34 35 36 37 38 39 40 41 42 43 44 45 46 47 48 49 50 51 52 53 54 55 56 57 58 59 60 61 62 63 64 65 66 67 68 69 70 71 72 73 74 75 76 77 78 79 80 @Configuration public class SecurityConfig extends WebSecurityConfigurerAdapter {@Autowired @Bean passwordEncoder () {return new BCryptPasswordEncoder ();@Override protected void configure (AuthenticationManagerBuilder auth) throws Exception {@Override protected void configure (HttpSecurity http) throws Exception {"username" )"password" )"/doLogin" )"/login" )new AuthenticationSuccessHandler () {@Override public void onAuthenticationSuccess (HttpServletRequest request, HttpServletResponse response, Authentication authentication) throws IOException, ServletException {"application/json;charset=utf-8" );Hr hr = (Hr) authentication.getPrincipal();null );RespBean ok = RespBean.ok("登陆成功" , hr);String s = new ObjectMapper ().writeValueAsString(ok);new AuthenticationFailureHandler () {@Override public void onAuthenticationFailure (HttpServletRequest request, HttpServletResponse response, AuthenticationException exception) throws IOException, ServletException {"application/json;charset=utf-8" );RespBean respBean = RespBean.error("登录失败!" );if (exception instanceof LockedException){"账户被锁定,请联系管理员!" );else if (exception instanceof CredentialsExpiredException){"密码过期,请联系管理员" );else if (exception instanceof AccountExpiredException){"账户过期,请联系管理员" );else if (exception instanceof DisabledException){"账户被禁用,请联系管理员" );else if (exception instanceof BadCredentialsException){"用户名或密码输入错误,请重新输入" );new ObjectMapper ().writeValueAsString(respBean));new LogoutSuccessHandler () {@Override public void onLogoutSuccess (HttpServletRequest request, HttpServletResponse response, Authentication authentication) throws IOException, ServletException {"application/json;charset=utf-8" );PrintWriter out = response.getWriter();new ObjectMapper ().writeValueAsString(RespBean.ok("注销成功!!" )));
着重看3个Handler中的配置信息。
还有新写的RespBean类
1 2 3 4 5 6 7 8 9 10 11 12 13 14 15 16 17 18 19 20 21 22 23 24 25 26 27 28 29 30 31 32 33 34 35 36 37 38 39 40 41 42 43 44 45 46 47 48 49 50 51 52 53 54 public class RespBean {private Integer status;private String msg;private Object obj;public static RespBean ok (String msg) {return new RespBean (200 ,msg,null );public static RespBean ok (String msg,Object obj) {return new RespBean (200 ,msg,obj);public static RespBean error (String msg) {return new RespBean (500 ,msg,null );public static RespBean error (String msg,Object obj) {return new RespBean (500 ,msg,obj);private RespBean () {}private RespBean (Integer status, String msg, Object obj) {this .status = status;this .msg = msg;this .obj = obj;public Integer getStatus () {return status;public void setStatus (Integer status) {this .status = status;public String getMsg () {return msg;public void setMsg (String msg) {this .msg = msg;public Object getObj () {return obj;public void setObj (Object obj) {this .obj = obj;
还需要配置2个controller但是很简单,就不放了。
前后端对接 首先需要修改一下后端端口,因为前后端的默认都是8080,会冲突,所以在application.properties中修改一下。
前后端对接使用axios(算是一个主流方案)。
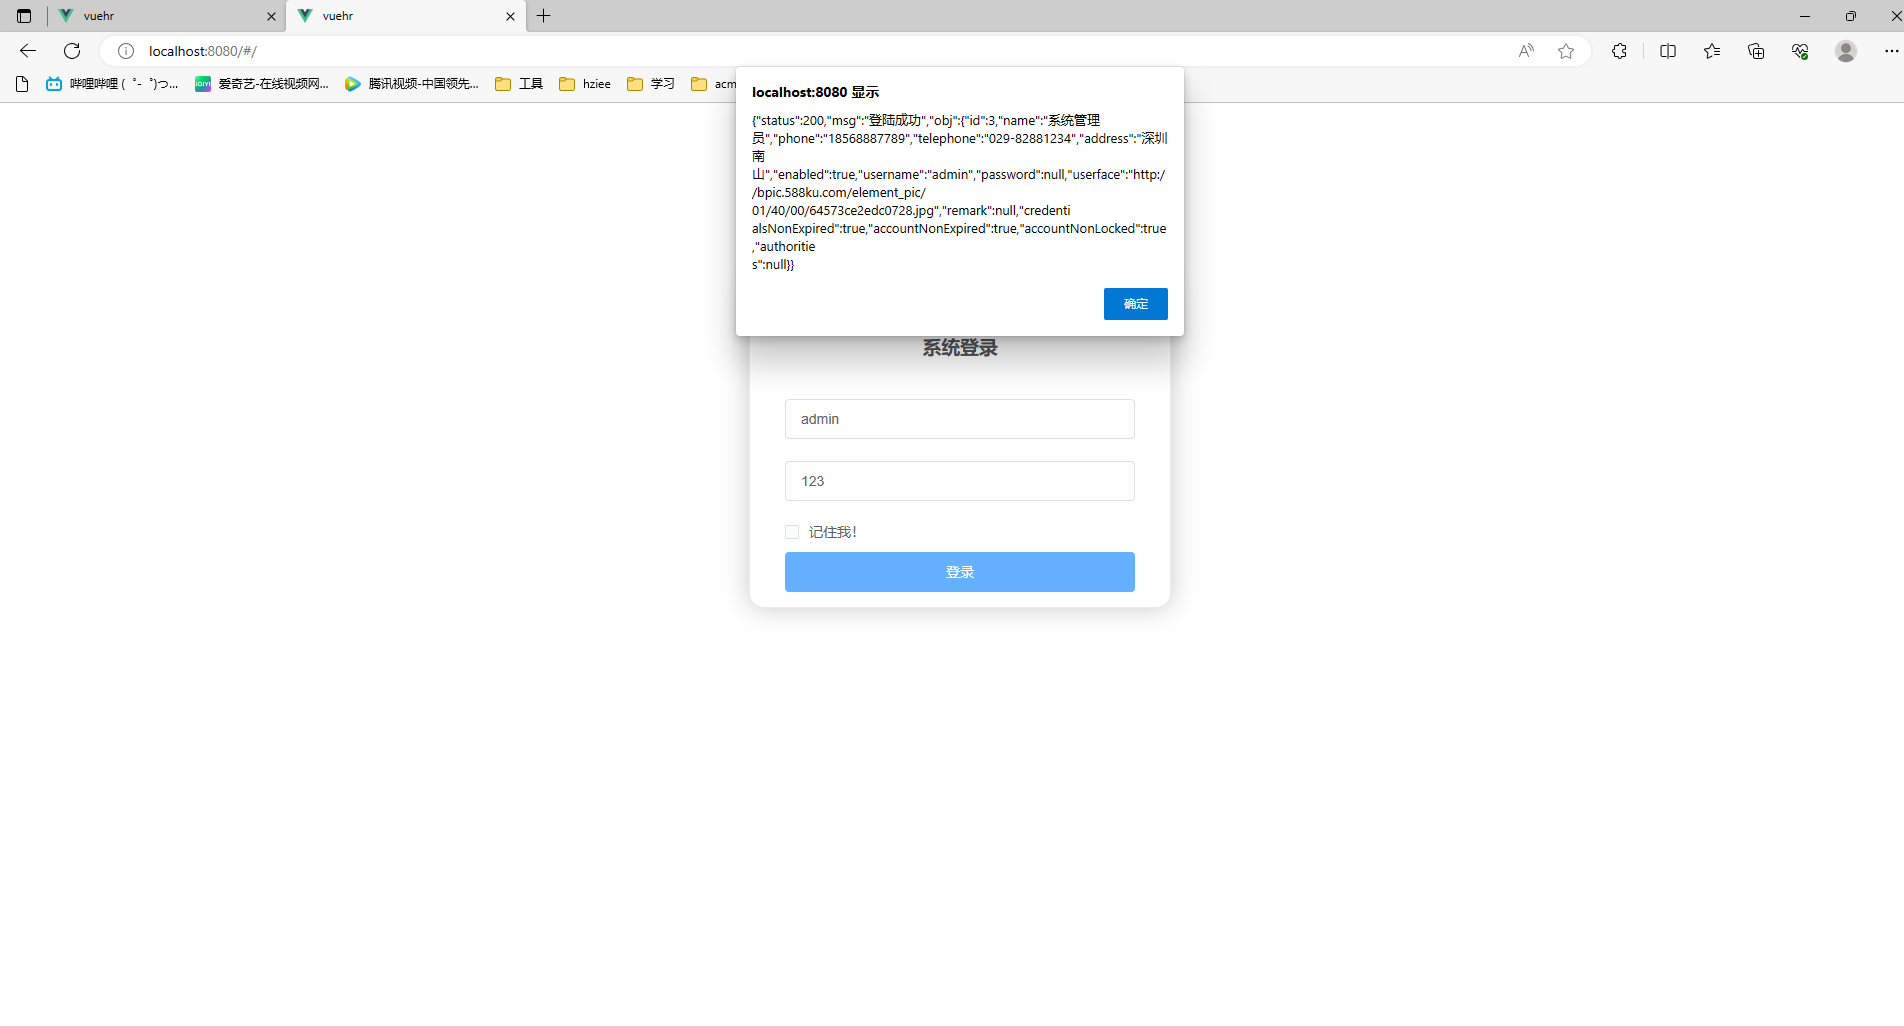
此时后端接口使用postman已经完全调试完毕了,确定可以使用了。
就要在前端调用axios,首先使用npm下载一个axios的依赖:
创建utils包并在其中创建api.js
1 2 3 4 5 6 7 8 9 10 11 12 13 14 15 16 17 18 19 20 21 22 23 24 25 26 27 28 29 30 31 32 33 34 35 36 37 38 39 40 41 42 43 44 45 46 import axios from "axios" ;import { Message } from "element-ui" ;interceptors .response .use (success =>if (success.status &&success.status ==200 && success.data .status ==500 ){Message .error ({message :success.data .msg })return ;return success.data ;error =>if (error.response .status ==504 ||error.response .status ==404 ){Message .error ({message :'服务器被吃掉了0.o' })else if (error.response .status ==403 ){Message .error ({message :'权限不足,快去找管理员讨一个' })else if (error.response .status ==401 ){Message .error ({message :'尚未登陆,请登录' })else {if (error.response .data .msg ){Message .error ({message :error.response .data .msg })else {Message .error ({message :'未知错误' })return ;let base='' ;export const postKeyValueRequest =(url,params )=>{return axios ({method :'post' ,url :`${base} ${url} ` ,data :params,transformRequest :[function (data ){let ret='' ;for (let i in data){encodeURIComponent (i)+'=' +encodeURIComponent (data[i])+'&' console .log (ret);return ret;headers :{'Content-Type' :'application/x-www-form-urlencoded'
transformRequest用修改request的传参格式。
然后最上面的axios.interceptors.response是用于拦截所有的返回信息进行处理,其中比较有意思的是,因为在后端已经对respBean进行过创建的处理了,导致error.msg为500,但实际上的状态码为200,会传入到success之中,那么在success就就需要将这俩个error的状态剔除出去,直接返回空值 return;
然后在login组件中调用该这个postKeyValueRequest方法,将原本的submit的alert显示修改为进行前后端对接,从而实现将数据的传递和接受。
1 2 3 4 5 6 7 8 9 10 11 12 13 14 15 16 17 methods :{submitLogin (this .$refs .loginForm .validate ((valid ) => {if (valid) {postKeyValueRequest ('/doLogin' ,this .loginForm ).then (resp =>if (resp){alert (JSON .stringify (resp))else {this .$message .error ('请输入全部字段' );return false ;
由于vue的端口为8080,springboot的端口为8081,这属于伪跨域,因为这种跨域仅仅存在于测试之中,打包部署后不会存在这种问题。测试中解决这个问题是使用vue.config.js
1 2 3 4 5 6 7 8 9 10 11 12 13 14 15 16 let proxyObj={};'/' ]={ws :false ,target :'http://localhost:8081' ,changeOrigin :true ,pathRewrite :{'^/' :'' module .exports ={devServer :{host :'localhost' ,port :8080 ,proxy :proxyObj
使用node.js转发到8081,再对传回的数据进行处理即可。
成功截图!
踩坑:数据格式写错了,api中的transformRequest的return值的格式错误,但依旧被成功接受,导致username和password读取到了错误数据,一直返回用户名或者密码错误,要仔细!但是这次踩坑学会了两个东西,一个是如何在configuration中直接进行配置输出收到的parameter
1 2 "username" )); System.out.println(request.getParameter("password" ));
还有一个就是松哥使用的登录验证是BCrypt的验证,内部自己校验完成的,不需要我编写校验的方法,使用userdetails的实现类,由于我目前还没学习完spring security导致我不知道在哪里校验登录数据,然后上面说的那个bug DE了很久(很烦)。然后BCrypt是spring security内置的东西,是过滤器链上的东西。
页面跳转 首先创建Home.vue的组件,然后在rounter.js中导入(我这里是rounter包下的index.js,效果一致)
跳转可以使用replace和push,差距在于repalace是直接取代,而push则是进行压栈,简单来说replace不能返回上一页,而push可以。
将原本的alert替换成如下代码:
1 2 window .sessionStorage .setItem ("user" ,JSON .stringify (resp.obj ));this .$router .replace ('/home' )
实现跳转功能。
前端请求方法封装 将所有的请求方法封装在api.js之中,以后使用起来更加方便一些。
1 2 3 4 5 6 7 8 9 10 11 12 13 14 15 16 17 18 19 20 21 22 23 24 25 26 27 28 29 30 31 export const postRequest =(url,params )=>{return axios ({method :'post' ,url :`${base} ${url} ` ,data :paramsexport const putRequest =(url,params )=>{return axios ({method :'put' ,url :`${base} ${url} ` ,data :paramsexport const getRequest =(url,params )=>{return axios ({method :'get' ,url :`${base} ${url} ` ,data :paramsexport const deleteRequest =(url,params )=>{return axios ({method :'delete' ,url :`${base} ${url} ` ,data :params
然后这个封装的方法有俩种使用方式。
在要使用的组件中进行导包,例如
1 import {postKeyValueRequest} from "@/utils/api" ;
然后就可以直接使用postKeyValueRequest该方法了!
将该方法制作成为插件使用,在main.js中进行制作插件。
1 2 3 4 5 6 7 8 9 10 11 import {postRequest} from "@/utils/api" ;import {putRequest} from "@/utils/api" ;import {getRequest} from "@/utils/api" ;import {deleteRequest} from "@/utils/api" ;import {postKeyValueRequest} from "@/utils/api" ;Vue .prototype postRequest =postRequest;Vue .prototype putRequest =putRequest;Vue .prototype getRequest =getRequest;Vue .prototype deleteRequest =deleteRequest;Vue .prototype postKeyValueRequest =postKeyValueRequest;
然后在要使用的地方直接添加this.前缀使用即可。这样就不用再进行导包了。
1 this .postKeyValueRequest ('/doLogin' ,this .loginForm ).then (resp =>
Home页面 使用el-container布局容器。
title 操作菜单使用dropdown下拉菜单制作。
确认退出添加messageBox弹框。
登出方法:
1 2 3 4 5 6 7 8 9 10 11 12 13 14 15 16 17 18 19 20 21 22 23 24 methods :{commandHandler (cmd ){if (cmd=='logout' ){this .$confirm('此操作将注销登录, 是否继续?' , '提示' , {confirmButtonText : '确定' ,cancelButtonText : '取消' ,type : 'warning' then (() => {this .getRequest ('/logout' );window .sessionStorage .removeItem ("user" );this .$router .replace ("/" );catch (() => {this .$message({type : 'info' ,message : '已取消登出'
页面:
1 2 3 4 5 6 7 8 9 10 11 12 13 14 15 16 17 18 19 20 21 22 23 24 <template>
导航栏效果图:
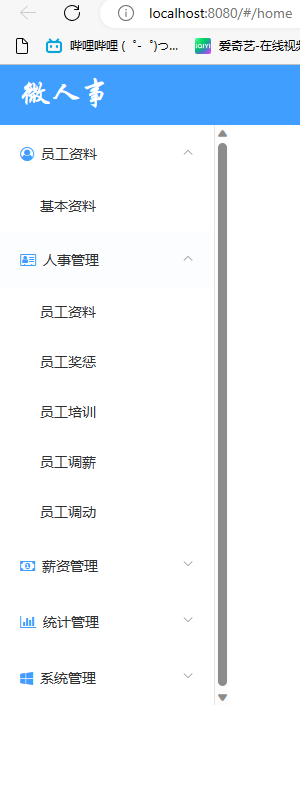
左边导航栏 使用NavMenu导航菜单
对router.js进行配置,使得跳转可以实现页面内的router-view的切换,并且给其他组件配置hidden为true,方便后面进行for循环。
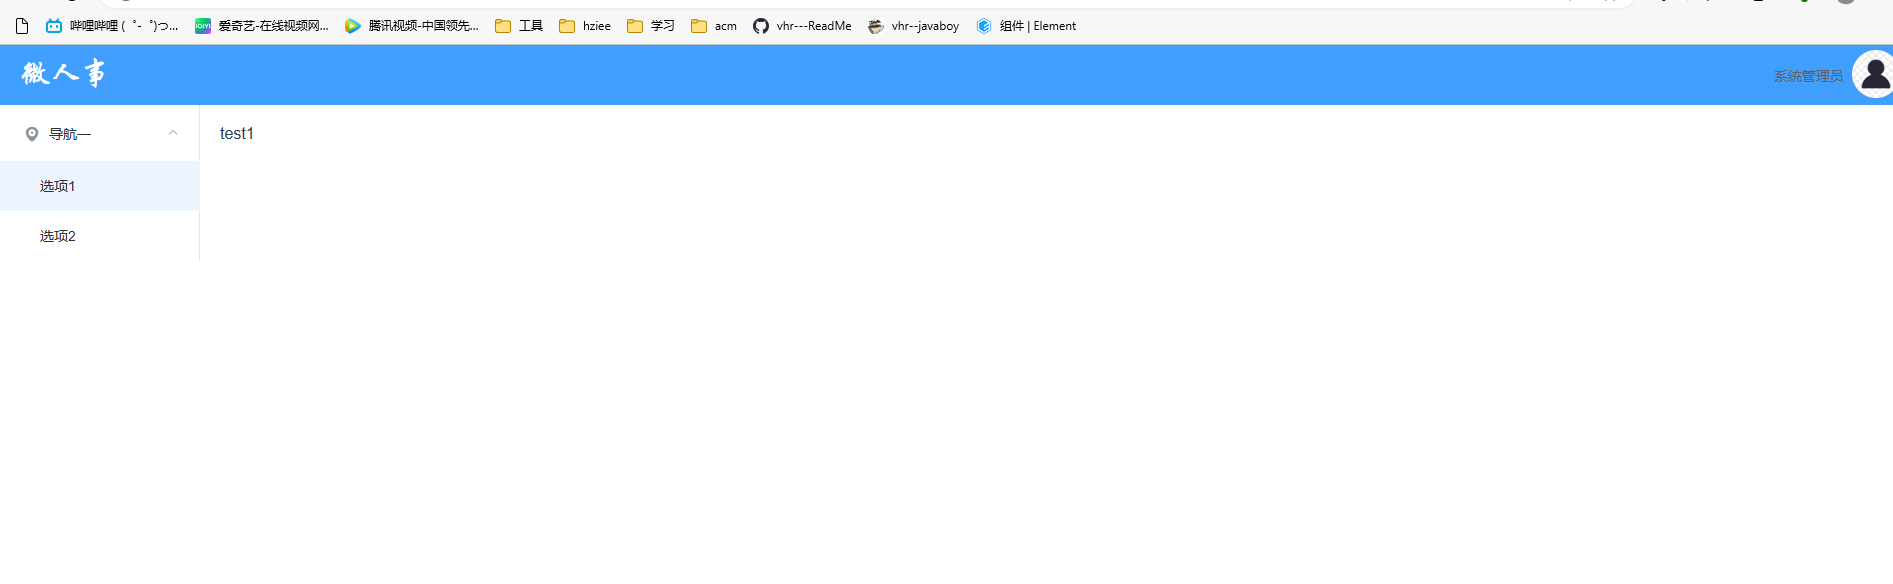
1 2 3 4 5 6 7 8 9 10 11 12 13 14 15 16 {path : '/home' ,name : '导航一' ,component : Home ,children :[path : '/test1' ,name : '选项1' ,component : Test1 path : '/test2' ,name : '选项2' ,component : Test2
el-menu中可以添加router,此时将会自动将选项的index作为跳转的path进行跳转操作。
1 2 3 4 5 6 7 8 9 10 11 <el-menu router>
使用for循环进行遍历所有的children,用router-view进行展示内容。
1 2 3 <el-main>
效果:
菜单项接口 后端创建实体类Meta用于存放别的数据,然后将Menu实体类修改为合理的字段。
这个是这一小项里的难点
首先是实体类属性的修改,如下是menu实体类添加的属性,并且删除了keepAlive和requireAuth(为了符合返回给前端的数据格式)。
1 2 3 private Meta meta;private List<Menu> children;
Meta类则是一个为了符合数据格式而创建的类,其中的属性就是:
1 2 private Boolean keepAlive;private Boolean requireAuth;
做完实体类的修改,就等于做好了准备工作。
接下来创建controller,然后在其中创建接口,再按照业务逻辑编写全新的SQL语句(注意:养成好的习惯!!现在navicat里面运行,成功之后再直接CV到xml里面,这样能够更加容易确认错误出哪 )
1 2 3 4 5 6 7 8 9 10 11 12 13 14 15 16 17 18 19 20 21 22 23 24 SELECT DISTINCT * , m2.id AS id2,AS component2,AS enabled2,AS iconCls2,AS keepAlive2,AS name2,AS parentId2,AS requireAuth2,AS path2FROM WHERE = m2.parentIdAND hrr.hrid = 10 AND hrr.rid = mr.ridAND mr.mid = m2.idAND m2.enabled = TRUE ORDER BY
然后就是mapper.xml里面的resultMap的配置
1 2 3 4 5 6 7 8 9 10 11 12 13 14 15 16 17 18 19 20 21 22 23 24 25 26 27 28 29 30 <resultMap id ="BaseResultMap" type ="com.xgfm.vhr.pojo.Menu" > <id property ="id" column ="id" jdbcType ="INTEGER" /> <result property ="url" column ="url" jdbcType ="VARCHAR" /> <result property ="path" column ="path" jdbcType ="VARCHAR" /> <result property ="component" column ="component" jdbcType ="VARCHAR" /> <result property ="name" column ="name" jdbcType ="VARCHAR" /> <result property ="iconCls" column ="iconCls" jdbcType ="VARCHAR" /> <result property ="parentId" column ="parentId" jdbcType ="INTEGER" /> <result property ="enabled" column ="enabled" jdbcType ="BOOLEAN" /> <association property ="meta" javaType ="com.xgfm.vhr.pojo.Meta" > <result property ="keepAlive" column ="keepAlive" jdbcType ="BIT" /> <result property ="requireAuth" column ="requireAuth" jdbcType ="BIT" /> </association > </resultMap > <resultMap id ="Menus2" type ="com.xgfm.vhr.pojo.Menu" extends ="BaseResultMap" > <collection property ="children" ofType ="com.xgfm.vhr.pojo.Menu" > <id property ="id" column ="id2" jdbcType ="INTEGER" /> <result property ="url" column ="url2" jdbcType ="VARCHAR" /> <result property ="path" column ="path2" jdbcType ="VARCHAR" /> <result property ="component" column ="component2" jdbcType ="VARCHAR" /> <result property ="name" column ="name2" jdbcType ="VARCHAR" /> <result property ="iconCls" column ="iconCls2" jdbcType ="VARCHAR" /> <result property ="parentId" column ="parentId2" jdbcType ="INTEGER" /> <result property ="enabled" column ="enabled2" jdbcType ="BOOLEAN" /> <association property ="meta" javaType ="com.xgfm.vhr.pojo.Meta" > <result property ="keepAlive" column ="keepAlive" jdbcType ="BIT" /> <result property ="requireAuth" column ="requireAuth" jdbcType ="BIT" /> </association > </collection > </resultMap >
这用到了association和collection,分别用于一对多和多对一,实现导航和children导航的数据格式正确。
还有遵守mybatis里的标签放置规范,中途我有一个报错就是因为collection标签放在了中间,导致解析错误。
然后使用postman进行测试,成功!!进入前端开发。
Vuex 菜单项数据加载成功之后,在前端有几个可以存放的地方:
sessionStorage
localStorage
vuex(状态管理),最大优点就是安全
安装 在webstrom控制台安装vuex。
配置 创建store包并其中创建index.js页面
1 2 3 4 5 6 7 8 9 10 11 12 13 14 15 16 import Vue from "vue" ;import Vuex from "vuex" Vue .use (Vuex )export default new Vuex .Store ({state :{routes :[]mutations :{initRoutes (state,data ){routes =data;actions :{
菜单请求工具类封装 这个比较的复杂。因为component是导入的包,而前端获取的component是字符串,需要对其进行处理,从而才能够实现格式化的数据使用。
需要配置工具类menus.js(目前理解不是很深刻,就直接放代码了)
1 2 3 4 5 6 7 8 9 10 11 12 13 14 15 16 17 18 19 20 21 22 23 24 25 26 27 28 29 30 31 32 33 34 35 36 37 38 39 40 41 42 43 import {getRequest} from "@/utils/api" ;export const initMenu =(router,store )=>{if (store.state .routes .length >0 ){return ;getRequest ("/system/config/menu" ).then (data =>if (data){let fmtRountes=formatRoutes (data);addRoutes (fmtRountes);commit ('initRoutes' ,fmtRountes);export const formatRoutes =(routes )=>{let fmRoutes=[];forEach (router =>let {if (children && children instanceof Array ){formatRoutes (children)let fmRounter={path :path,name :name,iconCls :iconCls,meta :meta,children :children,component (resolve ){require (['../views/' +component+'.vue' ],resolve);push (fmRounter)return fmRoutes;
前端页面添加并完善 也就把所需要的views的功能的组件根据数据库的功能完善好,完善结果如下:
重复的机械活,花时间但不用动脑子。
继续导航栏功能 菜单加载 使用路由导航守卫,类似于后端的过滤器,可以对跳转进行监听。
正如其名,vue-router 提供的导航守卫主要用来通过跳转或取消的方式守卫导航。这里有很多方式植入路由导航中:全局的,单个路由独享的,或者组件级的。
在main.js中添加导航守卫的代码,在导航守卫中进行判断
1 2 3 4 5 6 7 8 router.beforeEach ((to, from , next ) => {if (to.path =='/' ){next ();else {initMenu (router,store);next ();
然后是需要在注销时对store中的数据进行清空。
需要在home.vue中添加如下代码:
1 this .$store .commit ('initRoutes' ,[])
执行initRoutes方法并且给一个空数组。
导航栏的图片使用前需要下载awesome
然后在main.js中导入
1 import 'font-awesome/css/font-awesome.min.css'
菜单的代码:
1 2 3 4 5 6 7 8 9 10 11 <el-menu router unique-opened>
最主要的改动就是添加了unique-opened属性和index属性修改为”index+’ ‘“这样可以避免全部导航栏被识别成同一个导航栏。
但是我个人感觉不加unique-opened会更加好看一点点(但我还是加着吧)。
成果图:
bug解决 之前的代码仍然存在一些小小问题,就是router-views不会跟着导航栏的点击而发生改变,就在这里解决一下吧
这是因为Home组件里的导航栏并没有被导入这几个包,点击自然而然就是无效的了,需要在这menus.js中添加Home的路径。
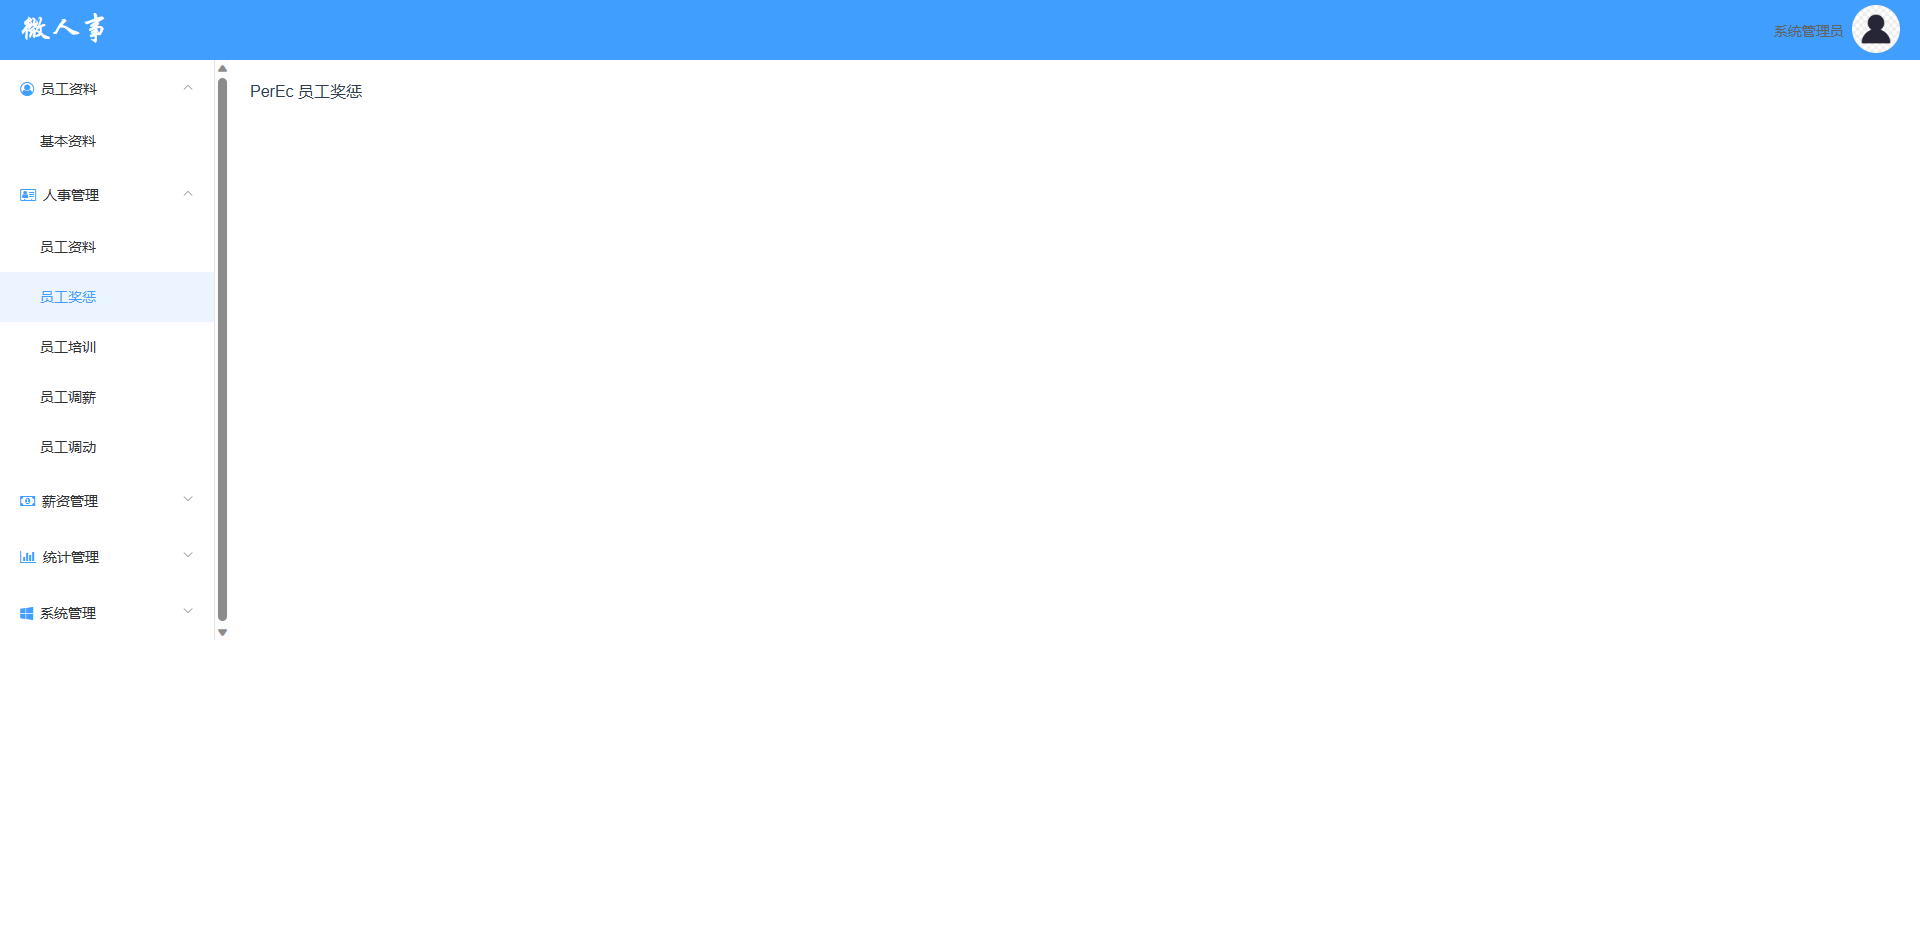
1 2 3 4 5 6 7 8 9 10 11 12 13 14 15 component (resolve ){if (component.startsWith ("Home" )){require (['../views/' +component+'.vue' ],resolve);else if (component.startsWith ("Emp" )){require (['../views/emp/' +component+'.vue' ],resolve);else if (component.startsWith ("Per" )){require (['../views/per/' +component+'.vue' ],resolve);else if (component.startsWith ("Sal" )){require (['../views/sal/' +component+'.vue' ],resolve);else if (component.startsWith ("Sta" )){require (['../views/sta/' +component+'.vue' ],resolve);else if (component.startsWith ("Sys" )){require (['../views/sys/' +component+'.vue' ],resolve);
成功之后如下:
然后添加了一个回车登录的功能,就是在login.vue组件中的password框里添加keydown就可以了。
1 <el-input type="text" v-model="loginForm.password" auto-complete="off" placeholder="请输入密码" @keydown.enter.native="submitLogin"></el-input>
然后今日总结就是对数据格式的注意,目前还需要加深mybatis那些代码返回的数据格式的东西。
Home页面完善 使用elementUI的面包屑功能
Breadcrumb 面包屑:显示当前页面的路径,快速返回之前的任意页面。
1 2 3 4 5 6 7 <el-breadcrumb separator-class="el-icon-arrow-right" v-if="this.$router.currentRoute.path!='/home'">
如此导入之后就可以增加用户体验了,放俩张成果图
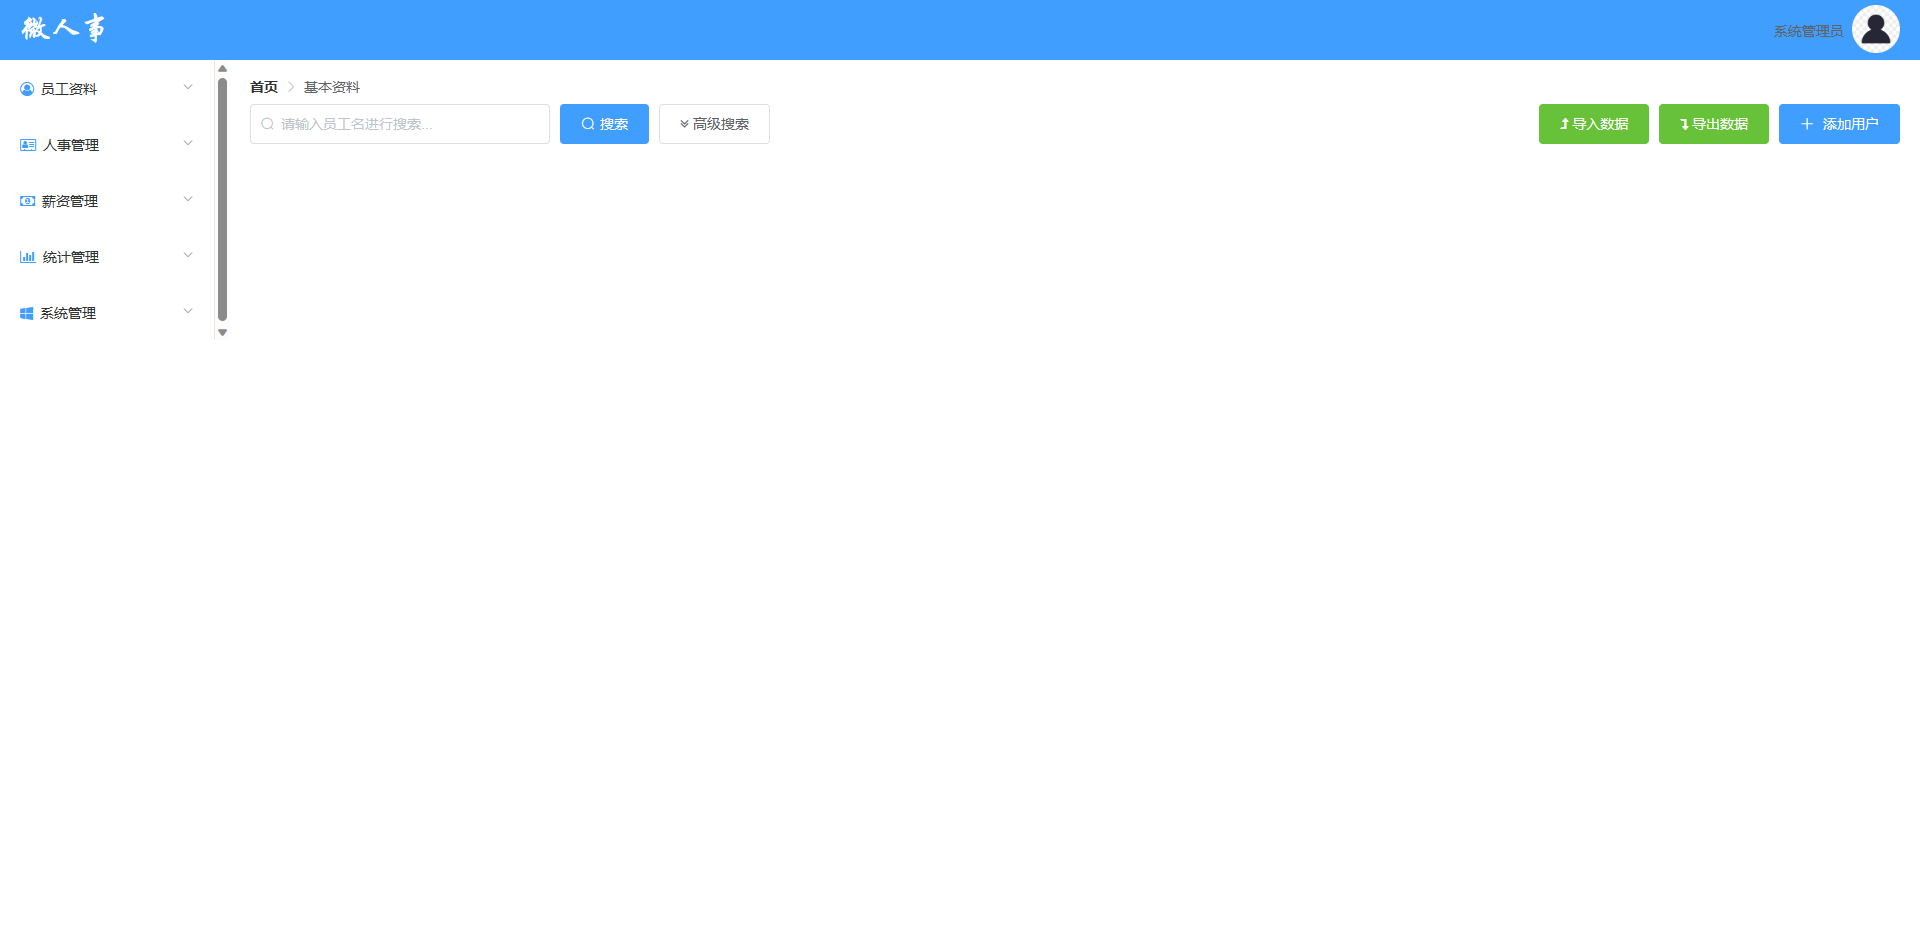
ok!Home页面的基础就到此了!
权限管理思路 在传统的前后端不分的开发中,权限管理主要通过过滤器或者拦截器来进行(权限管理框架本身也是通过过滤器来实现功能),如果用户不具备某一个角色或者某一个权限,则无法访问某一个页面。
但是在前后端分离中,页面的跳转统统交给前端去做,后端只提供数据,这种时候,权限管理不能再按照之前的思路来。
目前来说,数据安全不能依靠前端来实现,简单来说前端安全是不可信的。
前端数据校验是为了提高效率和用户体验,而后端才是为了确保数据完整性。
之前将接口和菜单进行隐藏,只是为了提高用户体验。
后端接口权限设计
根据用户发送的URL获取他的角色
查询他的角色是否具备相对应的权限
新建一个MyFilter类。然后再扩展Menu实体类,menu添加如下:
1 2 3 4 5 6 7 8 9 private List<Role> roles;public List<Role> getRoles () {return roles;public void setRoles (List<Role> roles) {this .roles = roles;
MenuService里的menuService.getAllMenusWithRole()通常不怎么发生改变,而访问时经常需要去请求,每次请求都要跑一遍过于浪费资源,所以这里一般使用Cacheable进行一个缓存,但是由于配置需要redis过于麻烦,这里先不使用,但是如果是工作中的开发是必不可少的。
在MenuService中添加如下方法:
1 2 3 4 public List<Menu> getAllMenusWithRole () {return menuMapper.getAllMenusWithRole();
测试SQL语句
1 2 3 4 5 6 7 8 9 10 11 12 13 SELECT * , r.id AS rid,AS rname,AS rnameZhFROM WHERE = mr.midAND mr.rid = r.idORDER BY
添加getAllMenusWithRole的mapper的方法
1 2 3 4 5 6 7 8 9 10 11 <select id ="getAllMenusWithRole" resultMap ="MenuWithRole" > </select > <resultMap id ="MenuWithRole" type ="com.xgfm.vhr.pojo.Menu" extends ="BaseResultMap" > <collection property ="roles" ofType ="com.xgfm.vhr.pojo.Role" > <id column ="rid" property ="id" /> <result column ="rname" property ="name" /> <result column ="rnameZh" property ="namezh" /> </collection > </resultMap >
然后把CustomFilterInvocationSecurityMetadataSource配置完成
1 2 3 4 5 6 7 8 9 10 11 12 13 14 15 16 17 18 19 20 21 22 23 24 25 26 27 28 29 30 31 32 33 @Component public class MyFilter implements FilterInvocationSecurityMetadataSource {@Autowired new AntPathMatcher ();@Override public Collection<ConfigAttribute> getAttributes (Object object) throws IllegalArgumentException {String requestUrl = ((FilterInvocation) object).getRequestUrl();for (Menu menu:menus){if (antPathMatcher.match(menu.getUrl(),requestUrl)){new String [roles.size()];for (int i=0 ;i<roles.size();i++){return SecurityConfig.createList(str);return SecurityConfig.createList("ROLE_LOGIN" );@Override public Collection<ConfigAttribute> getAllConfigAttributes () {return null ;@Override public boolean supports (Class<?> clazz) {return false ;
其中对我来说没怎么了解过的是SecurityConfig和AntPathMatcher。
AntPathMatcher用于识别路径是否和获取到的menu路径吻合。
SecurityConfig是Security的类,在这里用于返回数据,其中数据格式要求是字符串和字符串数组。
然后创建CustomUrlDecisionManager实体类,继承AccessDecisionManager接口,并且修改supports方法的返回值为true。
myBatisX生成的代码不是驼峰命名,需要自己手动修改一下!!!这里需要修改Role里的东西!
写到这里就可以开始测试了,但测试的时候突然发现,我们从头至尾没有对角色进行处理,导致实际上的角色全都是null。
现在来处理一下,思路是从登录的地方开始处理。
在登录的地方添加hr.setRoles(hrMapper.getHrRolesById(hr.getId()));
然后给hr添加setRoles方法和roles属性,再给mapper添加getHrRolesById接口方法。
1 SELECT r.* from role r,hr_role hrr where hrr.rid=r.id and hrr.hrid=#{hid}
HrMapper中接口如下:
1 2 3 <select id="getHrRolesById" resultType="com.xgfm.vhr.pojo.Role" >SELECT r .* from role r ,hr_role hrr where hrr.rid=r.id and hrr.hrid=select >
然后进行测试!解决!
这么一来因为是直接对前端页面权限的管理,所以这样基本上就可以使用权限管理了,接下来是一些完善。
完善 还有一点小bug,比如直接访问没有权限或没有登录访问接口,会直接在控制台报错,而不给出提示信息,或者跳转回登录页面。
给出提示信息:
直接在configure(HttpSecurity http)方法后添加
1 2 3 4 5 6 7 8 9 10 11 12 13 14 15 16 17 18 .exceptionHandling().authenticationEntryPoint(new AuthenticationEntryPoint () {@Override public void commence (HttpServletRequest request, HttpServletResponse response, AuthenticationException authException) throws IOException, ServletException {"application/json;charset=utf-8" );RespBean respBean = RespBean.error("访问失败!" );if (authException instanceof InsufficientAuthenticationException){"请求失败,请联系管理员啊啊啊" );new ObjectMapper ().writeValueAsString(respBean));
自动跳转:
在main.js中修改导航守卫
1 2 3 4 5 6 7 8 9 10 11 12 13 14 router.beforeEach ((to, from , next ) => {console .log (to)console .log (from )if (to.path =='/' ){next ();else {if (window .sessionStorage .getItem ("user" )){initMenu (router,store);next ();else {next ("/" );
优化自动跳转:
跳转到登录页面后,我希望登录之后如果有权限可以直接跳转到我自动跳转之前访问的页面。
修改main中导航守卫:
1 2 3 4 5 6 7 8 9 10 11 12 13 14 router.beforeEach((to, from, next) => {
修改Login组件中的方法:
1 2 3 4 5 6 7 8 this .postKeyValueRequest ('/doLogin' ,this .loginForm ).then (resp =>if (resp){window .sessionStorage .setItem ("user" ,JSON .stringify (resp.obj ));let path=this .$route .query .redirect ;this .$router .replace ((path=="/" ||path==undefined )?'/home' :path)
差不多就完善了,剩下有需要的再慢慢补。
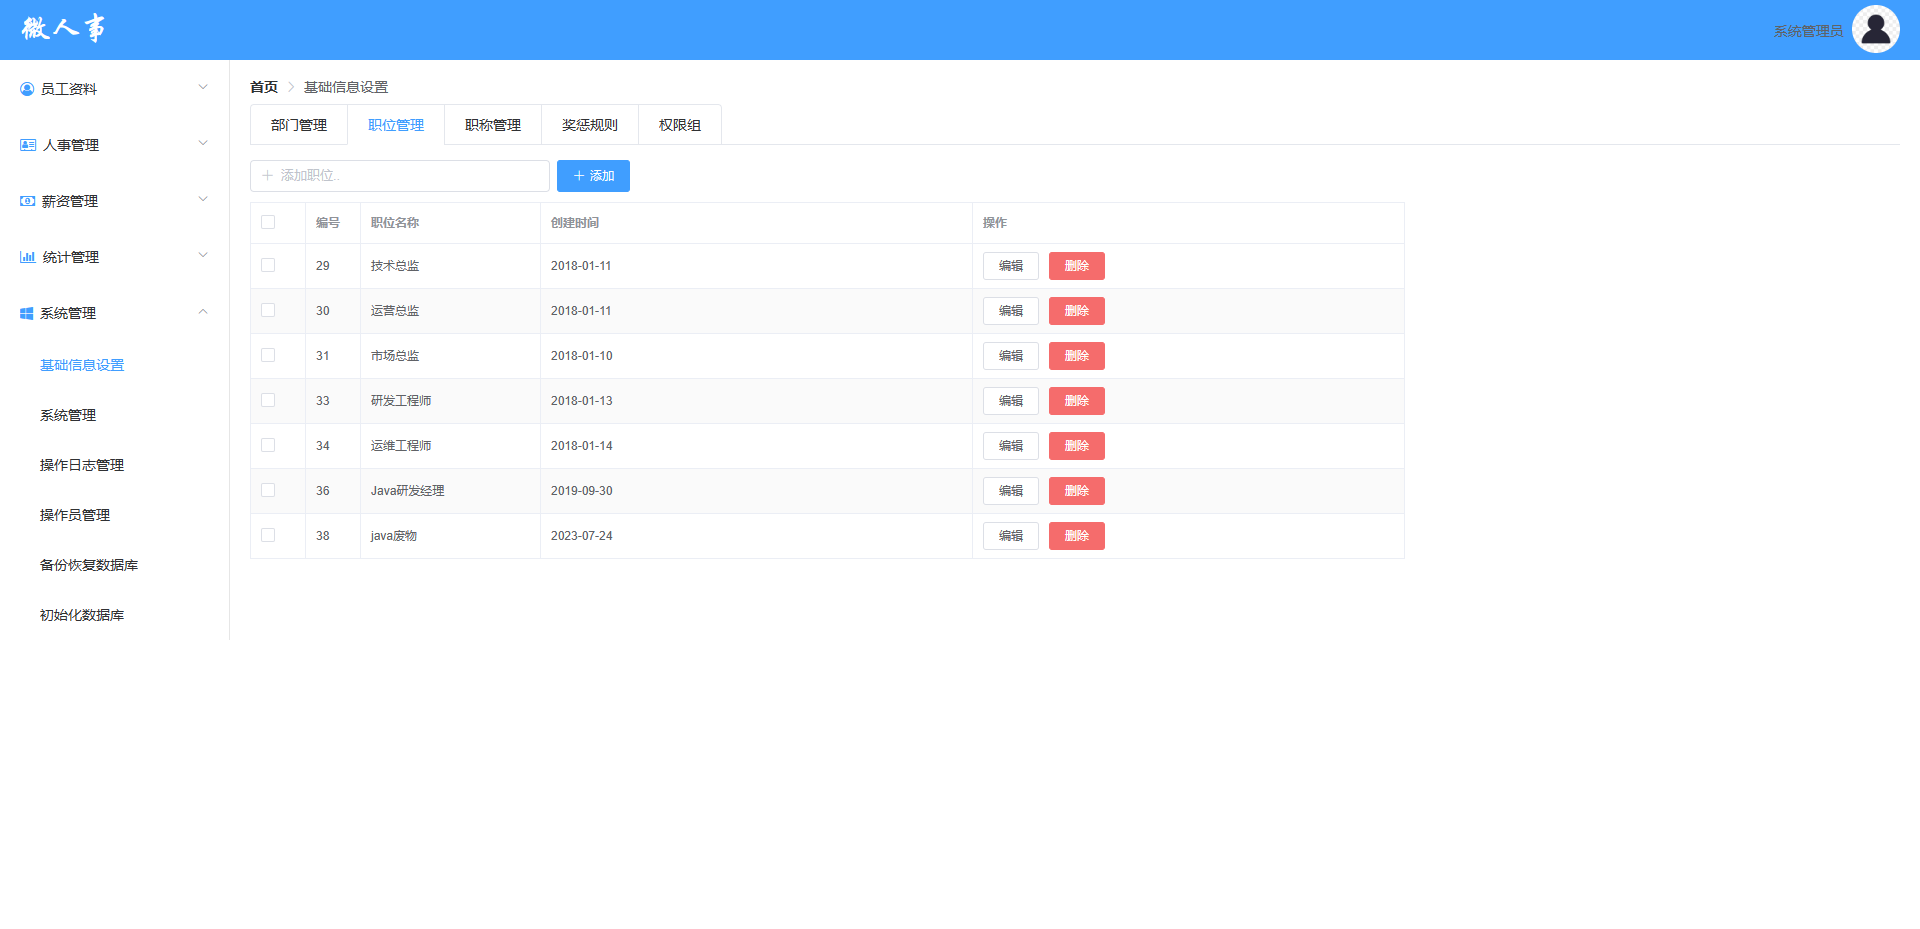
基础信息设置 使用ELUI中的tabs选项卡
1 2 3 4 5 6 7 8 9 <div>
其中各个卡片使用vue组件进行分别开发。
1 2 3 4 5 6 7 components :{DepMana ,PosMana ,JobLevelMana ,EcMana ,PermissMana
职位管理 职位管理前端页面设计 添加框使用ELUI的input输入框和button按钮
成功效果:
并且需要使得输入框的model绑定到pos.name,以便后面进行数据处理。
表格
1 2 3 4 5 6 7 8 9 10 11 12 13 14 15 16 17 18 19 20 21 22 <el-table
el-table一步到位,prop需要和后端的数据格式相同。 border和stripe分别是启动边框和斑纹。
效果如下:
职位管理后端接口设计 就是很基础的从controller到service,再到mapper到SQL即可。
有很多东西可以使用MybatisX自动生成的代码,updateByPrimaryKeySelective和updateByPrimaryKey这两者的区别,第一个会做一下非空判断,如果为空则不更新,后者则是全部修改。
这段我感觉比较简单,就只放一个controller记忆一下吧。
1 2 3 4 5 6 7 8 9 10 11 12 13 14 15 16 17 18 19 20 21 22 23 24 25 26 27 28 29 30 31 32 33 34 35 36 37 38 39 @RestController @RequestMapping("/system/basic/pos") public class PositionController {@Autowired @GetMapping("/") public List<Position> getAllPositions () {return positionService.getAllPositions();@PostMapping("/") public RespBean addPosition (@RequestBody Position position) {if (positionService.addPosition(position)==1 ){return RespBean.ok("添加成功!!" );else {return RespBean.error("添加失败!!" );@PutMapping("/") public RespBean updatePositions (@RequestBody Position position) {if (positionService.updatePositions(position)==1 ){return RespBean.ok("更新成功!!" );else {return RespBean.error("更新失败!!" );@DeleteMapping("/{id}") public RespBean deletePositionById (@PathVariable Integer id) {if (positionService.deletePositionById(id)==1 ){return RespBean.ok("删除成功!!" );else {return RespBean.error("删除失败!!" );
前后端对接 1 2 3 4 5 6 7 8 9 10 11 12 13 14 15 16 17 18 19 20 21 22 23 24 25 26 27 28 29 30 31 32 33 34 35 36 37 38 39 40 41 42 methods :{initPositions (this .getRequest ("/system/basic/pos/" ).then (resp =>if (resp){this .positions = resp;handleEdit (index,data ){handleDelete (index,data ){this .$confirm('此操作将永久删除[' +data.name +']职位, 是否继续?' , '提示' , {confirmButtonText : '确定' ,cancelButtonText : '取消' ,type : 'warning' then (() => {this .deleteRequest ("/system/basic/pos/" +data.id ).then (resp =>if (resp){this .initPositions ();catch (() => {this .$message({type : 'info' ,message : '已取消删除' addPosition (if (this .pos .name ){this .postRequest ("/system/basic/pos/" ,this .pos ).then (resp =>if (resp){this .initPositions ();this .pos .name ='' ;else {this .$message .error ("职称名称不可为空" );
直接在methods中创建对应方法即可实现。
然后是编辑和操作按钮如下:
1 2 3 4 5 6 7 8 9 10 11 12 <el-table-column
成功效果如下:
bug小修
删除有关联的数据会无法删除,但message显示错误为未知错误,需要在后端进行处理,添加exception处理类
1 2 3 4 5 6 7 8 9 10 @RestControllerAdvice public class GlobalExceptionHandler {@ExceptionHandler(SQLException.class) public RespBean SQLException (SQLException e) {if (e instanceof MySQLIntegrityConstraintViolationException){return RespBean.error("该数据有关联数据,操作失败" );return RespBean.error("数据库异常,操作失败!" );
还有就是日期显示本来是不正确的,后端处理可以使用json的注解来格式化数据。
1 2 @JsonFormat(pattern = "yyyy-MM-dd",timezone = "Asia/ShangHai") private Date createDate;
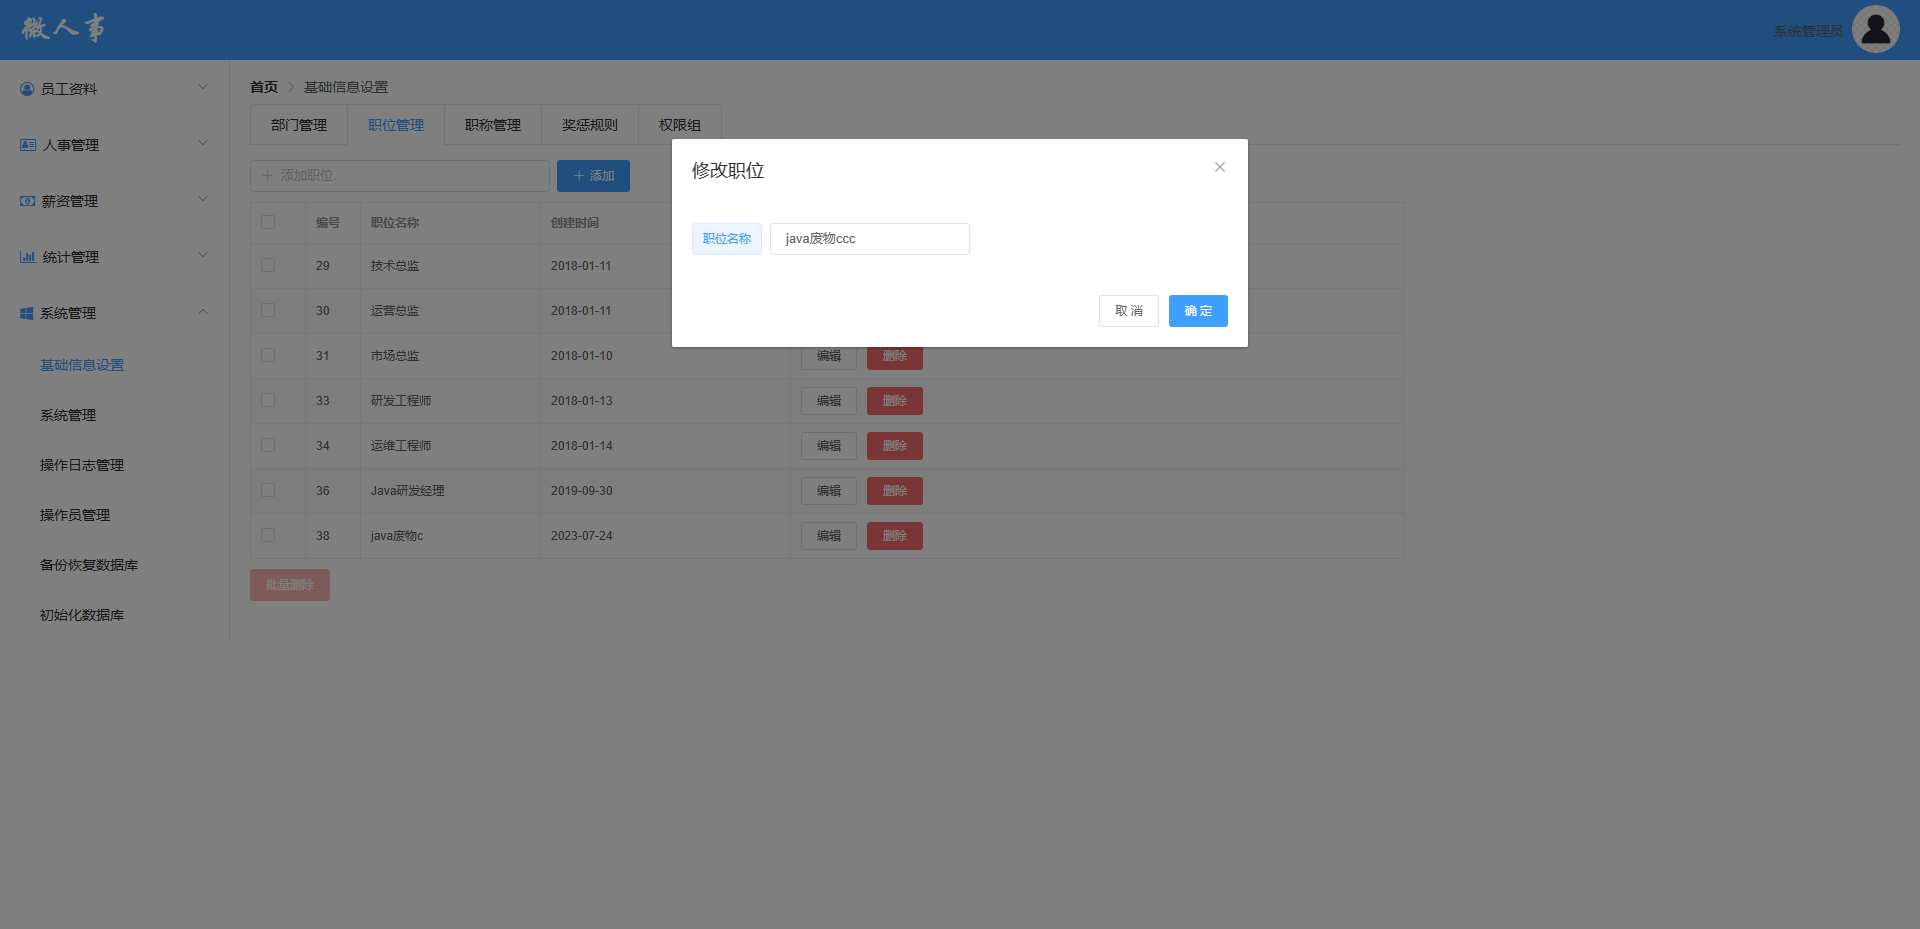
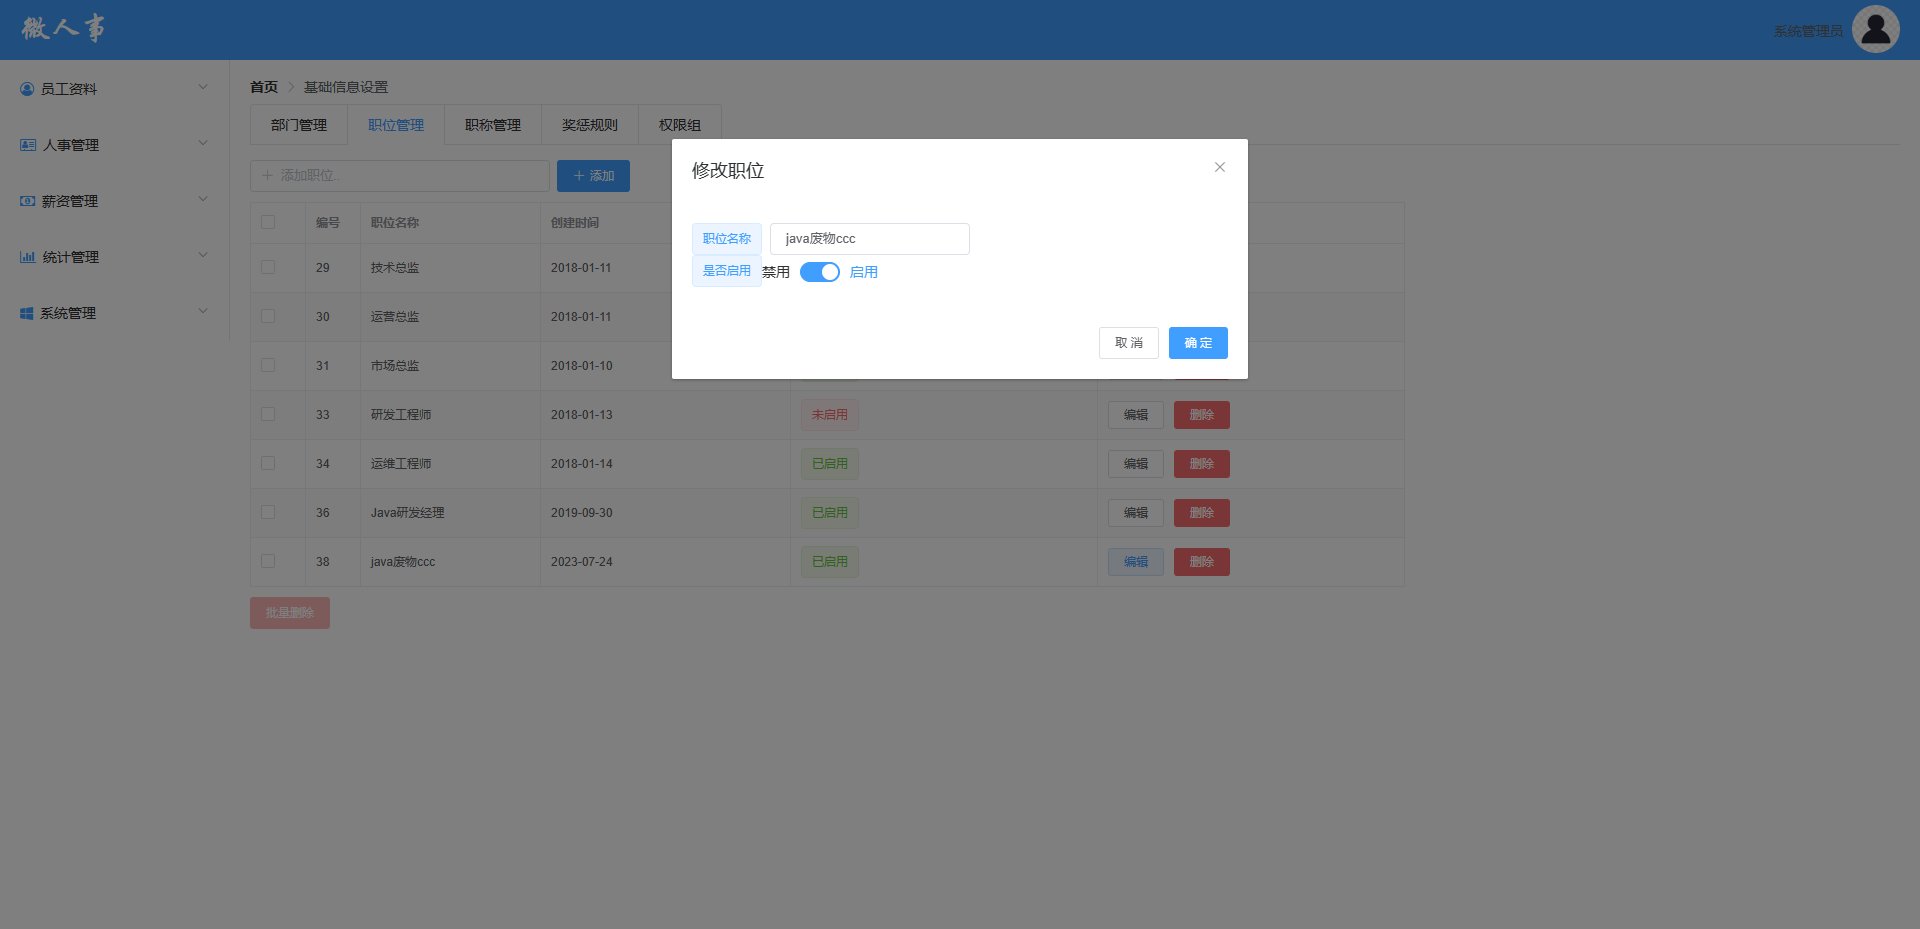
职位修改 1 2 3 4 5 6 7 8 9 10 11 12 13 <el-dialog
直接添加对应的doUpdate的js方法
1 2 3 4 5 6 7 8 9 doUpdate (this .putRequest ("/system/basic/pos/" ,this .updatePos ).then (resp =>if (resp){this .initPositions ();this .updatePos .name ='' ;this .dialogVisible =false ;
图如下:
批量删除 首先编写删除接口
1 2 3 4 5 6 7 8 @DeleteMapping("/") public RespBean deletePositionsByIds (Integer[] ids) {if (positionService.deletePositionsByIds(ids)==ids.length){return RespBean.ok("删除成功!!" );else {return RespBean.error("删除失败!!" );
这个因为是数组,第一次使用传回来数组的格式,所以把接口和mapper映射都放一下吧
1 Integer deletePositionsByIds (@Param("ids") Integer[] ids) ;
1 2 3 4 5 6 <delete id ="deletePositionsByIds" > <foreach collection ="ids" item ="id" separator ="," open ="(" close =")" > </foreach > </delete >
再是前端删除页面,首先看ELUI的指南找到批量勾选的方法
1 2 3 4 5 6 @selection-change="handleSelectionChange"
然后编写方法处理数据
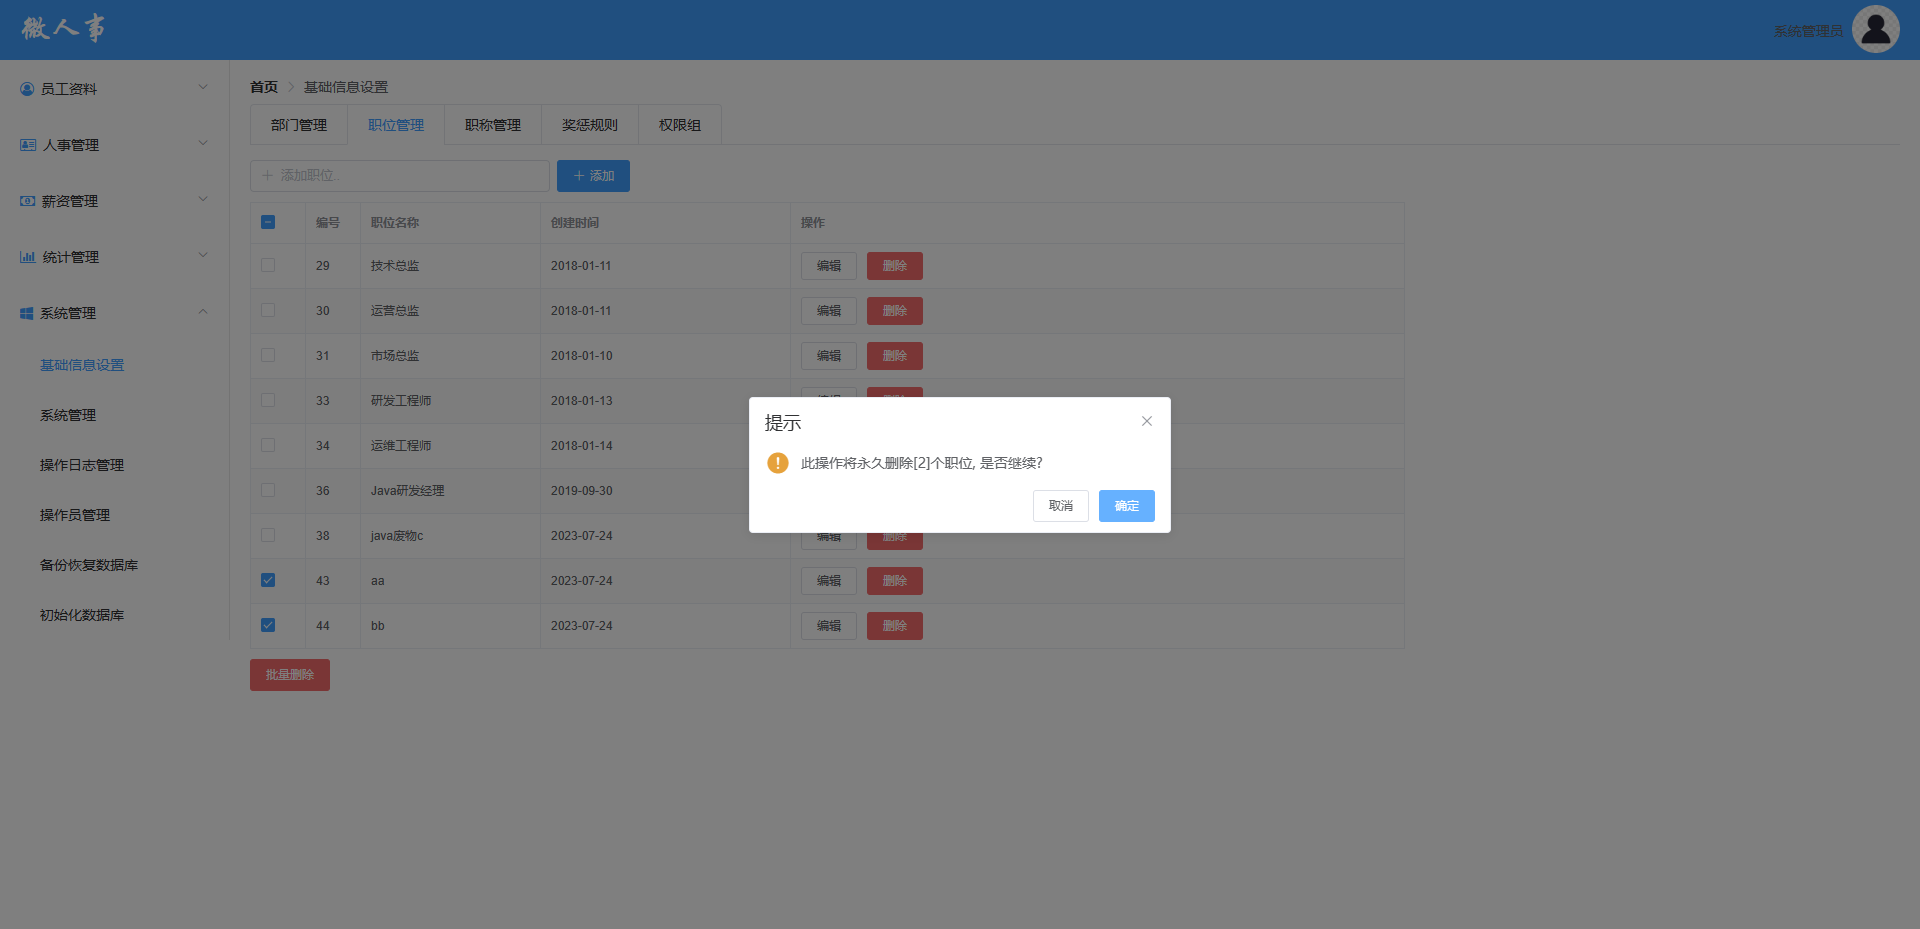
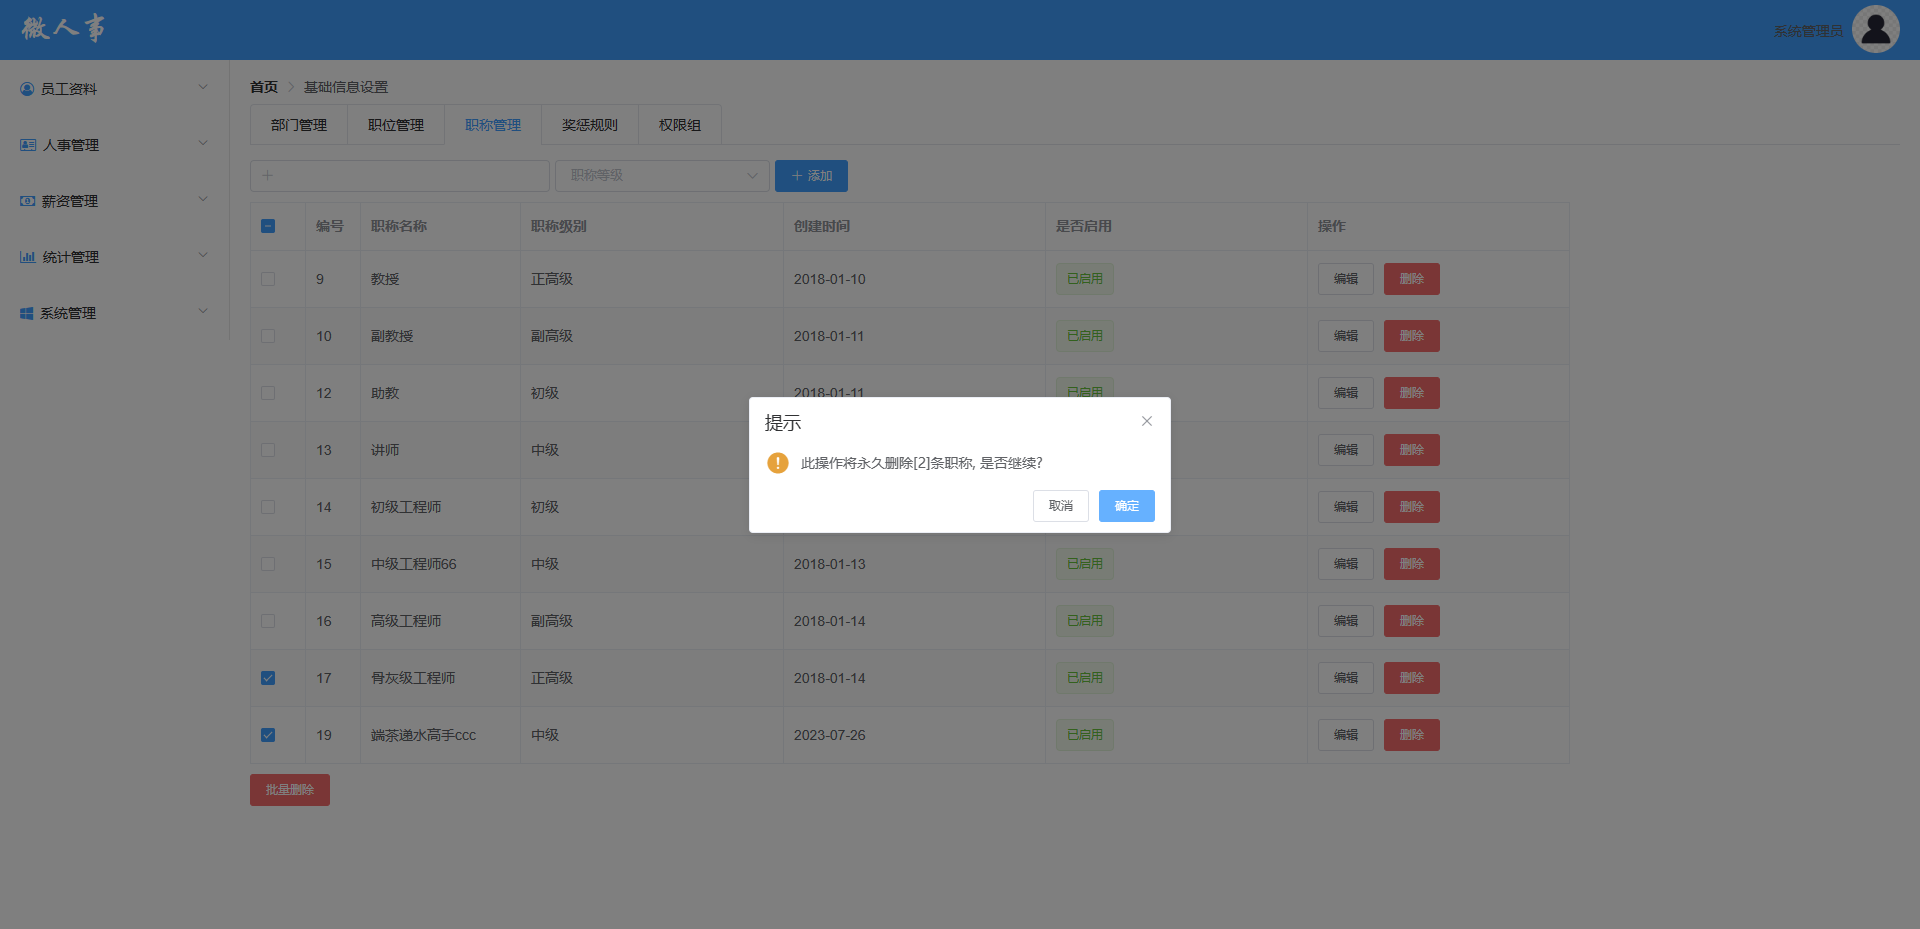
1 2 3 4 5 6 7 8 9 10 11 12 13 14 15 16 17 18 19 20 21 22 deleteMany (this .$confirm('此操作将永久删除[' +this .multipleSelection .length +']个职位, 是否继续?' , '提示' , {confirmButtonText : '确定' ,cancelButtonText : '取消' ,type : 'warning' then (() => {let ids='?' ;this .multipleSelection .forEach (item =>'ids=' +item.id +'&' ;this .deleteRequest ("/system/basic/pos/" +ids).then (resp =>if (resp){this .initPositions ();catch (() => {this .$message({type : 'info' ,message : '已取消删除'
为了实现无勾选情况下,批量删除不可点击的情况,给批量删除添加disabled并且绑定v-model处理。
1 2 <el-button type="danger" size="small" style="margin-top: 10px" :disabled="multipleSelection.length==0"
成果图如下:
添加enabled字段 在el-table中添加如下代码:
1 2 3 4 5 6 7 <el-table-column
然后将修改也做一下调整,使其也能够修改是否启用:
1 2 3 4 5 6 7 8 9 10 11 12 13 14 15 16 17 18 19 20 21 22 23 24 25 <el-dialog
成功图如下:
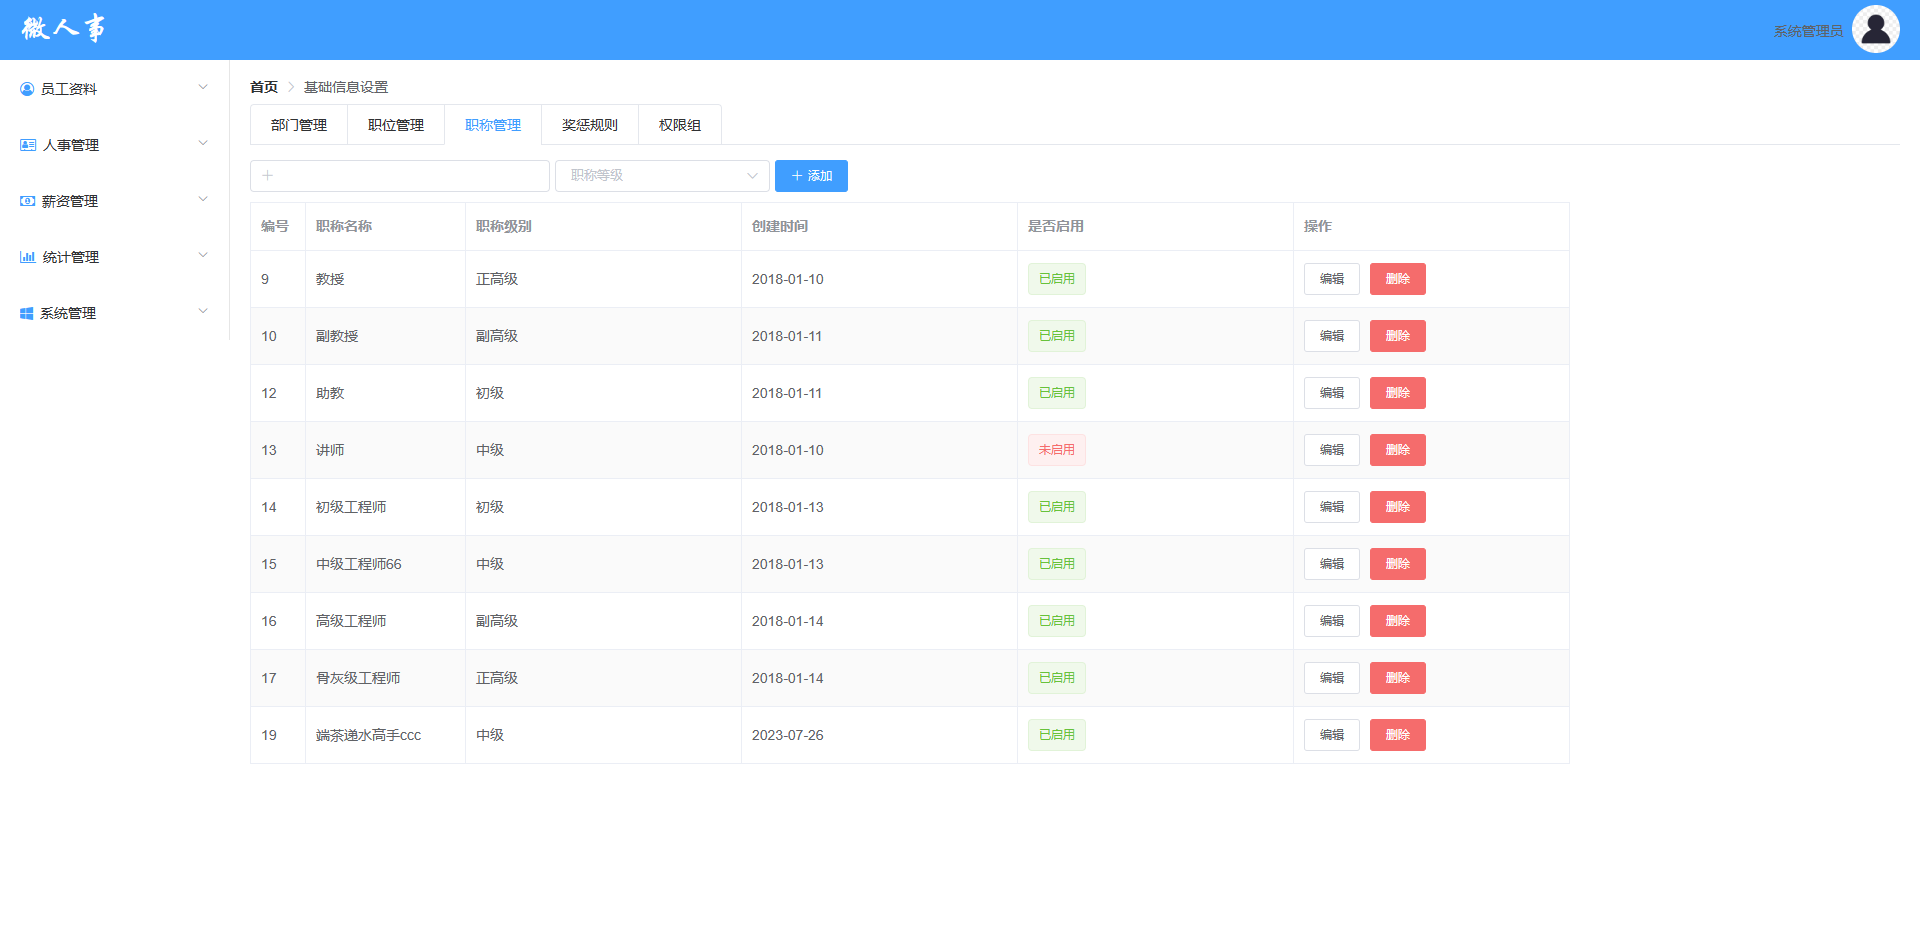
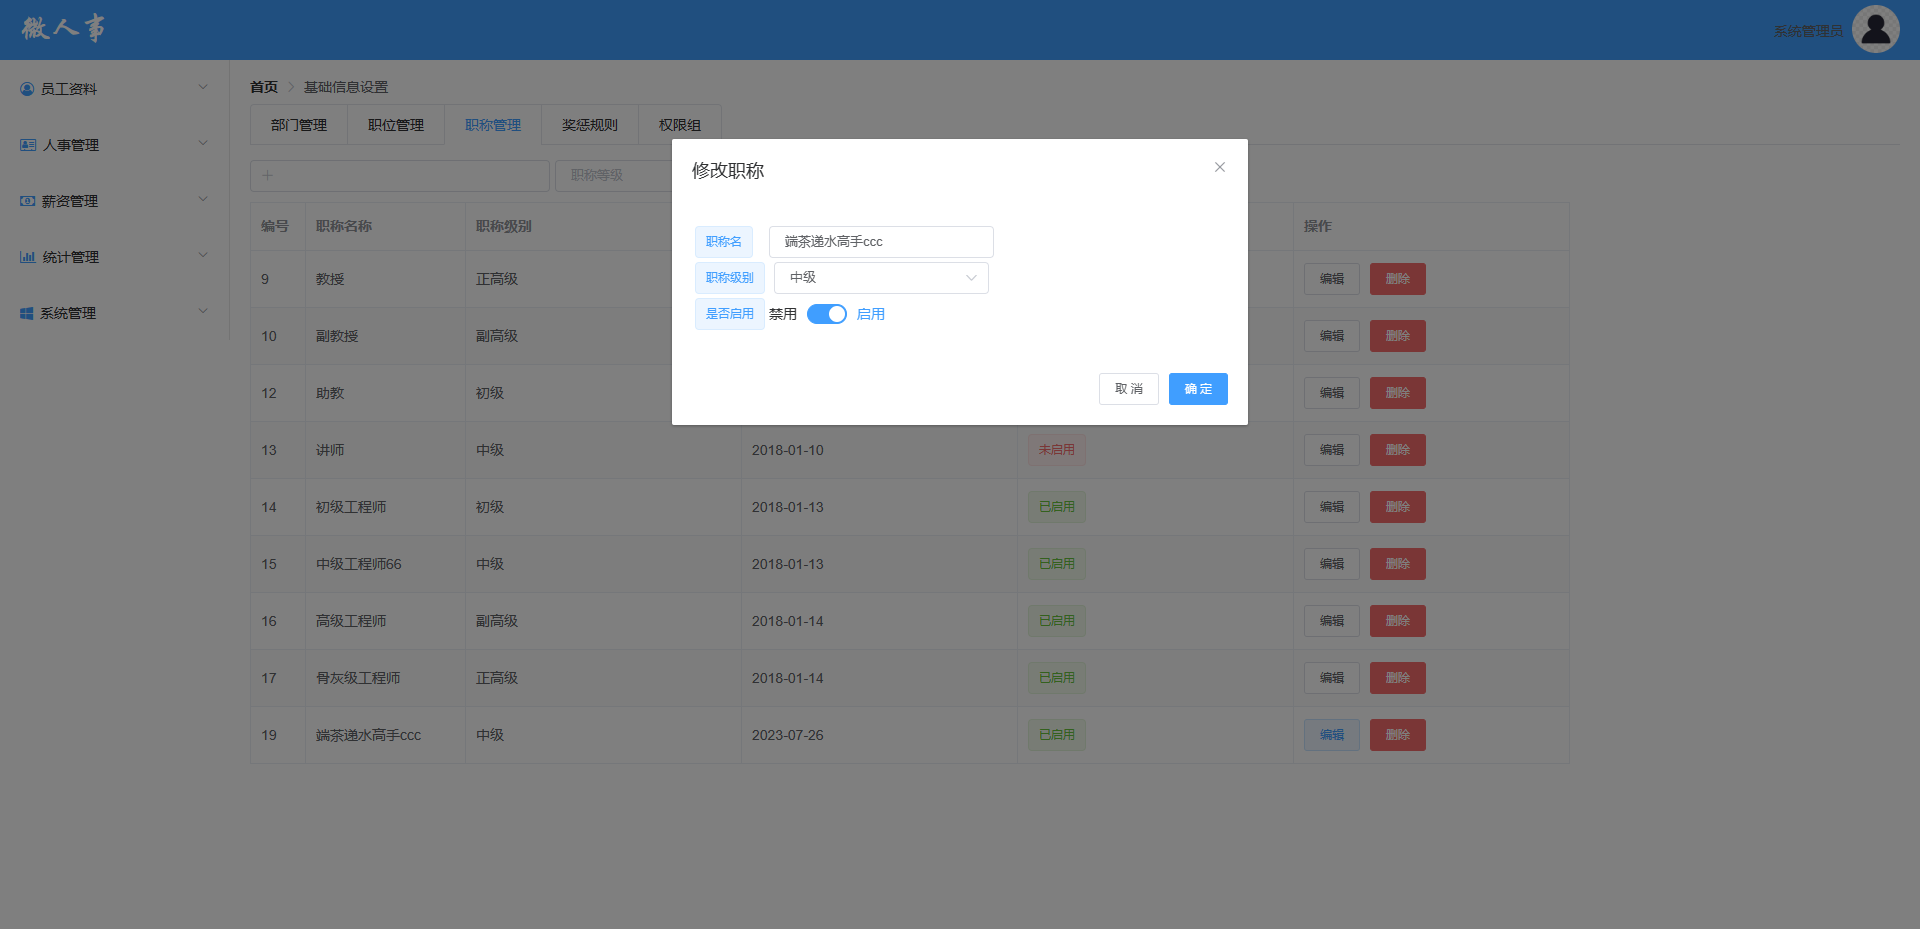
职称管理 技术点和职位管理基本一致。
前端页面设计 1 2 3 4 5 6 7 8 9 10 11 12 13 14 15 16 17 18 19 20 21 22 23 24 25 26 27 28 29 30 31 32 33 34 35 36 37 38 39 40 41 42 43 44 45 46 47 48 49 50 51 <template>
然后其中职称选择的select可以写死,因为后端也是固定的。然后在js中编写数据即可。
后端接口设计 总体上跟前面前端接口设计一样,就不加以赘述了。
不过这里犯了一个错误,在mapper中进行大小写替换的时候没有全部替换掉,导致报500错,并且在控制台出现如下报错信息:
1 org.apache.ibatis.reflection.ReflectionException: There is no getter for property named 'titlelevel' in 'class com.xgfm.vhr.pojo.JobLevel'
然后我还一直在排查JobLevel中的大小写,后来才发现原来是mapper中的没有进行替换。
前后端对接 前端比较不同的是使用switch开关,别的都比较一致,所以就直接放成功图:
批量删除 批量删除的后端编写也和之前的相类似,需要注意的还是那句话批量删除不要去在service方法里面加个for循环,然后遍历一个个删,要执行SQL全部同时移除
别的跟之前一模一样基本上,不赘述了
放张图:
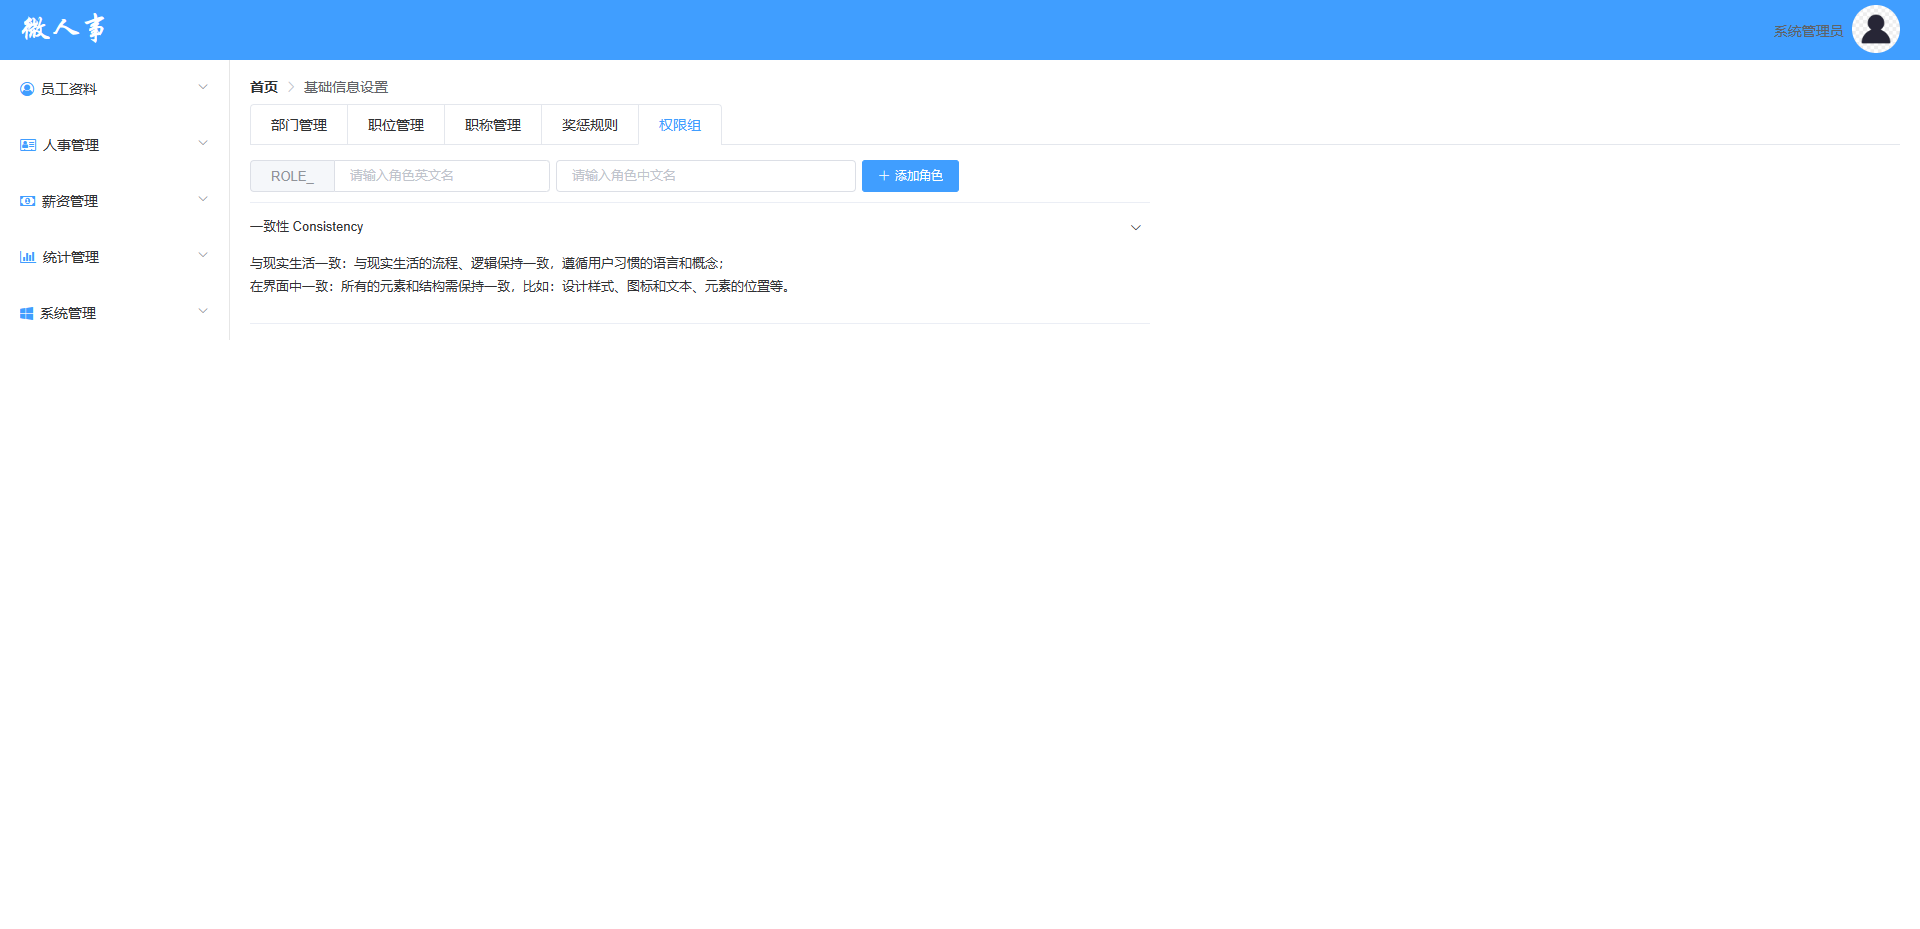
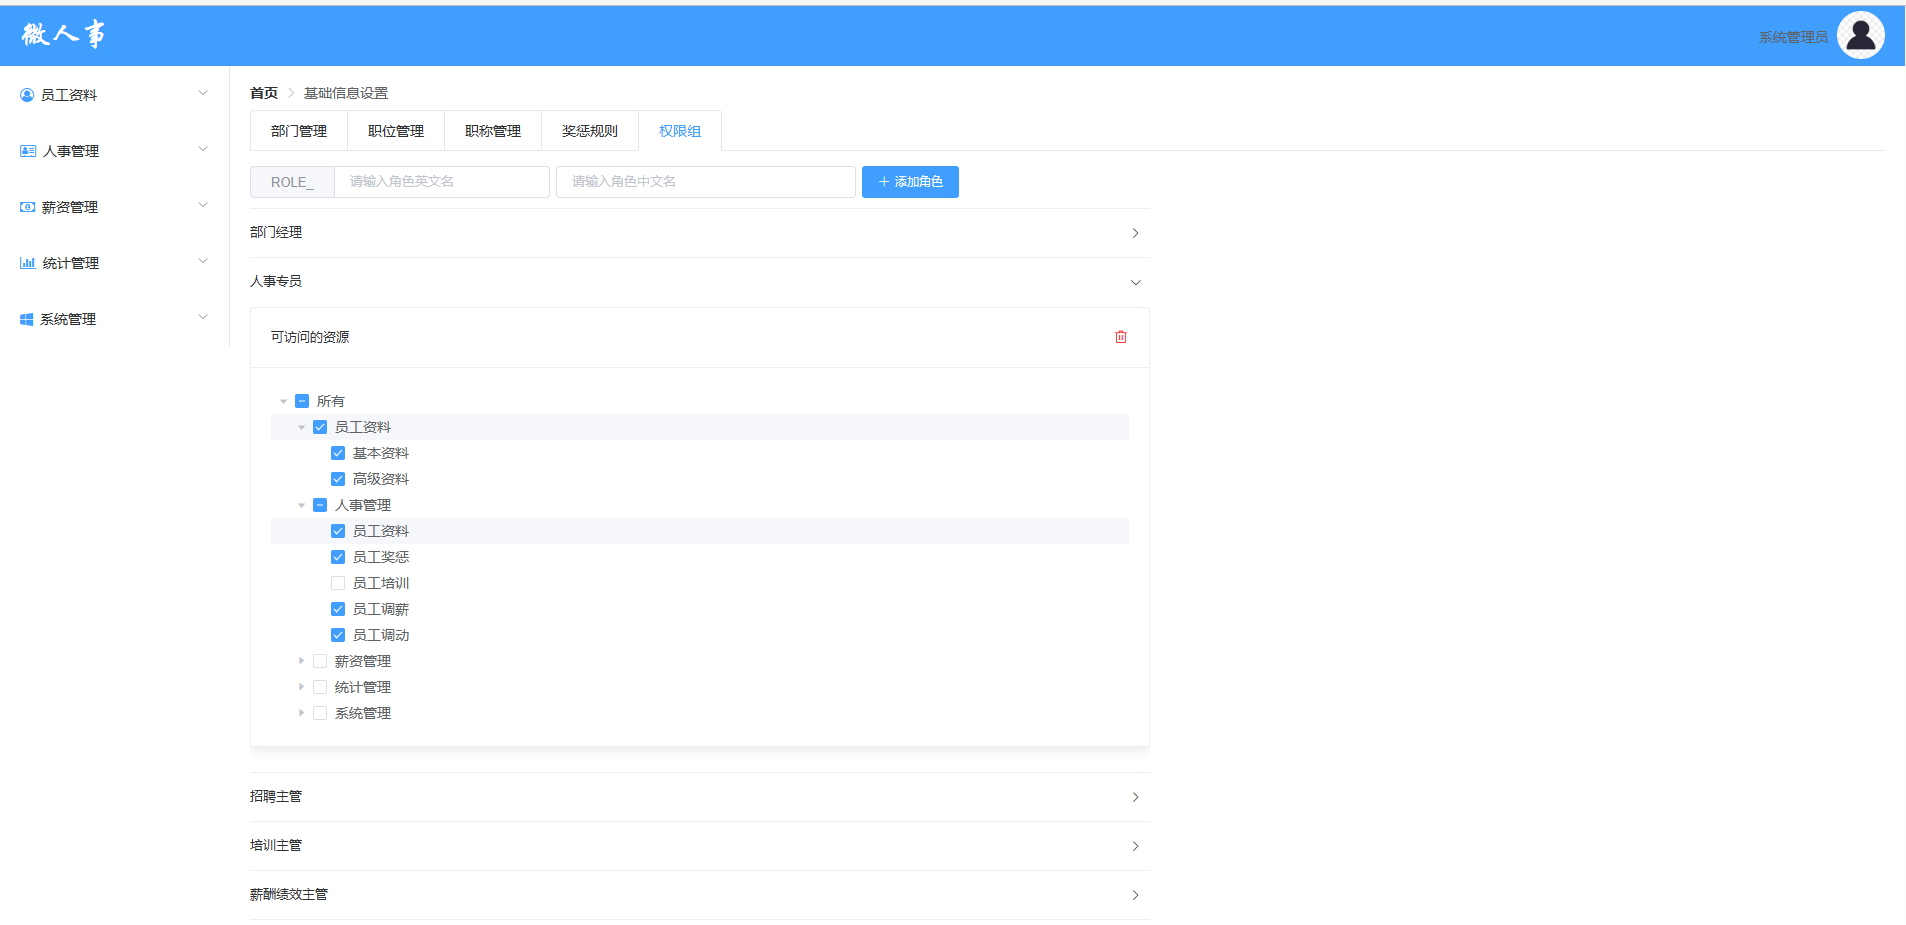
权限组 前端页面设计 首先整理一下业务逻辑。权限组用于设计一个角色拥有访问哪些菜单的权限。
角色及其权限列表使用collapseUI实现,
Collapse 折叠面板,通过折叠面板收纳内容区域。
然后再添加上input和按钮即可,权限角色需要以ROLE_开头(安全管理中的要求),所以需要加前缀。
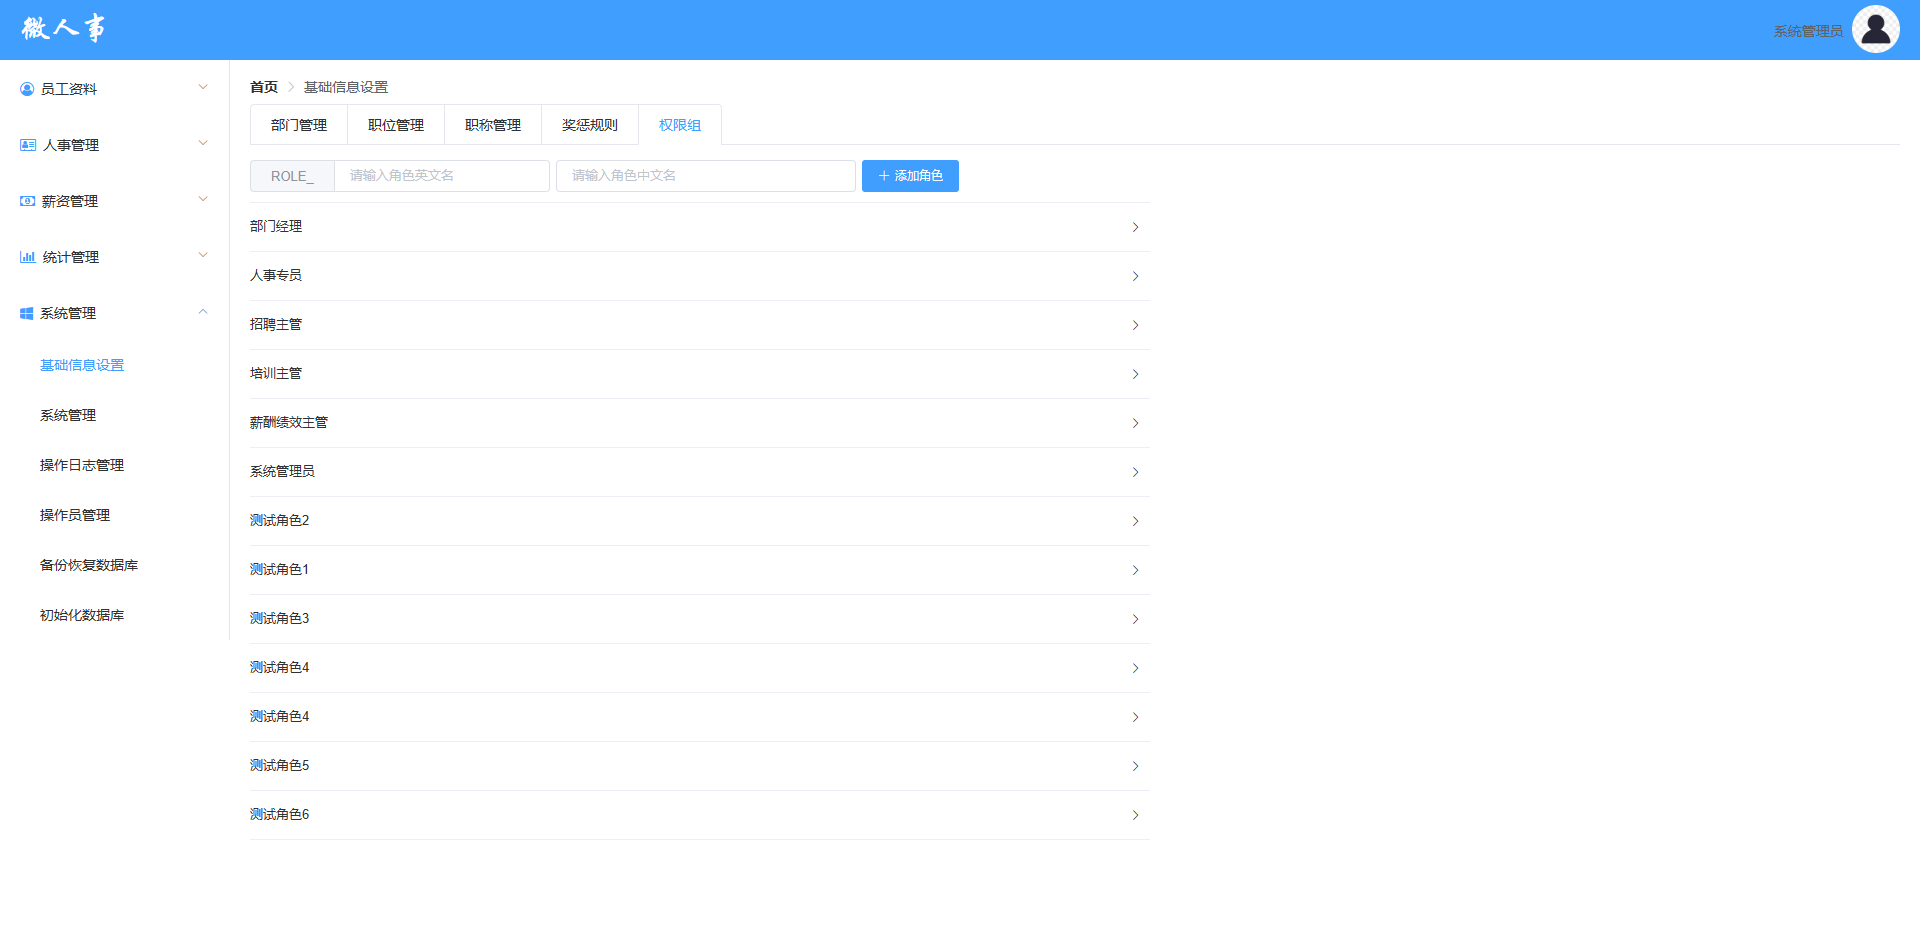
前端成果图:
其中collapse并未进行修改,因为需要根据后端的数据进行动态展示,等后端写好再进行更新。
后端接口设计及前后端对接 正常的编写一个getAllRoles的接口即可。按照controller-service-mapper的步骤来,然后使用postman测试接口。
测试成功后到前端使用for循环展示。
collapse内的东西使用卡片展示
1 2 3 4 5 6 7 8 9 10 11 12 13 <el-collapse accordion>
其中的各自权限还需要再编写接口再进行对接。
后端再编写menuService的方法注入到PermissController之中。其中采用的SQL方法是全部查出来,因为这里的menu基本上是不会变动的,如果需要编写动态的menu则需要编写递归的SQL,来查询出相对应的符合条件的SQL语句。
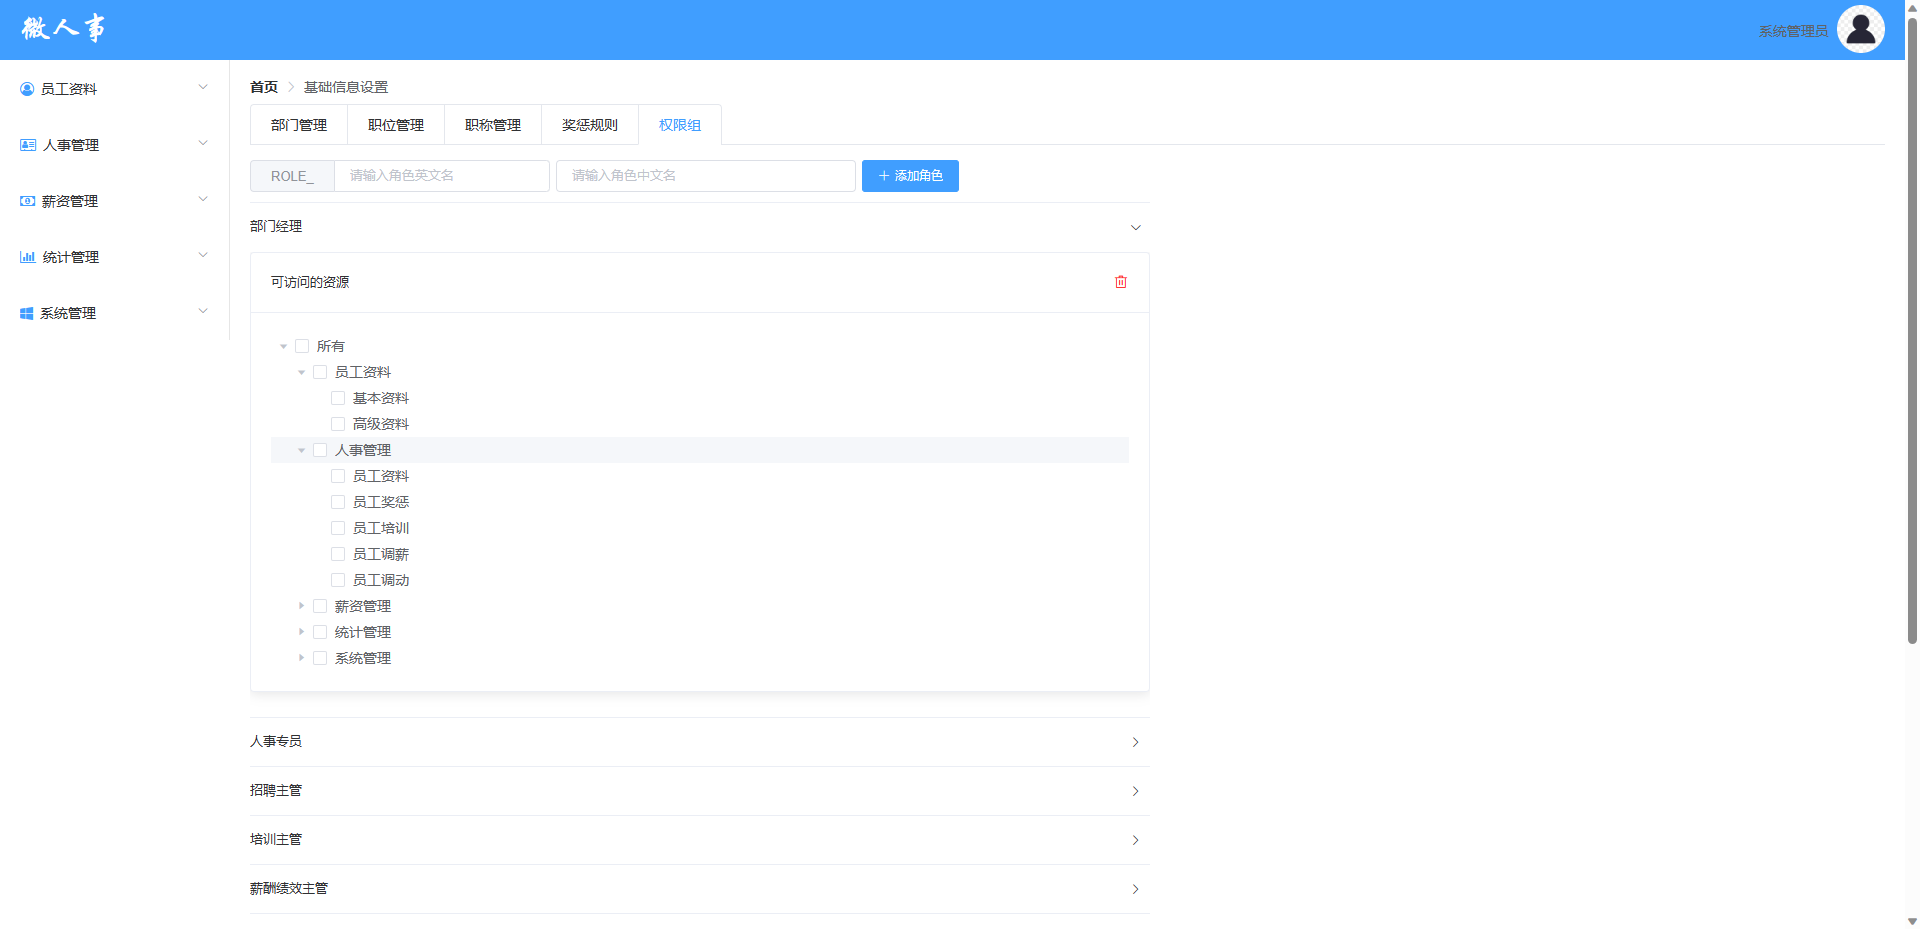
使用ELUI中的Tree树形控件将各自权限展示在前端,
1 2 3 4 5 6 7 8 9 10 11 12 13 <el-collapse accordion @change="change">
目前效果:
现在缺少一个添加预选中的功能。
添加预选功能 如果写死的话代码如下:
1 <el-tree :data="allmenus" :props="defaultProps" show-checkbox node-key="id" :default-checked-keys="[7,8,9]"></el-tree>
但是因为每个角色的权限是不同的那么default-checked-keys中的数字就需要根据后端提供的数据进行动态的修改了。
后端接口需要前端传回rid,然后才能进行下一步操作
1 2 3 <select id ="getMidsByRid" resultType ="java.lang.Integer" > </select >
然后将rid数组传回前端。
js的前端方法:
1 2 3 4 5 6 7 8 9 10 11 12 13 14 15 16 17 18 19 20 change (rid ){if (rid){this .initAllMenus ();this .initSelectedMenus (rid);initAllMenus (this .getRequest ("/system/basic/permiss/menus" ).then (resp =>if (resp){this .allmenus =resp;initSelectedMenus (rid ){this .getRequest ("/system/basic/permiss/mids/" +rid).then (resp =>if (resp){this .selectedMenus =resp;
通过这3个方法来完成数据的刷新,其中的change方法是tree树形控件自带的点击事件。
这样就完成了添加预选的功能。
添加角色权限修改的功能 使用tree树形控件的getCheckedKeys方法来获取到被选择的节点。
因为我们仅仅需要获取叶子节点的keys即可,一级目录的作用仅仅是用来分类的而已,所以在这需要添加参数true。
那么前端的操作就到此结束了。
后端操作需要将前端传过来的数组全部更新掉,那么操作就是根据rid把已经有的id全部删除掉,然后根据传回来的权限的数组进行全部插入,即可完成修改。
1 2 3 4 5 6 @Transactional public boolean updateMenuRole (Integer rid, Integer[] mids) {return result==mids.length;
这个是service的方法,@Transactional注解用于发生错误时回滚事务,避免出现无法添加但是已经删除的数据错误。
前端对接:
1 2 3 4 5 6 7 8 9 10 11 12 13 14 doUpdate (rid,index ){let tree = this .$refs .tree [index];let selectedKeys = tree.getCheckedKeys (true );let url='/system/basic/permiss/?rid=' +rid;forEach (key =>'&mids=' +key;this .putRequest (url).then (resp =>if (resp){this .initRoles ();this .activeName =-1 ;
编写对应的js方法即可,然后就是每次权限修改完成后能够自动跳转回到最开始的状态,需要给collapse绑定model
1 <el-collapse accordion @change="change" v-model="activeName">
activeName默认值设置为-1,即都不打开,更新完的时候再将activeName设置成-1即可。
BUG发现 发现一个bug,但是不知道是不是松哥后面会处理的,而且我的班长的blog也没有说这个bug
发现一个这样写的bug,松哥可能也没发现,也可能后面进行处理了,就是全部不选的时候后端会报错,我自己看了一下,这是因为如果全部不选的话,mids数组为空,那么后端的插入代码就无法运行了。
然后我就把后端的代码进行了一下修改,修改成如下:
1 2 3 4 5 6 7 8 9 10 11 @Transactional public boolean updateMenuRole (Integer rid, Integer[] mids) {1 ;if (mids!=null ){return result==mids.length;else {return true ;
但是这样好像也有问题,如果前端mids啥也没传回来的话(mids数据丢失的话),还是会正常运行,直接删光权限。
权限组角色添加 首先编写添加接口,直接使用mybatisX自动生成的代码即可。
前端编写js方法调用对应接口即可
1 2 3 4 5 6 7 8 9 10 11 12 13 doAddRole (if (this .role .name && this .role .nameZh ){this .postRequest ("/system/basic/permiss/role" ,this .role ).then (resp =>if (resp){this .role .name ='' ;this .role .nameZh ='' ;this .initRoles ();else {this .$message .error ("数据不可为空" )
期间发现如果打开完一个权限角色再打开另一个会有缓存存在,这时候需要使用:key=”index”来给tree绑定,表明每个tree是不同的即可。
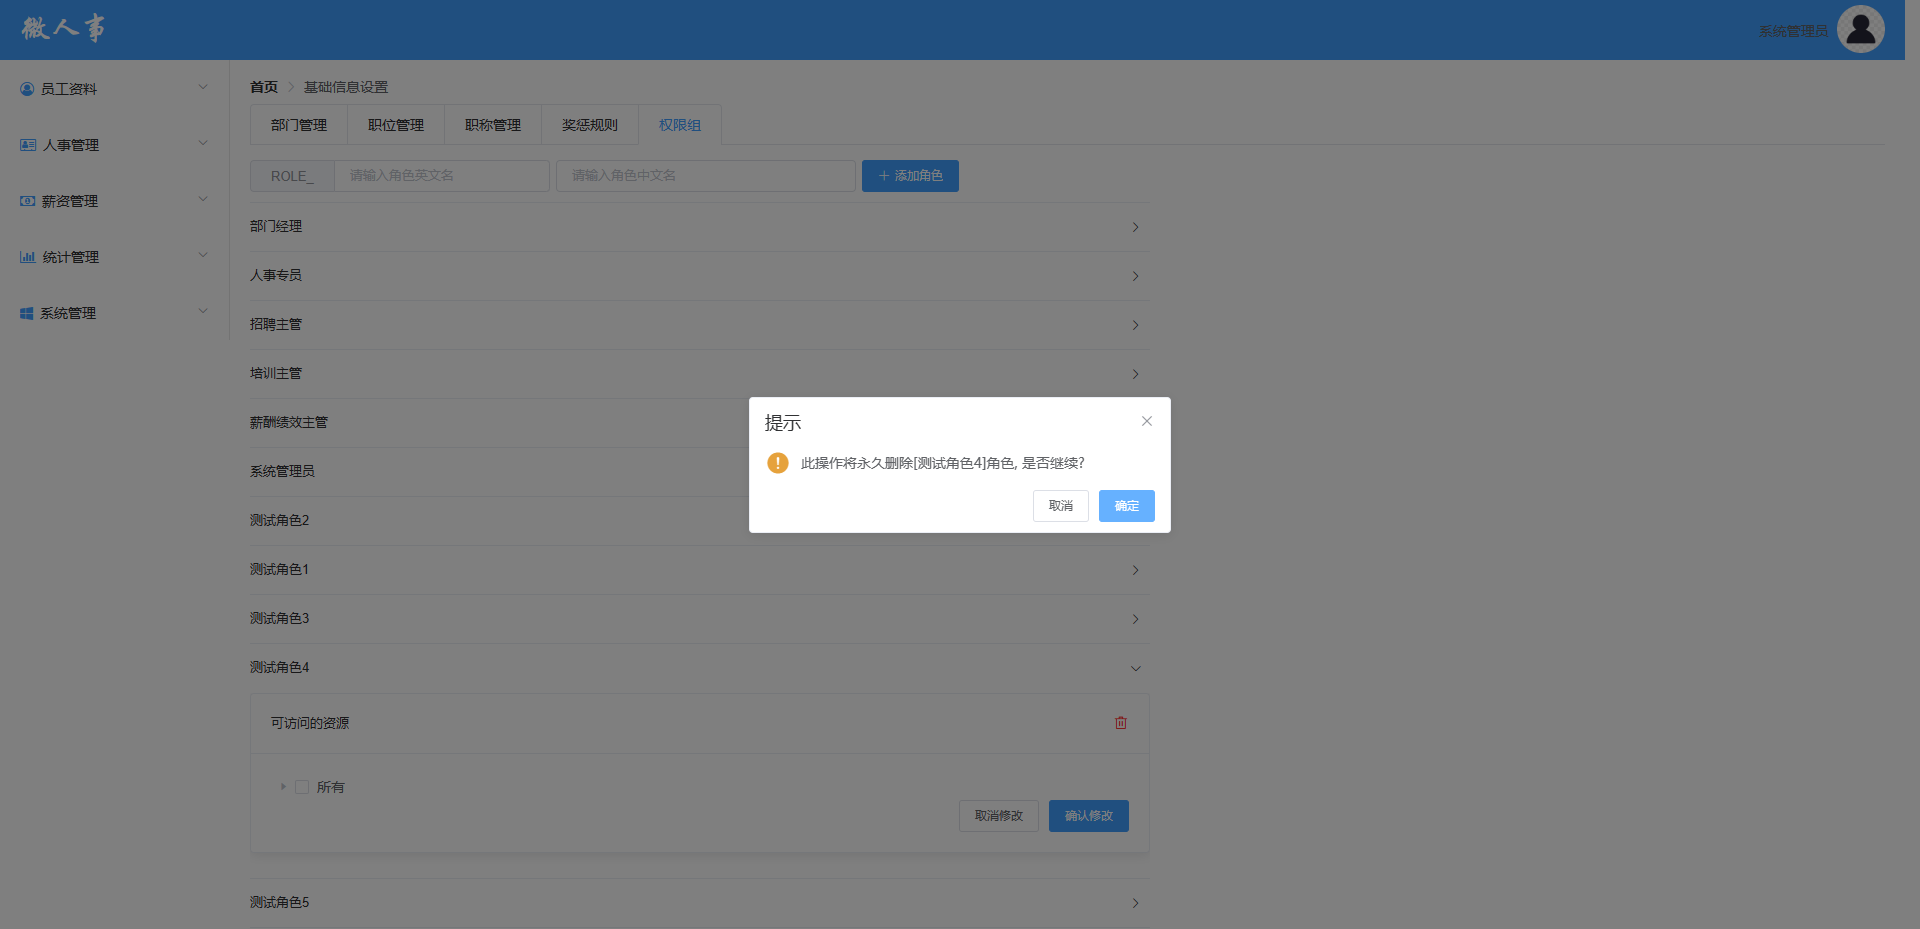
权限组角色删除 总的来说和添加相似,从接口开始写到前端实现。
1 2 3 4 5 6 7 @DeleteMapping("/role/{rid}") public RespBean deleteRoleById (@PathVariable Integer rid) {if (roleService.deleteRoleById(rid)==1 ){return RespBean.ok("权限组角色删除成功!!" );return RespBean.error("权限组角色删除失败!!" );
绑定js删除事件到icon的button按钮上面,完成删除操作并且刷新页面。
1 2 3 4 5 6 7 8 9 10 11 12 13 14 15 16 17 18 deleteRole (role ){this .$confirm('此操作将永久删除[' +role.nameZh +']角色, 是否继续?' , '提示' , {confirmButtonText : '确定' ,cancelButtonText : '取消' ,type : 'warning' then (() => {this .deleteRequest ("/system/basic/permiss/role/" +role.id ).then (resp =>if (resp){this .initRoles ();catch (() => {this .$message({type : 'info' ,message : '已取消删除'
登录问题解决 如果后端服务器重启之后,前端页面依旧可以操作,但是session已经失效(或者默认30分钟之后,session过期),无法操作,500错误。
首先在SecurityConfig中添加状态码回应:
1 response.setStatus(401 );
然后在api.js中进行处理
1 2 3 4 else if (error.response .status ==401 ){Message .error ({message :'尚未登陆,请登录' })replace ('/' );
设置当状态码为401时跳转回初始页面。
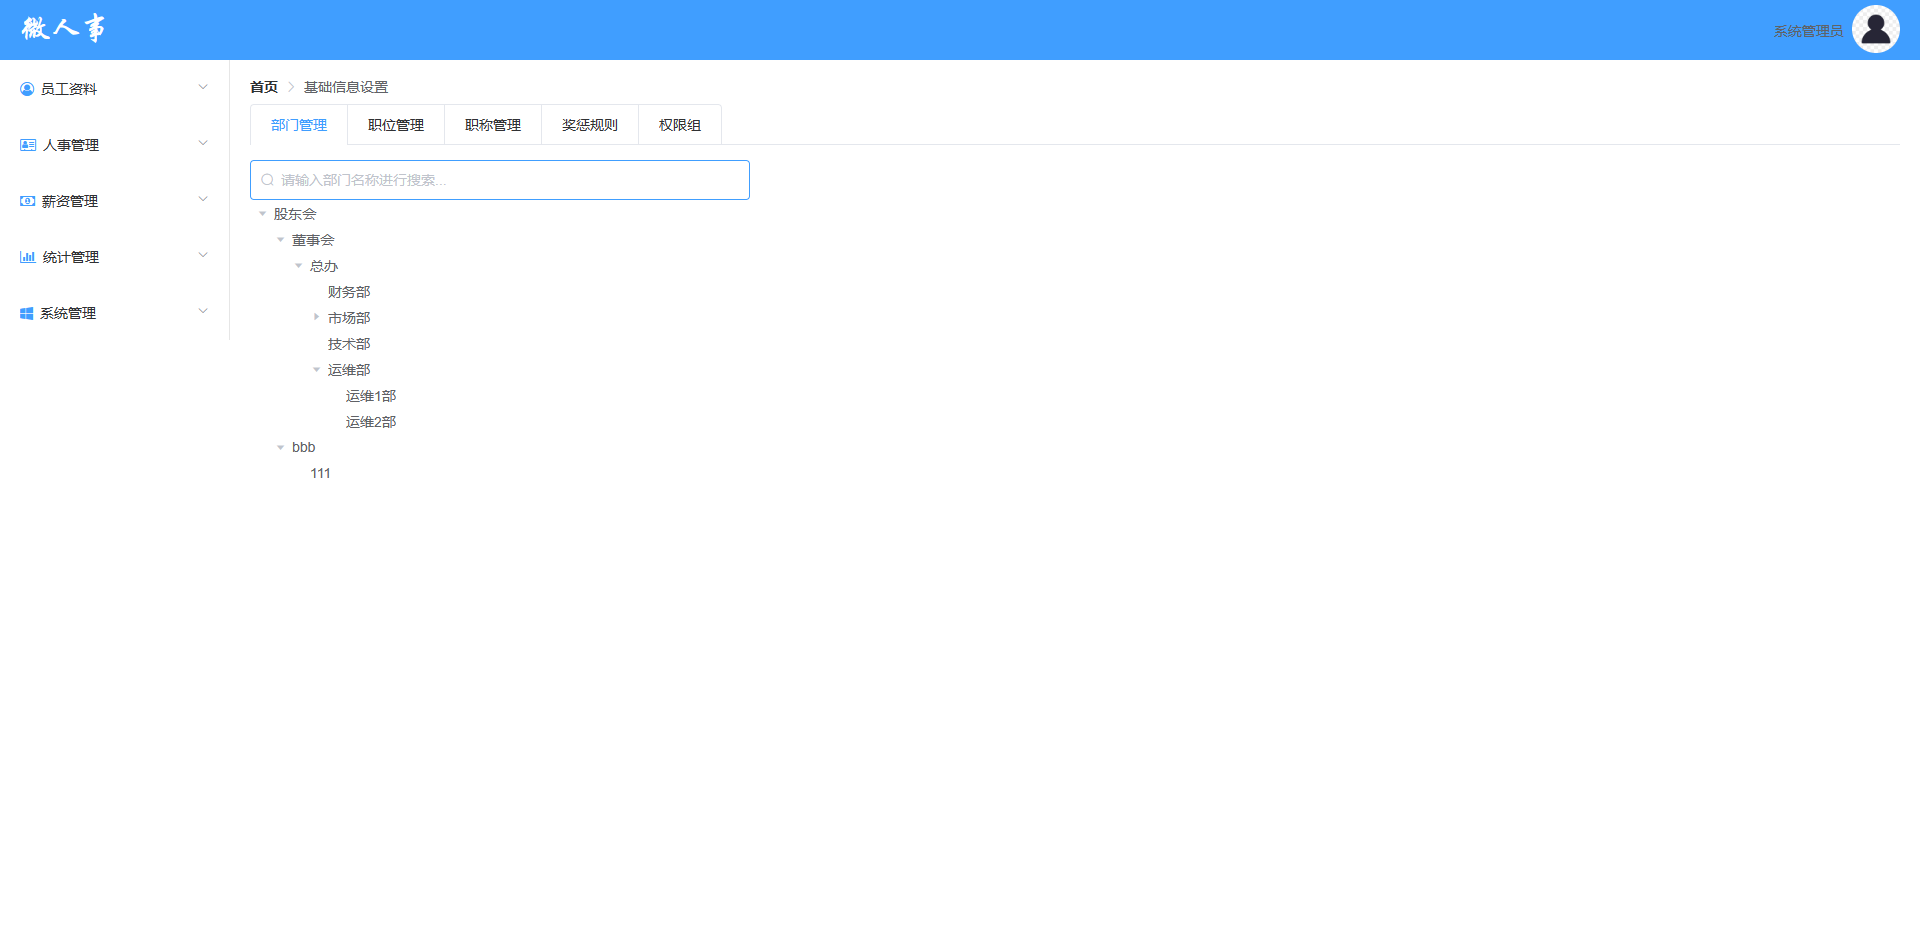
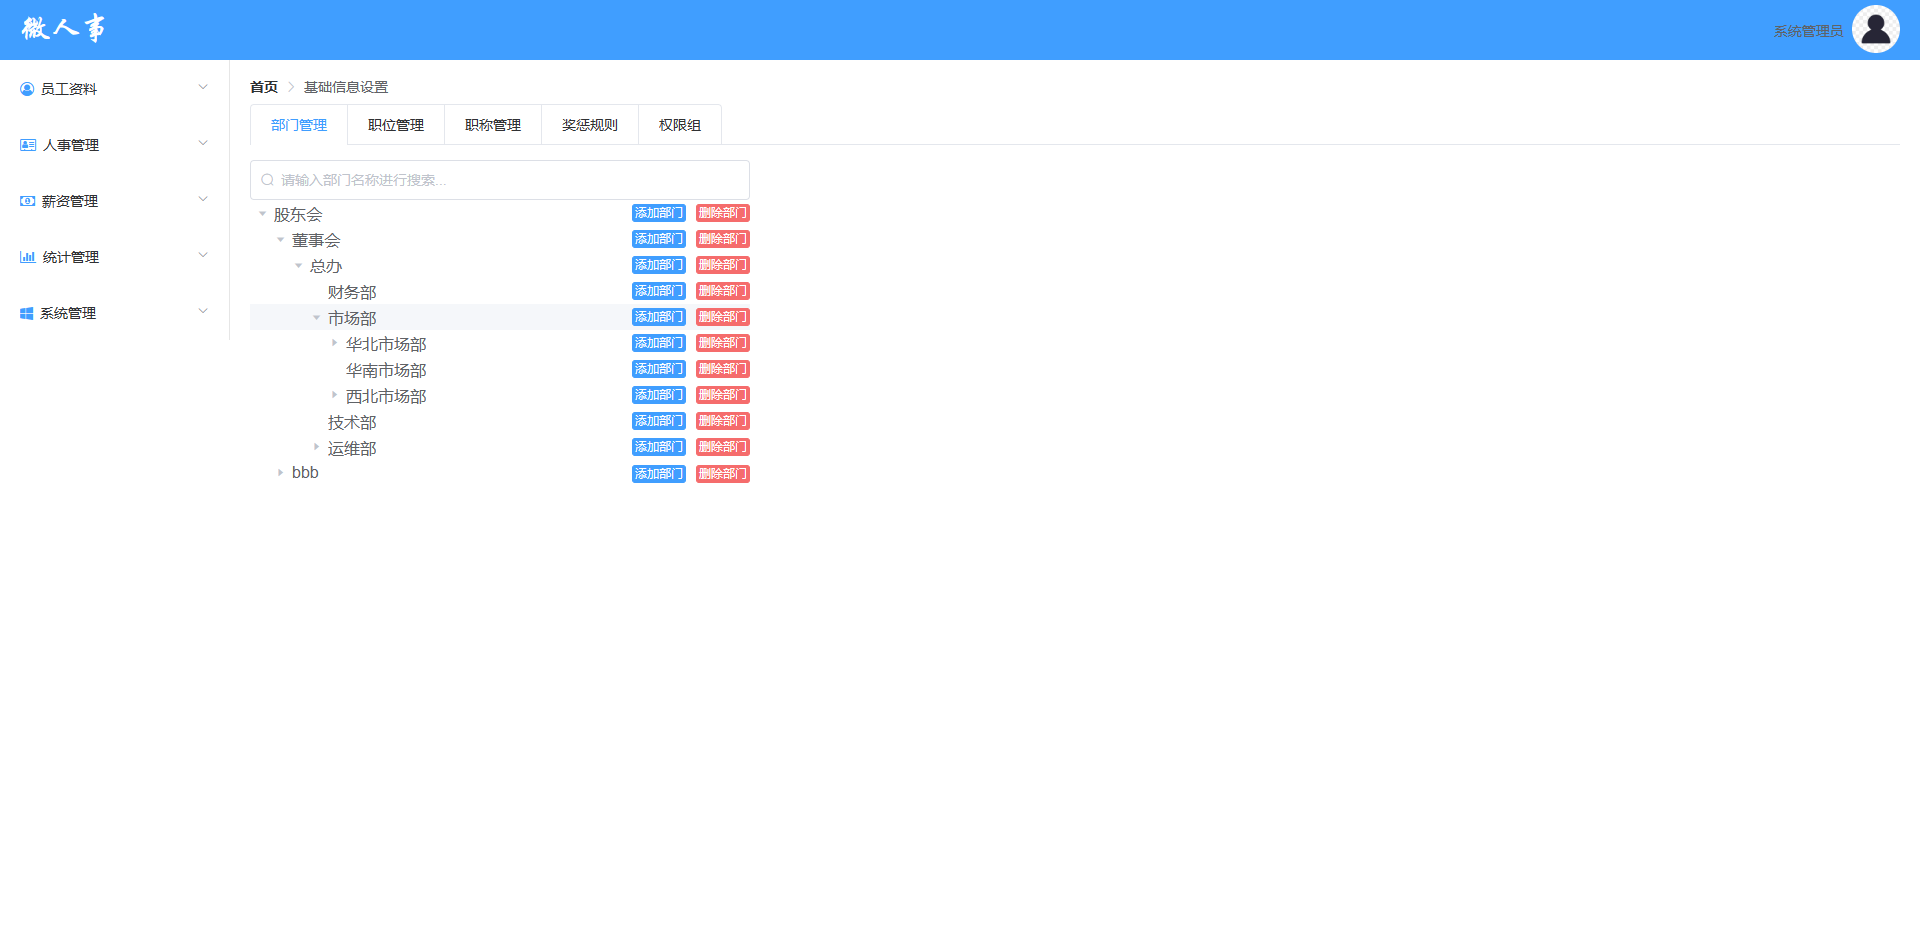
部门管理 这次从后端接口开始写,因为部门管理是动态的,并且修改复杂,而前端也是使用树形控件进行显示。并且使用json获得全部数据显示,而不是懒加载。
全部数据查询显示后端接口 为了能够一次获得全部数据的json,在后端接口会使用递归进行处理。
使用递归是因为比较简单,并且部门一般来说不会太多。如果部门实在过多,导致递归过于浪费资源,那么就使用懒加载就不会有这种问题,但是会导致前端比较麻烦。
进行pojo类的属性名调整的时候,发现idea自动设置的isParent字段的get和set方法名为xxxParent,导致mapper.xml中找不到isParent属性了,所以需要对get和set方法进行一下处理。
1 2 3 <resultMap id ="DepartmentWithChildren" type ="com.xgfm.vhr.pojo.Department" extends ="BaseResultMap" > <collection property ="children" ofType ="com.xgfm.vhr.pojo.Department" select ="com.xgfm.vhr.mapper.DepartmentMapper.getAllDepartmentsByParentId" column ="id" /> </resultMap >
就是这个collection标签select没怎么用过,和懒加载有关。放一下。
别的都和其他一样从controller到service到mapper正常编写即可。
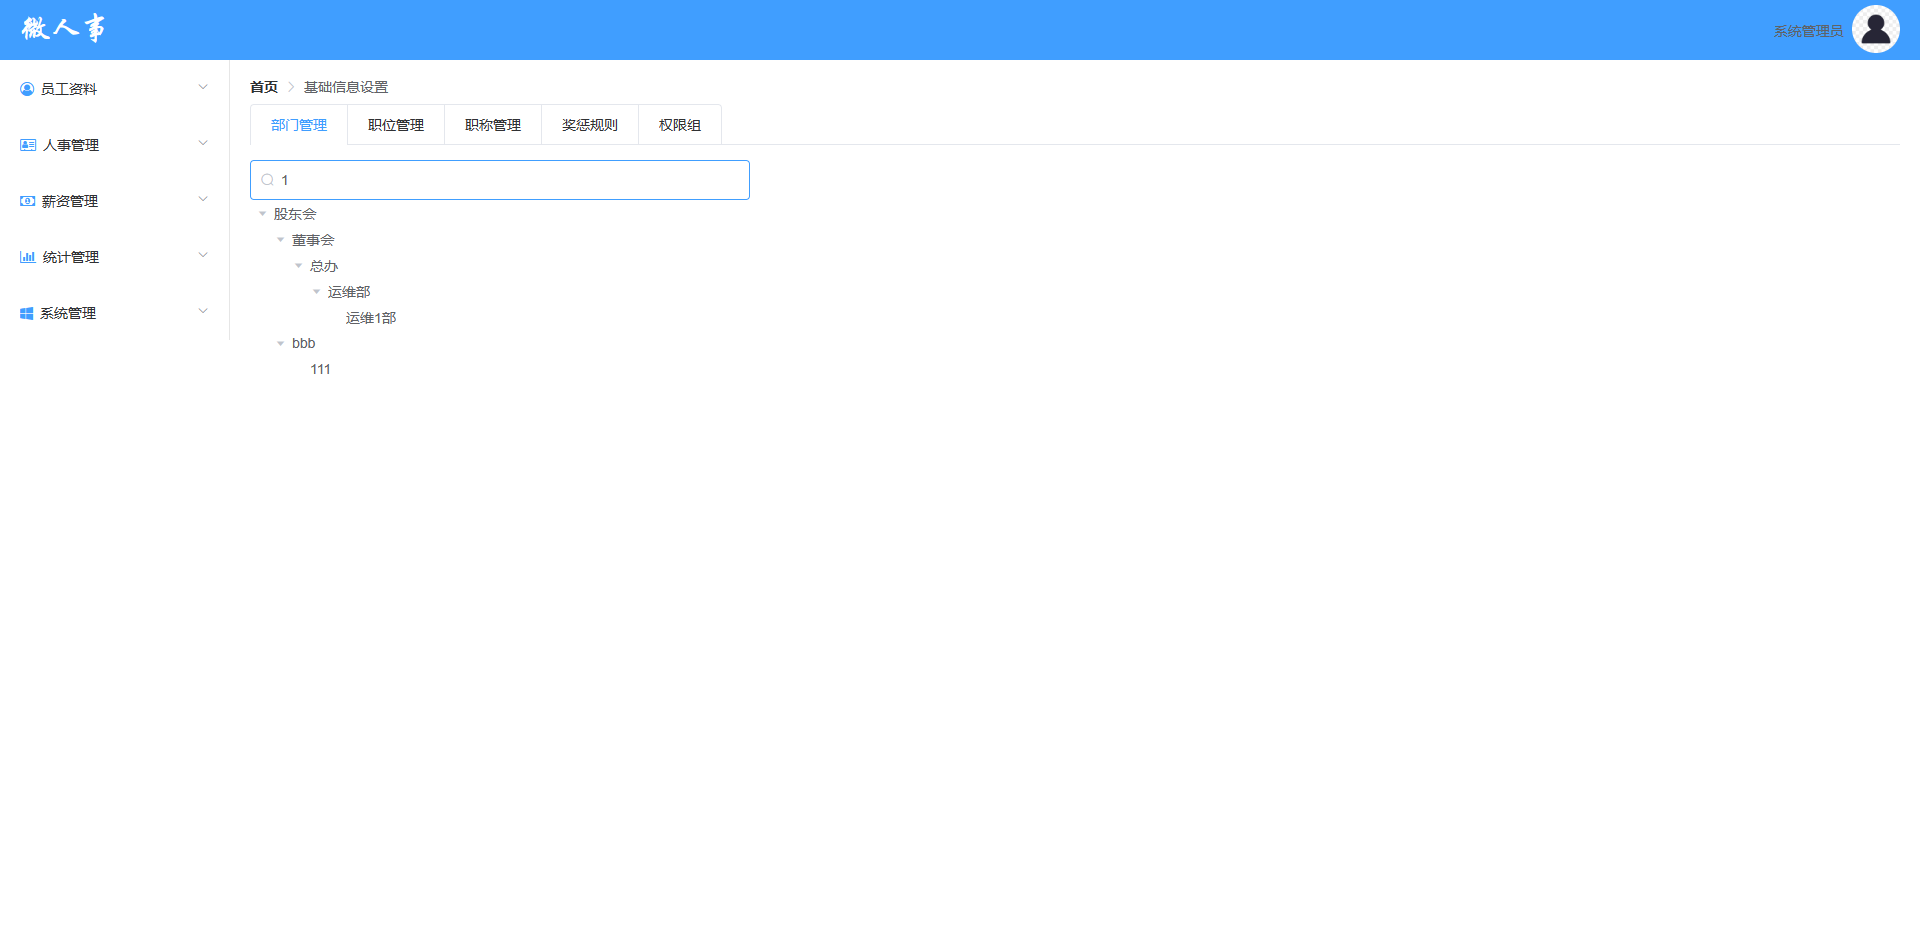
数据查询显示前端设计与对接 依旧使用tree控件,再说一下defaultProps
1 2 3 4 defaultProps : {children : 'children' ,label : 'name'
这里children是子树的节点名,label是自己的节点名。
这个属性可以让ELUI知道如何排序。
1 2 3 4 5 watch : {filterText (val ) {this .$refs .tree .filter (val);
添加的新的方法。
watch,监控器,当filterText发生变化,其中的代码就会自动执行。this.$refs.tree.filter(val);用于获取树形控件,并调用其中的过滤的方法。
1 2 3 4 5 <el-tree
可以看到过滤方法为filterNode
1 2 3 4 filterNode (value, data ) {if (!value) return true ;return data.label .indexOf (value) !== -1 ;
其中的label需要修改为name,原因是defaultProps中定义的名称。这个方法是进行遍历并且返回值为true则保留,false则剔除,data.label.indexOf(value)是指data.label.index中不包含value则为-1。
成果图:
部门树添加与删除 前端页面添加与删除按钮 可以使用render-content和scoped slot进行处理。
这里我们使用scoped slot
1 2 3 4 5 6 7 8 9 10 11 12 13 14 15 16 17 <span class="custom-tree-node" style="display: flex;justify-content: space-between;width: 100%;" slot-scope="{ node, data }">
将这段代码添加到el-tree之中即可,样式使用padding使得前端更加美观一些。
然后给el-tree绑定:expand-on-click-node=”false”,使得只有点击文字前的箭头才会展开或收缩tree。
最后绑n按钮对应的js代码,然后置空,等后端编写后填入相对应的js代码。
前端页面:
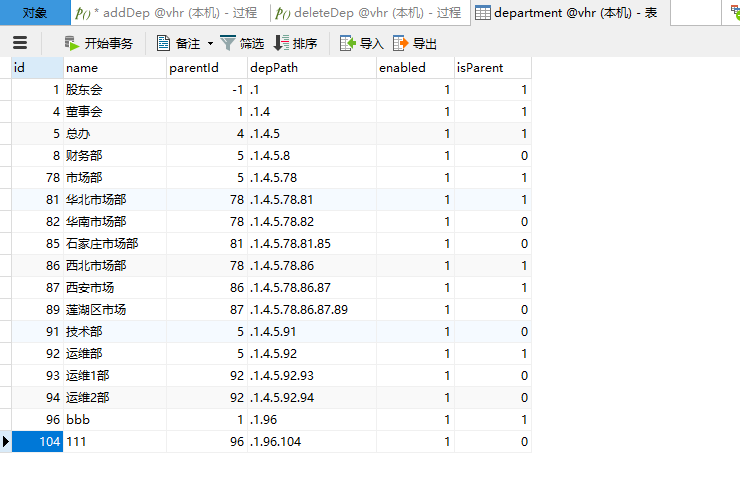
动态修改–添加的实现 放一下数据库中的department表。
后端接口设计还是从controller–service–mapper-xml。
前端传来的数据为name和parentId,2项。
这里的难点是数据库的级联操作,数据操作需要进行一系列的操作,第一步,首先插入新的数据到数据库中,第二步,depPath的数据需要寻找parent的depPath进行修改并插入,第三步,根据传入的parentId找到parent并且将其isParent的属性修改为true(1)。
其中有俩种方法:
在service中使用多句SQL的mapper进行操作,并且开启事务,确保代码执行的成功。
在mysql的数据库中设置addDep函数(存储进程),类似触发器,在mapper中使用SQL的步骤改为使用该addDep函数。
这个与之前的方法非常不同,函数我目前也并不是很了解,可以看看这个存储过程
1 2 3 4 <select id ="addDep" statementType ="CALLABLE" > </select >
使用存储进程(函数)在mybatis中要使用select的标签。
下面是addDep的存储过程。
1 2 3 4 5 6 7 8 9 10 11 begin declare did int ;declare pDepPath varchar (64 );insert into department set name= depName,parentId= parentId,enabled= enabled;select row_count() into result ;select last_insert_id() into did;set result2= did;select depPath into pDepPath from department where id= parentId;update department set depPath= concat(pDepPath,'.' ,did) where id= did;update department set isParent= true where id= parentId;end
mapper.xml中的格式对应其中的输出。
这里我们使用第二种方法,俩者都有利弊(比如第二种的方法如果要切换数据库,存储函数需要重新编写),这里使用第二种的方法更多为了掌握更多的知识。
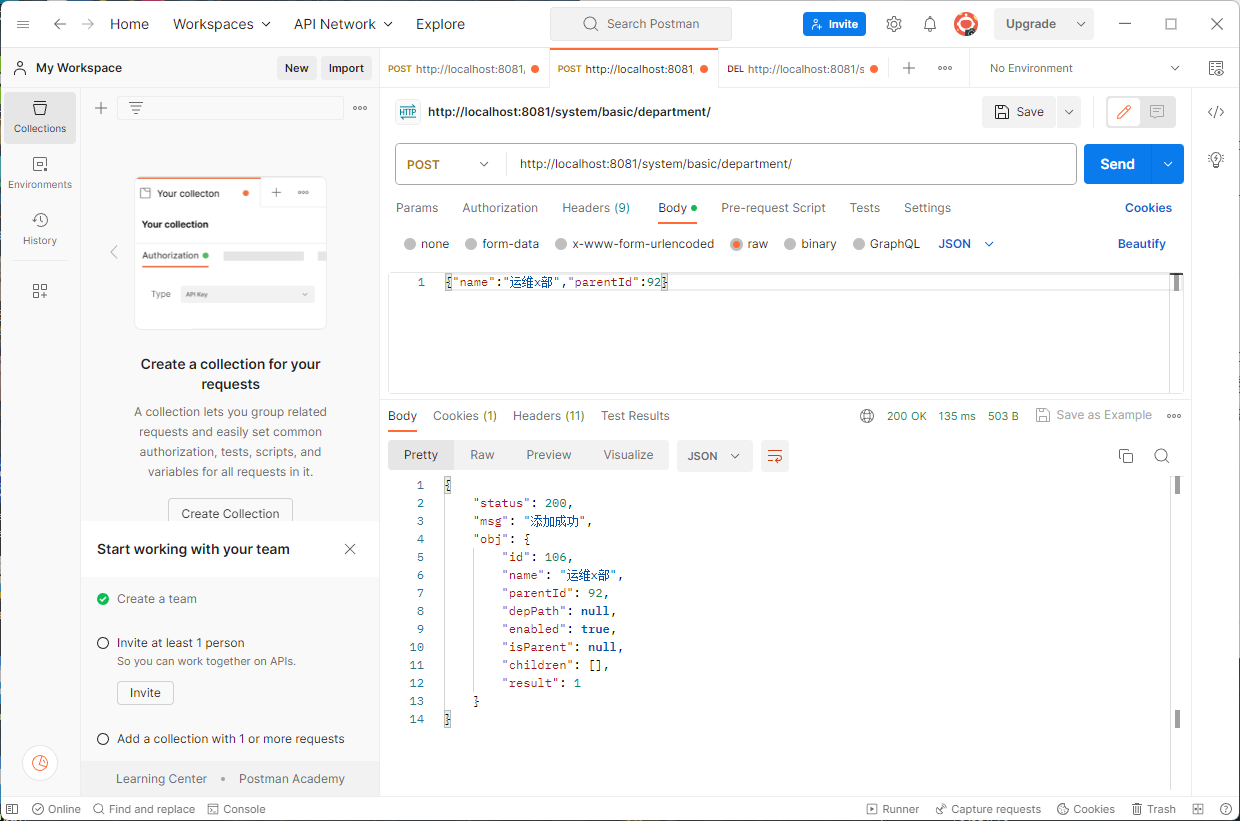
然后使用postman对后端接口进行测试。
至此,后端接口设计完成。
然后进行前后端对接。
添加按钮的操作界面使用dialog进行处理。
绑定对应的添加按钮即可
1 2 3 4 5 6 7 8 9 10 11 12 13 14 15 16 17 18 19 20 addDep2Deps (deps,dep ){for (let i=0 ;i<deps.length ;i++){let d=deps[i];if (d.id ==dep.parentId ){children =d.children .concat (dep);return ;else {this .addDep2Deps (d.children ,dep)doAddDep (this .postRequest ("/system/basic/department/" ,this .dep ).then (resp =>if (resp){this .addDep2Deps (this .deps ,resp.obj );this .dialogVisible =false ;this .initDep ();
原本doAddDep的刷新方法是使用initDeps进行刷新,但是重新获取数据会导致树形控件回缩至根节点,所以使用addDep2Deps方法来取代initDeps进行动态刷新tree来完成添加的效果。
动态修改–删除的实现 后端接口的数据库中的级联操作同样有两种方法。这里依旧使用存储过程(函数)来完成操作。
级联操作包含,查询子部门,查询部门中是否有员工,有员工和子部门的话应该返回对应的提示,并且使得删除操作失败,并且查询父部门的子部门如果父部门只有自己一个子部门,删除自己后,还需要将父部门的的isParent字段改为0(false)
1 2 3 4 5 6 7 8 9 10 11 12 13 14 15 16 17 18 19 20 begin declare ecount int ;declare pid int ;declare pcount int ;declare a int ;select count (* ) into a from department where id= did and isParent= false ;= 0 then set result = -2 ;else select count (* ) into ecount from employee where departmentId= did;> 0 then set result = -1 ;else select parentId into pid from department where id= did;delete from department where id= did and isParent= false ;select row_count() into result ;select count (* ) into pcount from department where parentId= pid;= 0 then update department set isParent= false where id= pid;end if;end if;end if;end
1 2 3 <select id ="deleteDepById" statementType ="CALLABLE" > </select >
因为根据result的返回值来确定是什么状态,需要根据result的值来确认message该返回的信息。
1 2 3 4 5 6 7 8 9 10 11 12 13 14 @DeleteMapping("/{id}") public RespBean deleteDepById (@PathVariable Integer id) {new Department ();if (dep.getResult()==-2 ){return RespBean.error("该部门下有子部门,删除失败" );else if (dep.getResult()==-1 ){return RespBean.error("该部门中有员工,删除失败" );else if (dep.getResult()==1 ){return RespBean.ok("部门删除成功" );return RespBean.error("部门删除失败" );
然后进行postman接口测试即可。
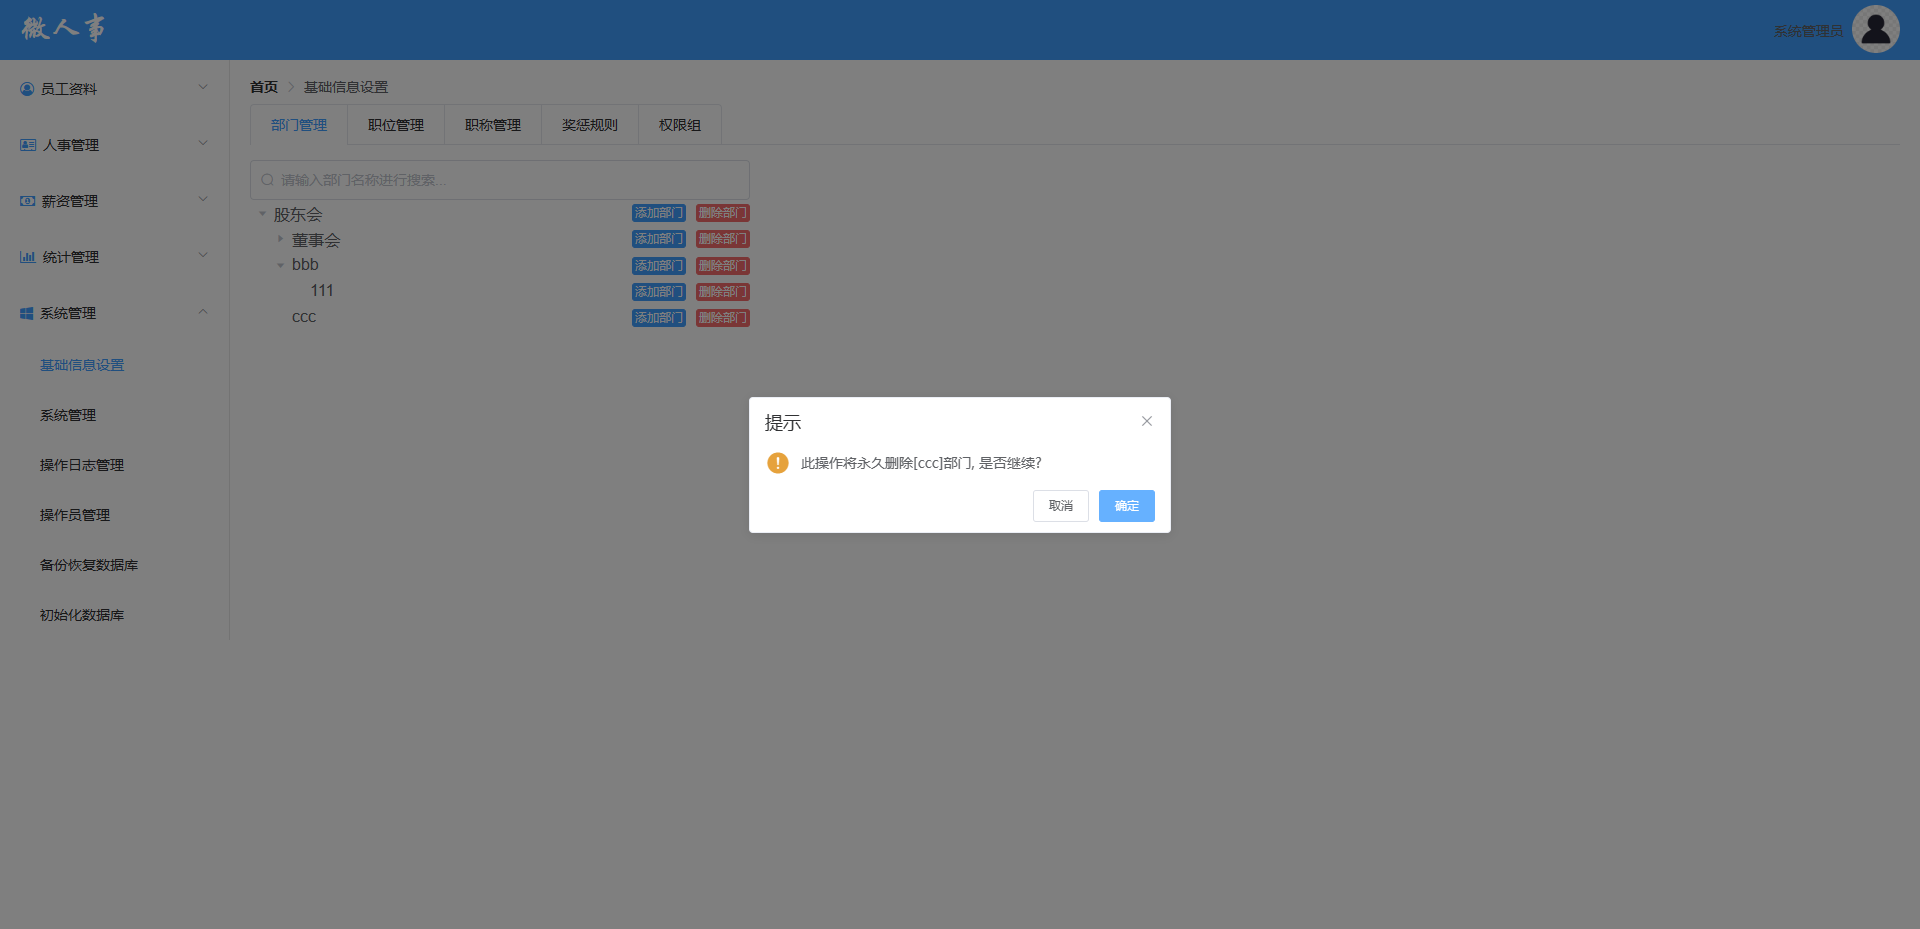
前端对接,使用messageBox弹窗即可,动态删除也需要重新编写一个方法并且调用。
1 2 3 4 5 6 7 8 9 10 11 12 13 14 15 16 17 18 19 20 21 22 23 24 25 26 27 28 29 30 31 32 33 removeDepFromDeps (deps,id ){for (let i=0 ;i<deps.length ;i++){let d=deps[i];if (d.id == id){console .log (id)return ;else {this .removeDepFromDeps (d.children ,id);deleteDep (data ){if (data.isParent ){this .$message .error ("是父部门,删除失败" )else {this .$confirm('此操作将永久删除[' +data.name +']部门, 是否继续?' , '提示' , {confirmButtonText : '确定' ,cancelButtonText : '取消' ,type : 'warning' then (() => {this .deleteRequest ("/system/basic/department/" +data.id ).then (resp =>if (resp){this .removeDepFromDeps (this .deps ,data.id );catch (() => {this .$message({type : 'info' ,message : '已取消删除'
成果图展示:
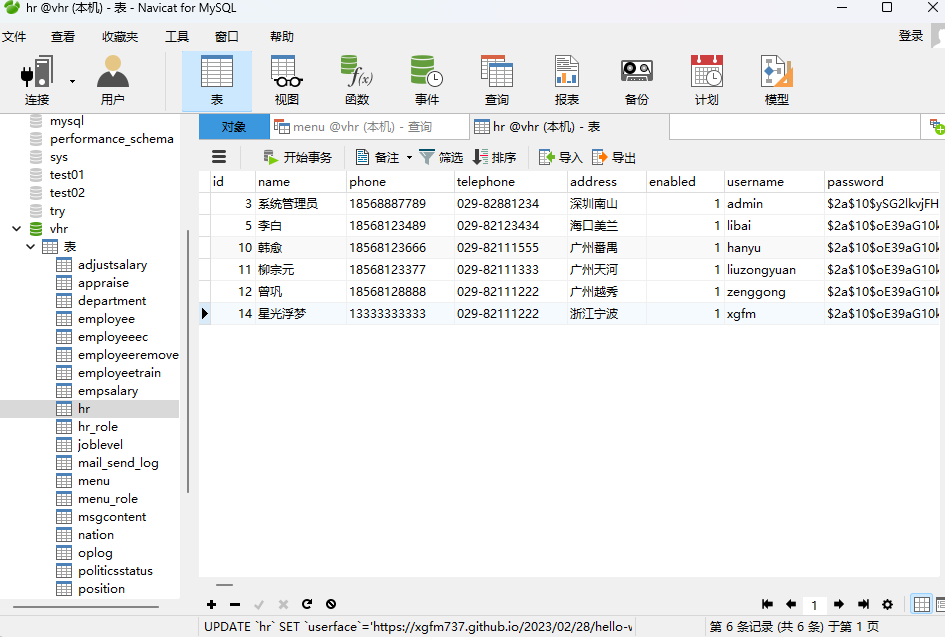
操作员管理 获取Hr后端接口设计 编写HrController中的getAllHrs方法,因为前端页面显示不需要显示自己的职位等其他操作,所以需要通过SpringSecurity来将获取到自己的id,并且将自己排除在外。
1 2 3 public List<Hr> getAllHrs () {return hrMapper.getAllHrs(HrUtils.getCurrentHr().getId());
并且编写工具类HrUtils
1 2 3 4 5 public class HrUtils {public static Hr getCurrentHr () {return ((Hr) SecurityContextHolder.getContext().getAuthentication().getPrincipal());
然后编写SQL语句。
1 2 3 4 5 6 7 8 9 10 11 12 13 14 15 16 17 18 19 20 21 22 23 24 25 26 27 28 29 <resultMap id ="HrWithRoles" type ="com.xgfm.vhr.pojo.Hr" extends ="BaseResultMap" > <collection property ="roles" ofType ="com.xgfm.vhr.pojo.Role" > <id column ="rid" property ="id" /> <result column ="rname" property ="name" /> <result column ="rnameZh" property ="nameZh" /> </collection > </resultMap > <select id ="getAllHrs" resultMap ="HrWithRoles" > </select >
完成后端接口,使用postman进行测试。
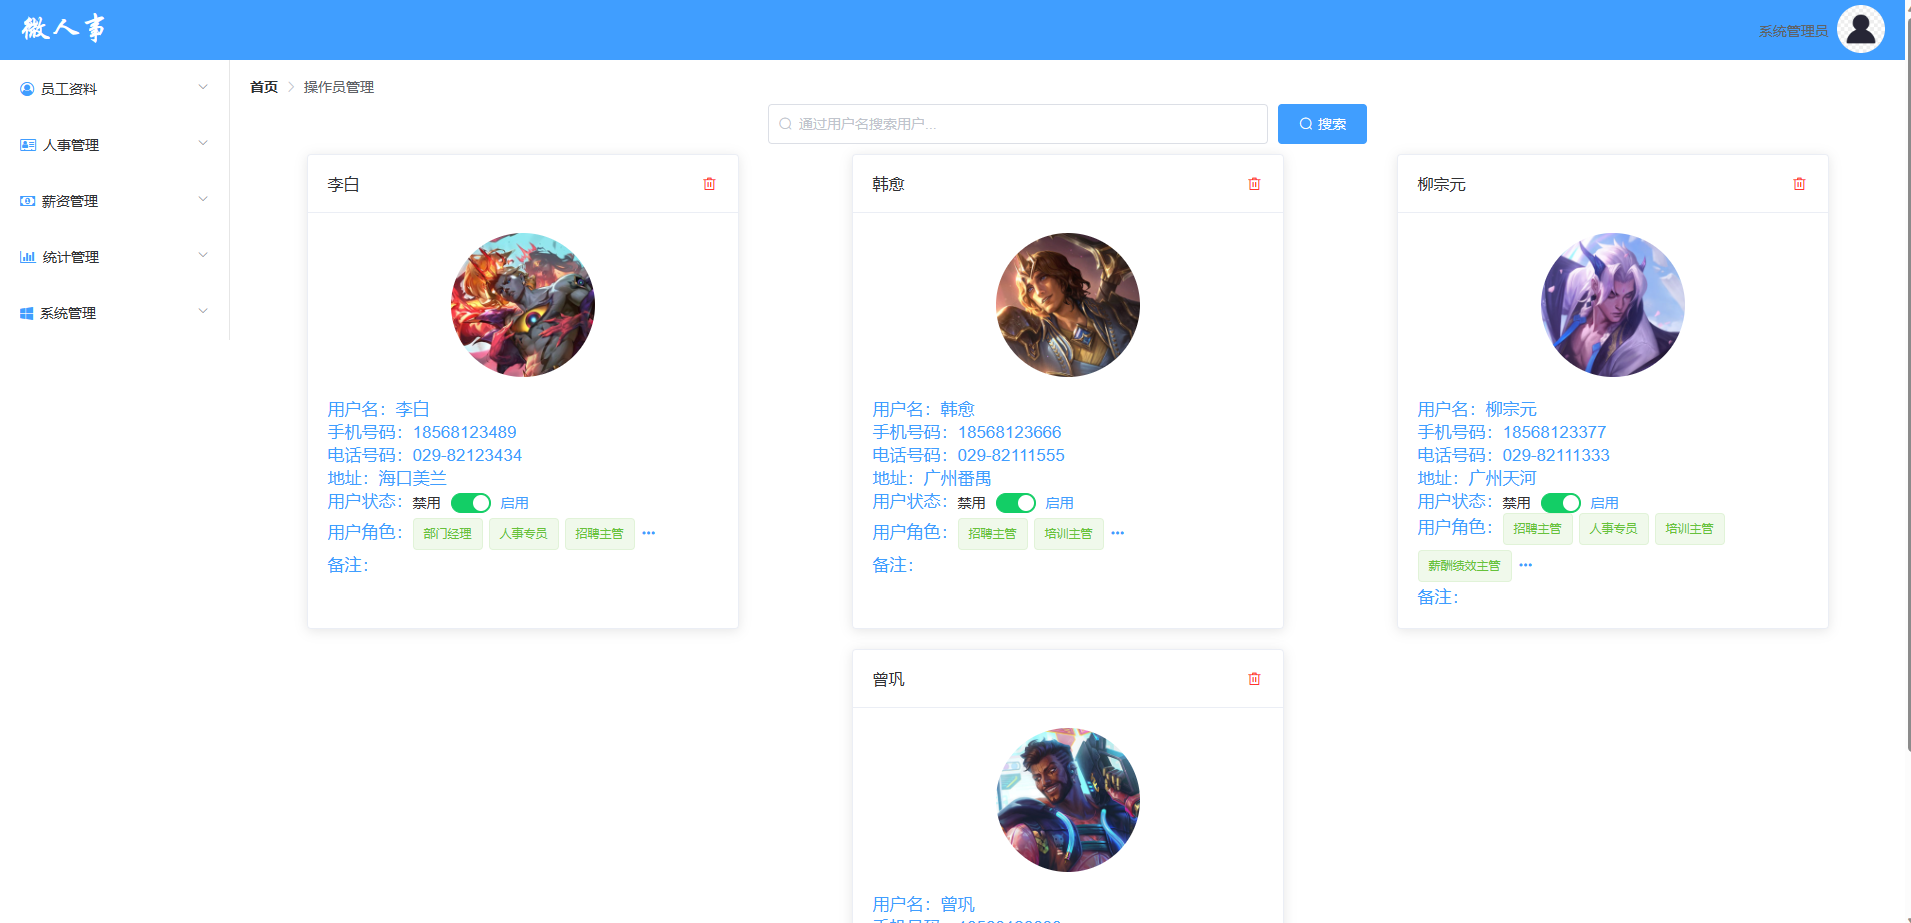
操作员管理页面展示 使用el卡片实现数据的展示。
然后设计样式,用for循环展示数据即可。
1 2 3 4 5 6 7 8 9 10 11 12 13 14 15 16 17 18 19 20 21 22 23 24 25 26 27 28 <el-card class="hr-card" v-for="(hr,index) in hrs" :key="index">
用户状态更新操作 首先编写后端的接口
1 2 3 4 5 6 7 @PutMapping ("/" )updateHr (@RequestBody Hr hr){if (hrService.updateHr (hr)==1 ){return RespBean .ok ("操作员更新成功!" );return RespBean .error ("操作员更新失败!" );
其中的updateHr方法直接使用mybatisX中生成的updateByPrimaryKeySelective方法即可。
前端接口与之对应,并且在前端将roles数组删除,因为该数组在更新中是用不到的。
前端直接调用方法把hr传过去就行了。
1 2 3 4 5 6 7 8 enabledChange (hr ){delete hr.roles ;this .putRequest ("/system/hr/" ,hr).then (resp =>if (resp){this .initHrs ();
遇到问题 期间遇到两个问题,一个是Authorities(Springsecurity中的东西)被强制转json到前端,这样东西只是为了安全管理使用的,所以添加上@JsonIgnore忽略即可。
第二个错误是松哥没有发生的。
1 org.apache.ibatis.reflection.ReflectionException: Illegal overloaded getter method with ambiguous type for property 'enabled ' in class 'com.xgfm.vhr.pojo.Hr '. This breaks the JavaBeans specification and can cause unpredictable results .
这说的是Hr类中的getEnabled方法过多,由于存在多个重载的getter方法,且这些方法具有模糊的返回类型,违反了JavaBeans规范。然后我查看了一下,是因为一个get方法是bean生成的,另一个是因为继承UserDetails接口(安全管理的东西)后重写的,二者虽然不是同一个方法,但是都被认为是getter方法,导致重复,报错。只要把bean自动生成删掉即可。
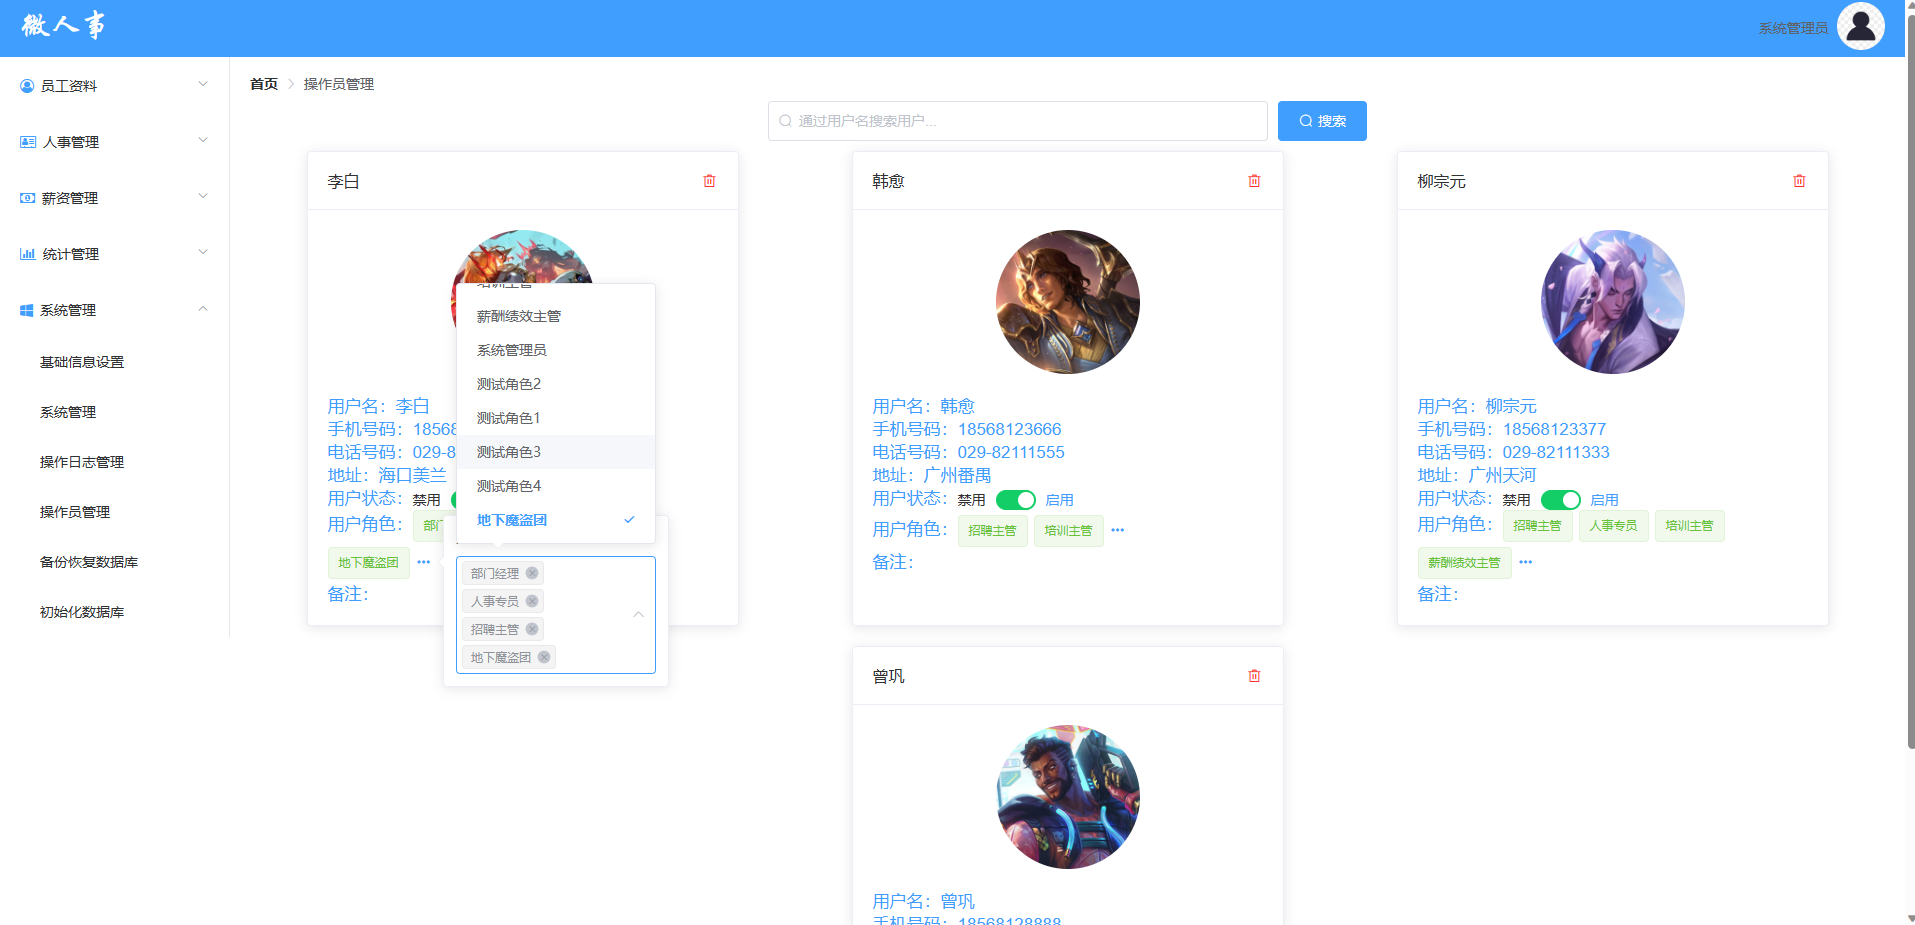
操作员角色更新 更新用户属于哪些角色,例如部门经理,培训主管等。
弹出框使用click激活的el-Popover弹出框。
并在弹出框上添加select选择器的下拉框实现可用角色的展示。
在前端定义initRoles的方法来获取到roles的数据,并且使用弹出框的show事件来触发initRoles。
并且绑定弹出框的hide事件(关闭事件)来实现前端数据的传递。
传递数据也使用跟权限组相类似的思路,即先根据该人的id删除全部的记录,然后根据传过来的rid数组重新添加所有的角色身份。
1 2 3 4 5 6 7 <el-popover
后端接口设计:
1 2 3 4 5 @Transactional public boolean updateHrRoles (Integer hrid, Integer[] rids) {return hrRoleMapper.addRole(hrid,rids)==rids.length;
添加事务的注解,不过我觉得这里如果把一个人的角色全部移除,还是会报空指针异常,先不改,后面试一下。
1 2 3 4 5 6 7 8 9 <insert id ="addRole" > <foreach collection ="rids" item ="rid" separator ="," > </foreach > </insert > <delete id ="deleteByHrid" > </delete >
前后端对接:
1 2 3 4 5 6 7 8 9 10 11 12 13 14 15 16 17 18 19 20 21 22 23 24 25 26 27 28 29 30 31 32 33 34 hidePop (hr ){let roles=[];Object .assign (roles,hr.roles );let flag=false ;if (roles.length !=this .selectedRoles .length ){true ;else {for (let i=0 ;i<roles.length ;i++){let role=roles[i];for (let j=0 ;j<this .selectedRoles .length ;j++){let sr=this .selectedRoles [j];if (role.id ==sr){splice (i,1 );break ;if (roles.length !=0 ){true ;if (flag){let url='/system/hr/role?hrid=' +hr.id ;this .selectedRoles .forEach (sr =>'&rids=' +sr;this .putRequest (url).then (resp =>if (resp){this .initHrs ();
编写js方法,其中有一个问题是如果什么都不做,也会说更新成功,这是不应该的,这里做了一下对比,使用嵌套for循环一一对照roles和selectRoles数组是否不同,相同则剔除roles中的该部分,最后如果roles全部剔除了,说明没有做任何改变,没有全部剔除,则需要修改flag为true,因为这说明做出了修改。
并且该js代码的前两行对roles进行了拷贝,避免剔除roles数组导致前端页面显示的改变(不拷贝也不会影响到后端数据)
成功截图:
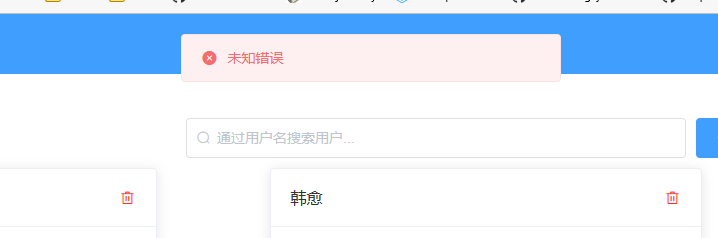
BUG 果然全部移除之后还是未知错误:
还是同样的修改方法:
添加rids判断即可。
1 2 3 4 5 6 7 8 9 @Transactional public boolean updateHrRoles (Integer hrid, Integer[] rids) {if (rids!=null ){return hrRoleMapper.addRole(hrid,rids)==rids.length;else {return true ;
完成:
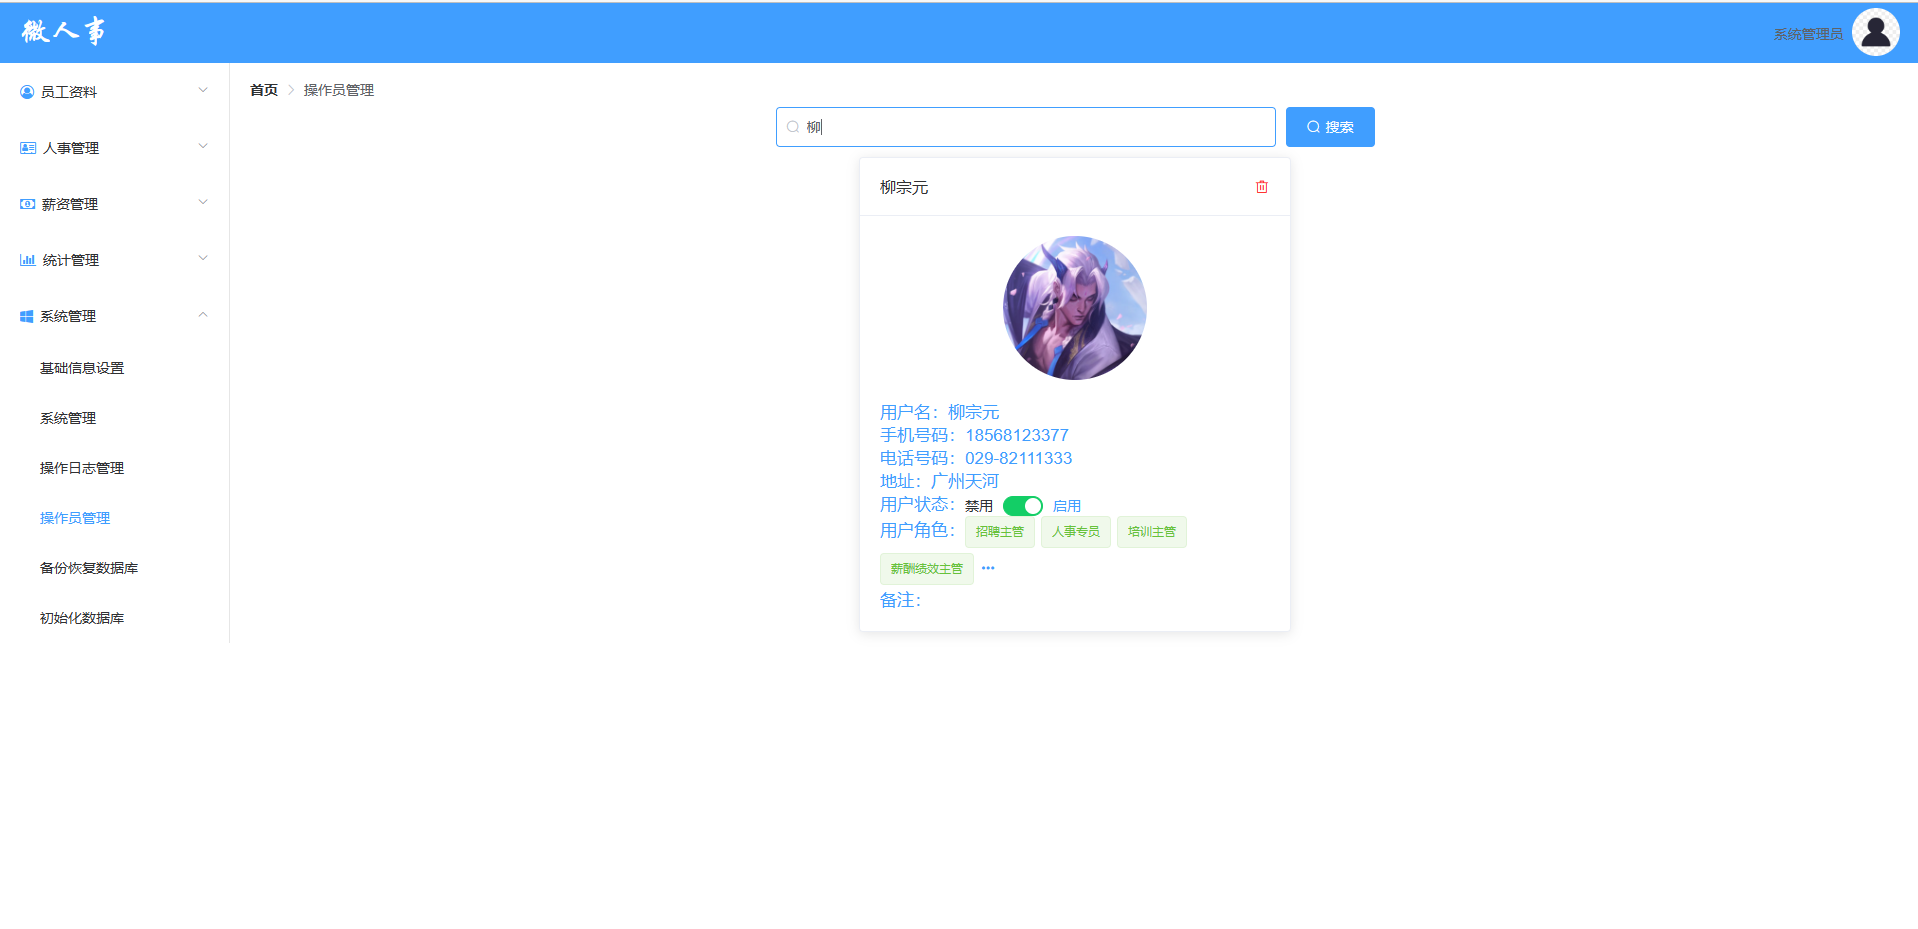
操作员查询 首先后端给getAllRoles添加
1 2 3 4 5 6 7 8 9 10 11 12 13 14 15 16 17 18 19 20 21 22 23 24 25 <select id ="getAllHrs" resultMap ="HrWithRoles" > <if test ="keywords!=null" > </if > </select >
if判断是否传入keywords来判断是否需要进行一个模糊查询的操作。
前端搜索按钮绑定对应js代码。
1 2 3 4 5 6 7 8 9 10 doSearch (this .initHrs ();initHrs (this .getRequest ("/system/hr/?keywords=" +this .keywords ).then (resp =>if (resp){this .hrs =resp;
修改initHrs方法通过keywords有无决定返回的数据。
完成。
操作员删除 为了方便演示直接在数据库中添加内容。
然后编写后端接口
1 2 3 4 5 6 7 @DeleteMapping("/{id}") public RespBean deleteHrById (Integer id) {if (hrService.deleteHrById(id)==1 ){return RespBean.ok("操作角色删除成功!!" );return RespBean.error("操作角色删除失败!!" );
并且添加确认messageBox弹框来完成。
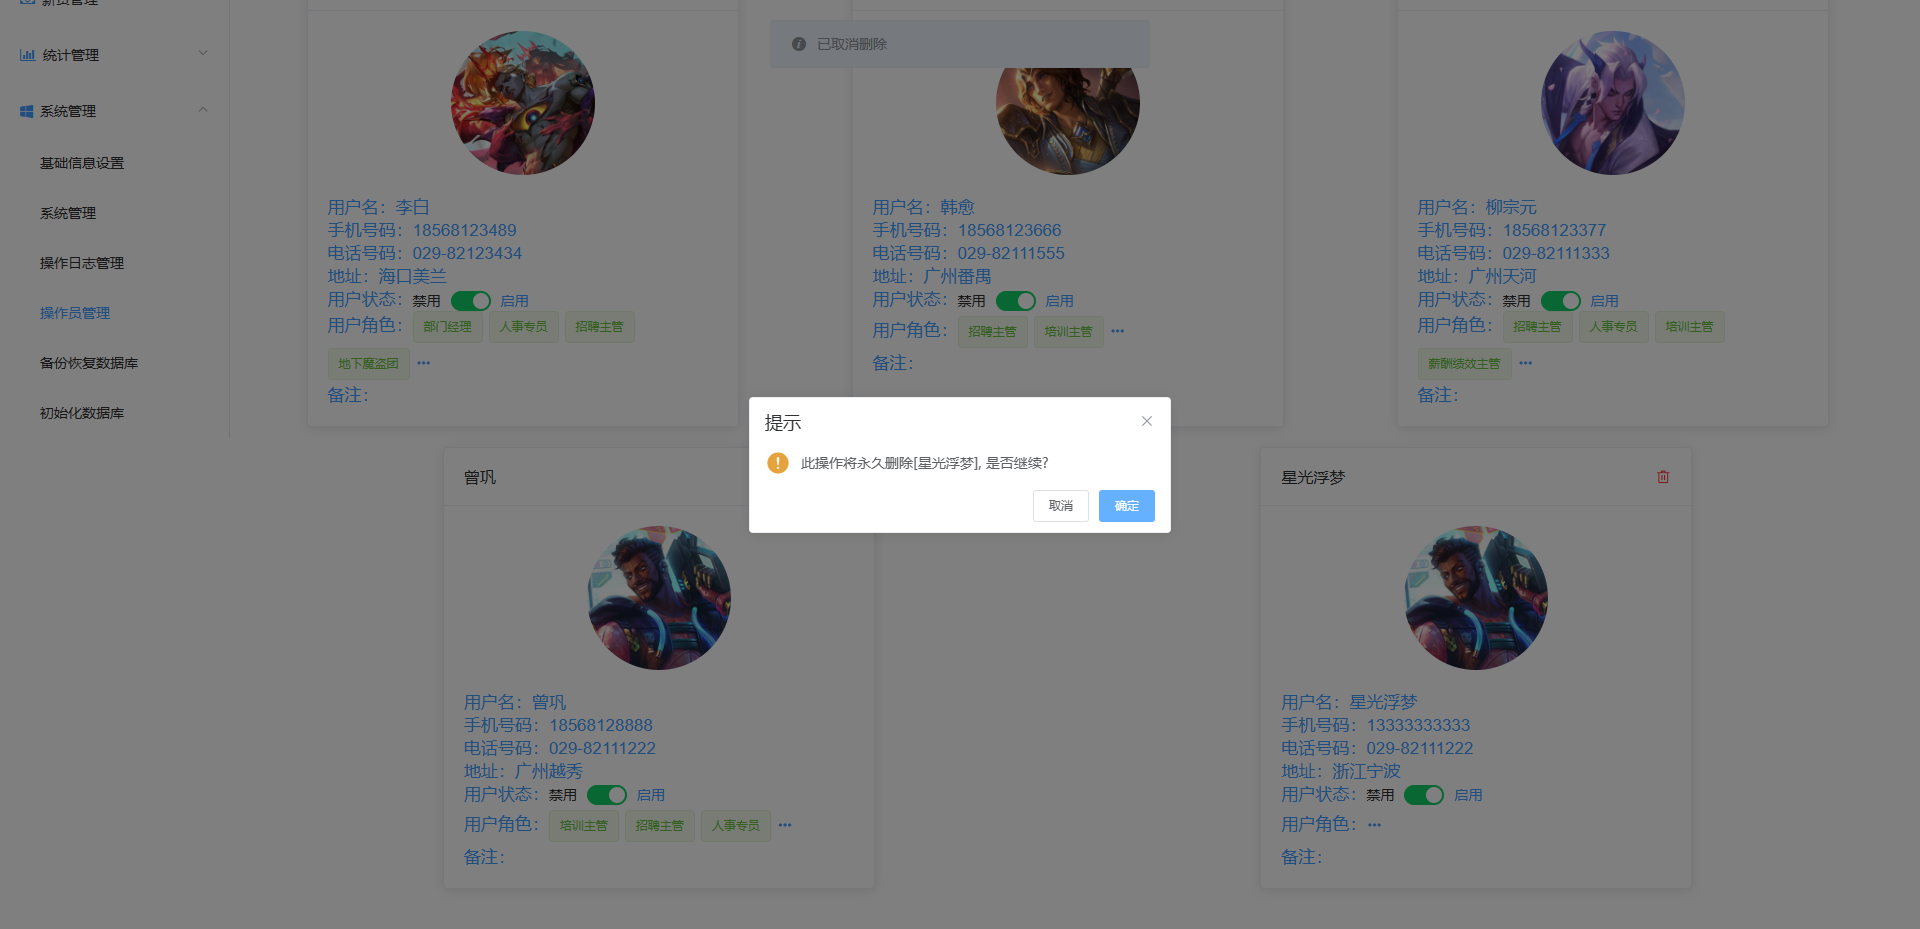
1 2 3 4 5 6 7 8 9 10 11 12 13 14 15 16 17 18 deleteHr (hr ){this .$confirm('此操作将永久删除[' +hr.name +'], 是否继续?' , '提示' , {confirmButtonText : '确定' ,cancelButtonText : '取消' ,type : 'warning' then (() => {this .deleteRequest ("/system/hr/" +hr.id ).then (resp =>if (resp){this .initHrs ();catch (() => {this .$message({type : 'info' ,message : '已取消删除'
完成:
增加数据加载进度条 给对应的数据的el标签中添加如下代码:
1 2 3 4 v-loading="loading"
通过修改loading的boolean值完成加载界面的显示和隐藏。
简单来说就是再需要有加载的地方添加上上面的代码,并且在刷新或修改数据的时候将loading的值改为true,完成后改为false。
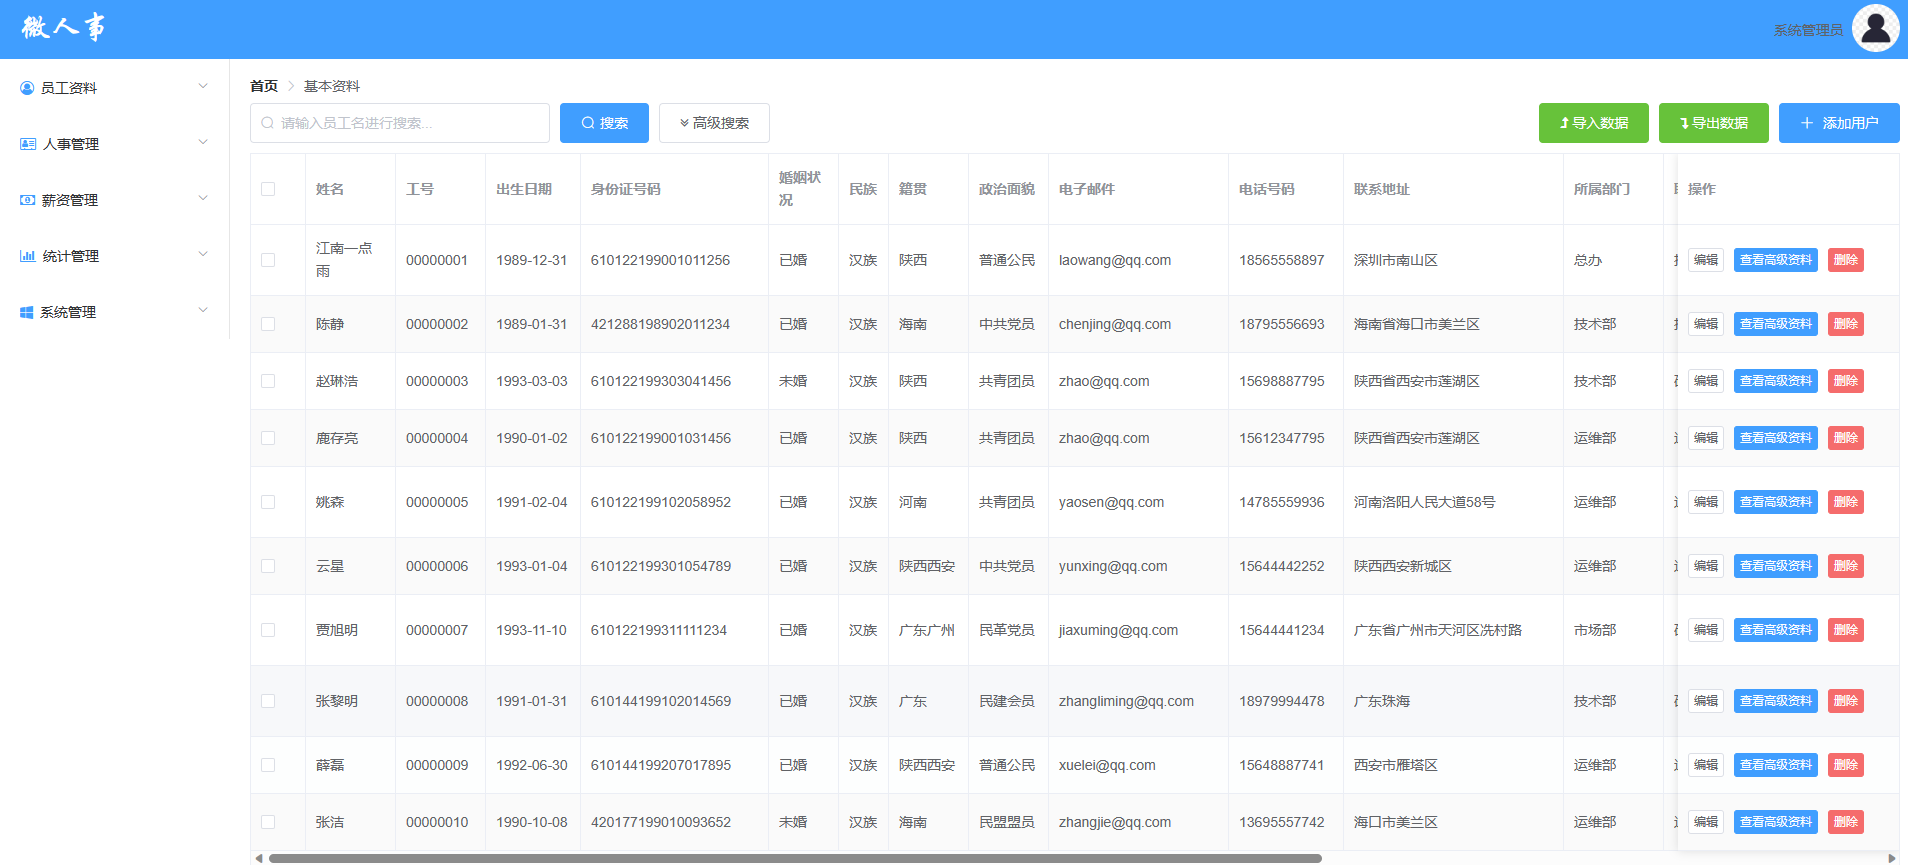
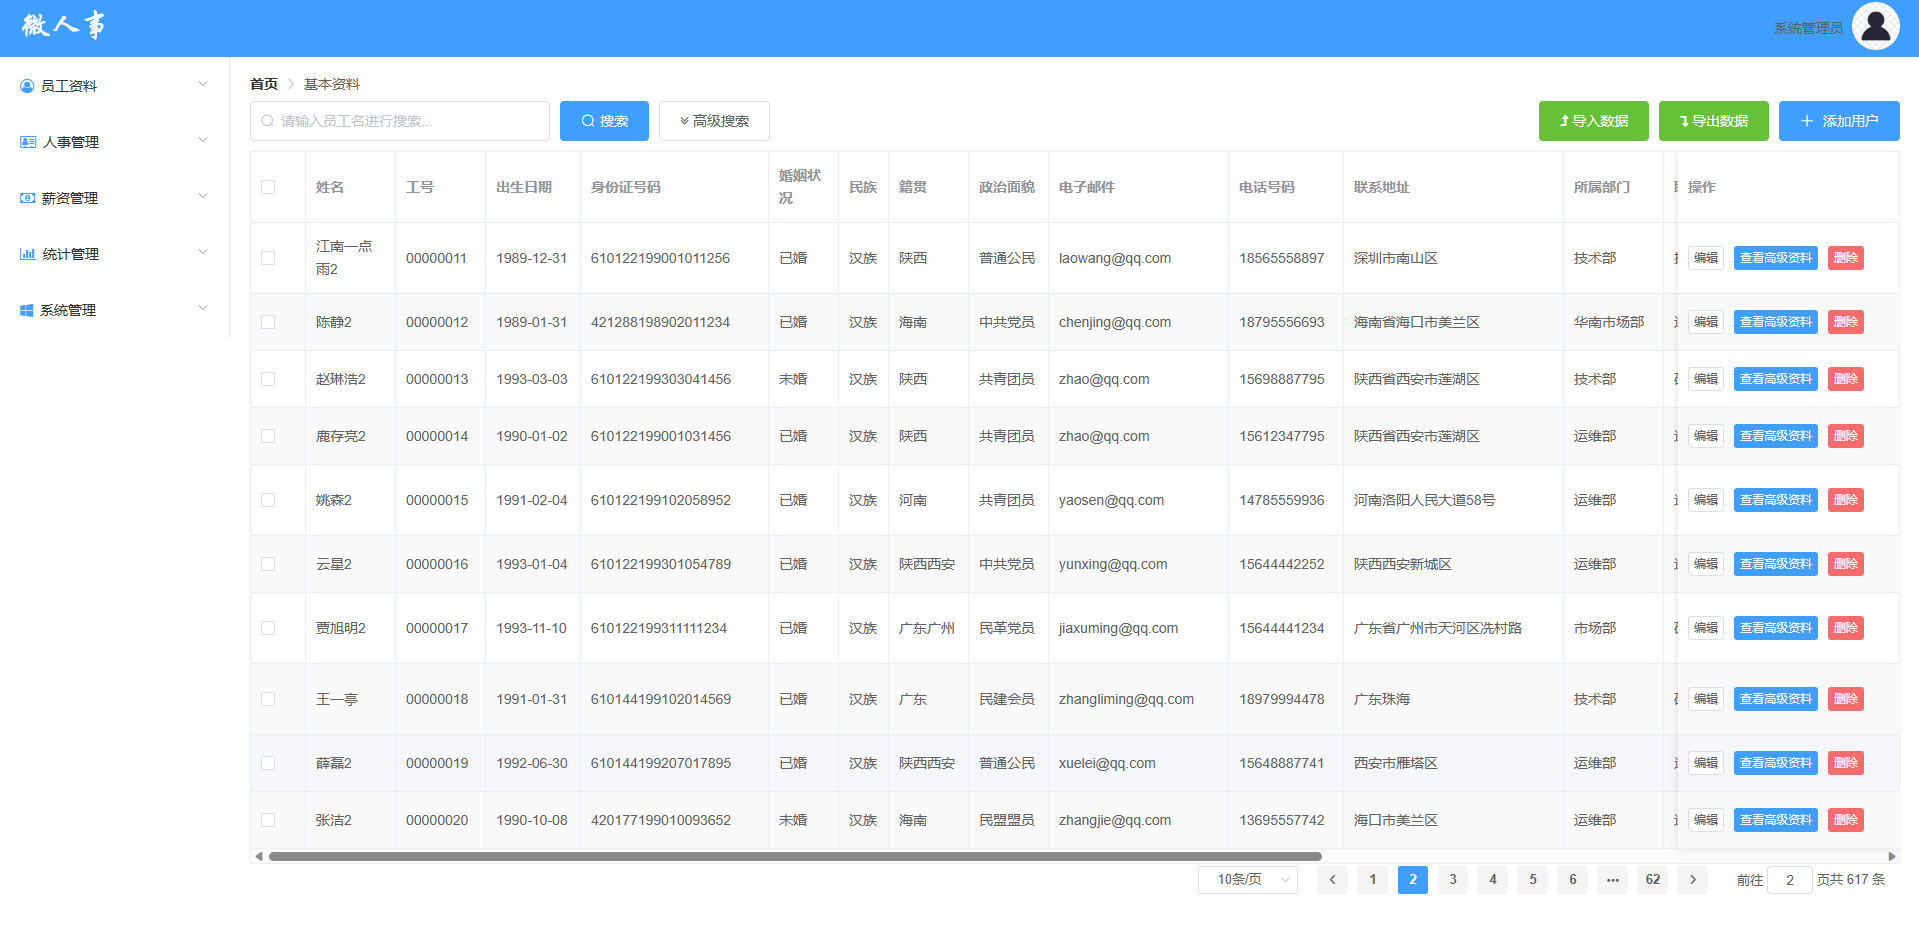
员工管理 员工资料字段多且复杂,并且需要分页。
员工资料查询 后端接口 因为这里需要用到分页查询,而分页查询接下来别的地方可能也会用到,所以这里将分页封装成一个model。
1 2 3 4 5 6 7 8 9 10 11 12 13 14 15 16 17 18 19 20 public class RespPageBean {private Long total;private List<?> data;public Long getTotal () {return total;public void setTotal (Long total) {this .total = total;public List<?> getData() {return data;public void setData (List<?> data) {this .data = data;
其中List集合不写死,这样通用性更高,不会仅仅局限于员工资料的查询。
然后就是修改那些pojo和mapper。
1 2 3 4 5 6 7 8 9 10 11 12 13 14 15 16 17 18 19 20 21 22 23 24 25 26 27 28 29 30 31 32 33 34 35 36 37 38 39 40 41 42 43 44 45 46 47 48 49 50 51 52 53 <resultMap id ="AllEmployeeInfo" type ="com.xgfm.vhr.pojo.Employee" extends ="BaseResultMap" > <association property ="nation" javaType ="com.xgfm.vhr.pojo.Nation" > <id column ="nid" property ="id" /> <result column ="nname" property ="name" /> </association > <association property ="politicsstatus" javaType ="com.xgfm.vhr.pojo.Politicsstatus" > <id column ="pid" property ="id" /> <result column ="pname" property ="name" /> </association > <association property ="department" javaType ="com.xgfm.vhr.pojo.Department" > <id column ="did" property ="id" /> <result column ="dname" property ="name" /> </association > <association property ="jobLevel" javaType ="com.xgfm.vhr.pojo.JobLevel" > <id column ="jid" property ="id" /> <result column ="jname" property ="name" /> </association > <association property ="position" javaType ="com.xgfm.vhr.pojo.Position" > <id column ="posid" property ="id" /> <result column ="posname" property ="name" /> </association > </resultMap > <select id ="getEmployeeByPage" resultMap ="AllEmployeeInfo" > </select > <select id ="getTotal" resultType ="java.lang.Long" > </select >
这样返回的数据就是关于page和size所决定的页码的数据了。
别的都是很常见的后端接口设计。
当然,写完postman测试一下
前端设计–搜索栏 1 2 3 4 5 6 7 8 9 10 11 12 13 14 <div>
比较新的就是这个i标签,也是一种特殊的el-icon吧。
成果图(只有搜索框,和功能按键)如下:
前端设计–数据展示 就是常见的表格数据展示,就是字段太多太多了比较麻烦花了点时间,但是因为是分页查询的,所以目前只有第一页的内容,并且还添加了数据加载进度条。
1 2 3 4 5 6 7 8 9 10 11 12 13 14 15 16 17 18 19 20 data (return {emps :[],loading :false mounted (this .initEmps ();methods :{initEmps (this .loading =true ;this .getRequest ("/emp/basic/" ).then (resp =>this .loading =false ;if (resp){this .emps =resp.data ;
前端设计–分页栏
事件名称
说明
回调参数
size-change
pageSize 改变时会触发
每页条数
current-change
currentPage 改变时会触发
当前页
prev-click
用户点击上一页按钮改变当前页后触发
当前页
next-click
用户点击下一页按钮改变当前页后触发
当前页
这个是ELUI的分页相关的事件,触发对应事件修改对应的参数,从而使得展示的数据发生改变。
1 2 3 4 5 6 7 8 9 10 11 12 13 14 15 16 17 18 19 20 methods :{initEmps (this .loading =true ;this .getRequest ("/emp/basic/?page=" +this .page +"&size=" +this .size ).then (resp =>this .loading =false ;if (resp){this .emps =resp.data ;this .total =resp.total ;currentChange (currentPage ){this .page =currentPage;this .initEmps ();sizeChange (currentSize ){this .size =currentSize;this .initEmps ();
以及该分页栏的代码:
1 2 3 4 5 6 7 8 9 <div style="display: flex;justify-content: flex-end">
成果图(右下角):
总结:
这里的难点主要是分页的实时变化修改size和page,别的和之前没什么差别。